


You also want an ePaper? Increase the reach of your titles
YUMPU automatically turns print PDFs into web optimized ePapers that Google loves.
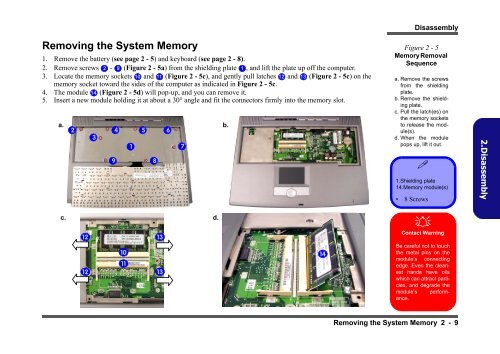
Removing the System Memory<br />
1. Remove the battery (see page 2 - 5) and keyboard (see page 2 - 8).<br />
2. Remove screws 2 - 9 (Figure 2 - 5a) from the shielding plate 1 , and lift the plate up off the computer.<br />
3. Locate the memory sockets 10 and 11 (Figure 2 - 5c), and gently pull latches 12 and 13 (Figure 2 - 5c) on the<br />
memory socket toward the s<strong>id</strong>es of the computer as indicated in Figure 2 - 5c.<br />
4. The module 14 (Figure 2 - 5d) will pop-up, and you can remove it.<br />
5. Insert a new module holding it at about a 30° angle and fit the connectors firmly into the memory slot.<br />
a. 2<br />
c. d.<br />
12<br />
12<br />
3<br />
9<br />
4<br />
10<br />
11<br />
1<br />
5<br />
8<br />
13<br />
13<br />
6<br />
7<br />
b.<br />
14<br />
Disassembly<br />
Figure 2 - 5<br />
Memory Removal<br />
Sequence<br />
a. Remove the screws<br />
from the shielding<br />
plate.<br />
b. Remove the shielding<br />
plate.<br />
c. Pull the latch(es) on<br />
the memory sockets<br />
to release the module(s).<br />
d. When the module<br />
pops up, lift it out.<br />
�<br />
1.Shielding plate<br />
14.Memory module(s)<br />
• 8 Screws<br />
�<br />
Contact Warning<br />
Be careful not to touch<br />
the metal pins on the<br />
module’s connecting<br />
edge. Even the cleanest<br />
hands have oils<br />
which can attract particles,<br />
and degrade the<br />
module’s performance.<br />
Removing the System Memory 2 - 9<br />
2.Disassembly


