


You also want an ePaper? Increase the reach of your titles
YUMPU automatically turns print PDFs into web optimized ePapers that Google loves.
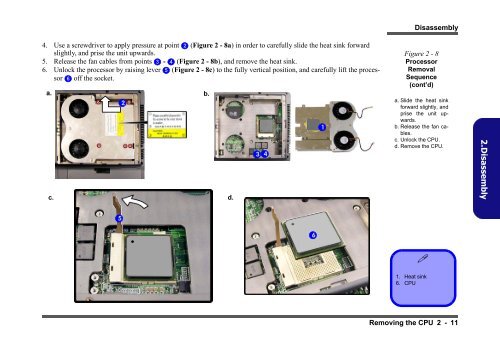
4. Use a screwdriver to apply pressure at point 2 (Figure 2 - 8a) in order to carefully sl<strong>id</strong>e the heat sink forward<br />
slightly, and prise the unit upwards.<br />
5. Release the fan cables from points 3 - 4 (Figure 2 - 8b), and remove the heat sink.<br />
6. Unlock the processor by raising lever 5 (Figure 2 - 8c) to the fully vertical position, and carefully lift the processor<br />
6 off the socket.<br />
a. b.<br />
2<br />
c.<br />
5<br />
d.<br />
3 4<br />
6<br />
1<br />
Disassembly<br />
Figure 2 - 8<br />
Processor<br />
Removal<br />
Sequence<br />
(cont’d)<br />
a. Sl<strong>id</strong>e the heat sink<br />
forward slightly, and<br />
prise the unit upwards.<br />
b. Release the fan cables.<br />
c. Unlock the CPU.<br />
d. Remove the CPU.<br />
�<br />
1. Heat sink<br />
6. CPU<br />
Removing the CPU 2 - 11<br />
2.Disassembly


