


You also want an ePaper? Increase the reach of your titles
YUMPU automatically turns print PDFs into web optimized ePapers that Google loves.
Disassembly<br />
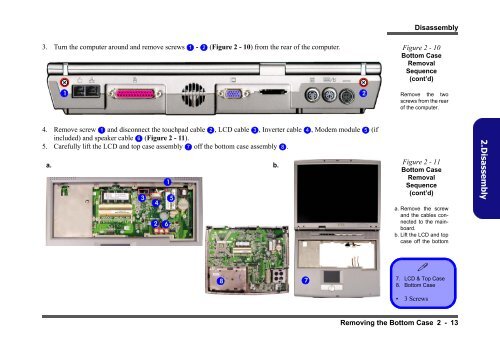
3. Turn the computer around and remove screws 1 - 2 (Figure 2 - 10) from the rear of the computer.<br />
Figure 2 - 10<br />
Bottom Case<br />
Removal<br />
Sequence<br />
(cont’d)<br />
1<br />
4. Remove screw 1 and disconnect the touchpad cable 2 , LCD cable 3 , Inverter cable 4 , Modem module 5 (if<br />
included) and speaker cable 6 (Figure 2 - 11).<br />
5. Carefully lift the LCD and top case assembly 7 off the bottom case assembly 8 .<br />
a. b.<br />
3 5<br />
4<br />
2<br />
1<br />
6<br />
8<br />
7<br />
2<br />
Remove the two<br />
screws from the rear<br />
of the computer.<br />
Figure 2 - 11<br />
Bottom Case<br />
Removal<br />
Sequence<br />
(cont’d)<br />
a. Remove the screw<br />
and the cables connected<br />
to the mainboard.<br />
b. Lift the LCD and top<br />
case off the bottom<br />
��<br />
7. LCD & Top Case<br />
8. Bottom Case<br />
• 6 3 Screws<br />
Removing the Bottom Case 2 - 13<br />
2.Disassembly


