Assembly instructions for on-board starters GB - FEMA Modelltechnik
Assembly instructions for on-board starters GB - FEMA Modelltechnik
Assembly instructions for on-board starters GB - FEMA Modelltechnik

Create successful ePaper yourself
Turn your PDF publications into a flip-book with our unique Google optimized e-Paper software.
<str<strong>on</strong>g>Assembly</str<strong>on</strong>g> <str<strong>on</strong>g>instructi<strong>on</strong>s</str<strong>on</strong>g> <str<strong>on</strong>g>for</str<strong>on</strong>g> <strong>on</strong>-<strong>board</strong> <strong>starters</strong><br />
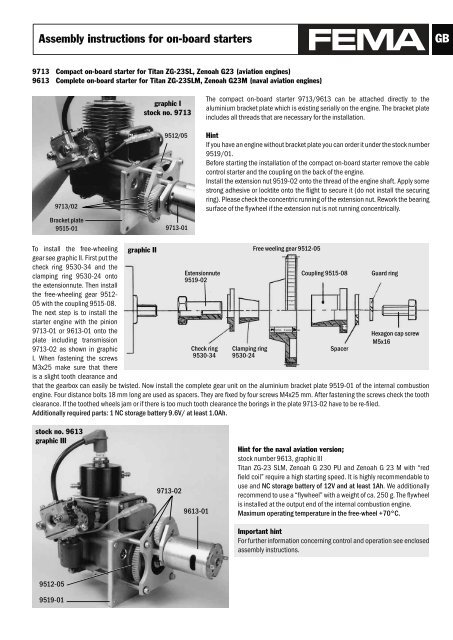
9713 Compact <strong>on</strong>-<strong>board</strong> starter <str<strong>on</strong>g>for</str<strong>on</strong>g> Titan ZG-23SL, Zenoah G23 (aviati<strong>on</strong> engines)<br />
9613 Complete <strong>on</strong>-<strong>board</strong> starter <str<strong>on</strong>g>for</str<strong>on</strong>g> Titan ZG-23SLM, Zenoah G23M (naval aviati<strong>on</strong> engines)<br />
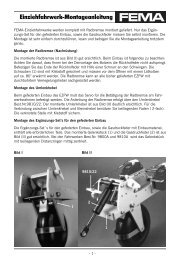
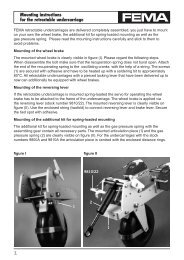
To install the free-wheeling<br />
gear see graphic II. First put the<br />
check ring 9530-34 and the<br />
clamping ring 9530-24 <strong>on</strong>to<br />
the extensi<strong>on</strong>nute. Then install<br />
the free-wheeling gear 9512-<br />
05 with the coupling 9515-08.<br />
The next step is to install the<br />
starter engine with the pini<strong>on</strong><br />
9713-01 or 9613-01 <strong>on</strong>to the<br />
plate including transmissi<strong>on</strong><br />
9713-02 as shown in graphic<br />
I. When fastening the screws<br />
M3x25 make sure that there<br />
is a slight tooth clearance and<br />
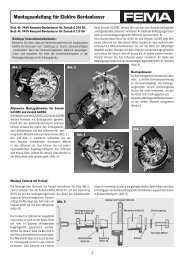
The compact <strong>on</strong>-<strong>board</strong> starter 9713/9613 can be attached directly to the<br />
aluminium bracket plate which is existing serially <strong>on</strong> the engine. The bracket plate<br />
includes all threads that are necessary <str<strong>on</strong>g>for</str<strong>on</strong>g> the installati<strong>on</strong>.<br />
Hint<br />
If you have an engine without bracket plate you can order it under the stock number<br />
9519/01.<br />
Be<str<strong>on</strong>g>for</str<strong>on</strong>g>e starting the installati<strong>on</strong> of the compact <strong>on</strong>-<strong>board</strong> starter remove the cable<br />
c<strong>on</strong>trol starter and the coupling <strong>on</strong> the back of the engine.<br />
Install the extensi<strong>on</strong> nut 9519-02 <strong>on</strong>to the thread of the engine shaft. Apply some<br />
str<strong>on</strong>g adhesive or locktite <strong>on</strong>to the fl ight to secure it (do not install the securing<br />
ring). Please check the c<strong>on</strong>centric running of the extensi<strong>on</strong> nut. Rework the bearing<br />
surface of the fl ywheel if the extensi<strong>on</strong> nut is not running c<strong>on</strong>centrically.<br />
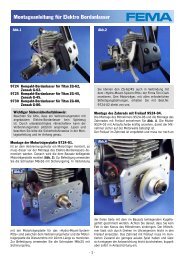
that the gearbox can easily be twisted. Now install the complete gear unit <strong>on</strong> the aluminium bracket plate 9519-01 of the internal combusti<strong>on</strong><br />
engine. Four distance bolts 18 mm l<strong>on</strong>g are used as spacers. They are fi xed by four screws M4x25 mm. After fastening the screws check the tooth<br />
clearance. If the toothed wheels jam or if there is too much tooth clearance the borings in the plate 9713-02 have to be re-fi led.<br />
Additi<strong>on</strong>ally required parts: 1 NC storage battery 9.6V/ at least 1.0Ah.<br />
9512-05<br />
9519-01<br />
9713/02<br />
Bracket plate<br />
9515-01<br />
stock no. 9613<br />
graphic III<br />
graphic II<br />
graphic I<br />
stock no. 9713<br />
9512/05<br />
9713-01<br />
9713-02<br />
Extensi<strong>on</strong>nute<br />
9519-02<br />
Check ring<br />
9530-34<br />
9613-01<br />
Clamping ring<br />
9530-24<br />
Free weeling gear 9512-05<br />
Coupling 9515-08 Guard ring<br />
Spacer<br />
Hexag<strong>on</strong> cap screw<br />
M5x16<br />
Hint <str<strong>on</strong>g>for</str<strong>on</strong>g> the naval aviati<strong>on</strong> versi<strong>on</strong>;<br />
stock number 9613, graphic III<br />
Titan ZG-23 SLM, Zenoah G 230 PU and Zenoah G 23 M with “red<br />
fi eld coil” require a high starting speed. It is highly recommendable to<br />
use and NC storage battery of 12V and at least 1Ah. We additi<strong>on</strong>ally<br />
recommend to use a “fl ywheel” with a weight of ca. 250 g. The fl ywheel<br />
is installed at the output end of the internal combusti<strong>on</strong> engine.<br />
Maximum operating temperature in the free-wheel +70°C.<br />
Important hint<br />
For further in<str<strong>on</strong>g>for</str<strong>on</strong>g>mati<strong>on</strong> c<strong>on</strong>cerning c<strong>on</strong>trol and operati<strong>on</strong> see enclosed<br />
assembly <str<strong>on</strong>g>instructi<strong>on</strong>s</str<strong>on</strong>g>.<br />
<strong>GB</strong>
<strong>GB</strong><br />
<str<strong>on</strong>g>Assembly</str<strong>on</strong>g> <str<strong>on</strong>g>instructi<strong>on</strong>s</str<strong>on</strong>g> <str<strong>on</strong>g>for</str<strong>on</strong>g> <strong>on</strong>-<strong>board</strong> <strong>starters</strong><br />
9714 Compact <strong>on</strong>-<strong>board</strong> starter <str<strong>on</strong>g>for</str<strong>on</strong>g> Titan ZG-38, Zenoah G38 (aviati<strong>on</strong> engines)<br />
9520-01<br />
Spare parts<br />
Check ring<br />
9530-34<br />
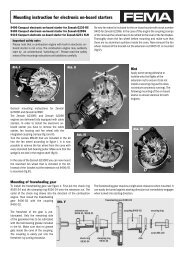
graphic IV<br />
9512-05<br />
9714-02 9613-01<br />
Clamping ring<br />
9530-24<br />
These internal combusti<strong>on</strong> engines are delivered without bracket plate. First install bracket<br />
plate 9520-01 – which is included in the kit – according to graphic IV.<br />
Hint<br />
The bearing points <str<strong>on</strong>g>for</str<strong>on</strong>g> the bracket plate of the Titan ZG-38 are not treated. The bearing points<br />
have to be fi led plane. Make sure that all bearing points have the same height. You can easily<br />
check this by putting <strong>on</strong> it the bracket plate. The casing has to be re-fi led as well if necessary.<br />
After installing the bracket plate the free-wheeling gear 9512-05 is attached. First put the<br />
check ring 9530-34 and the clamping ring 9530-24 <strong>on</strong>to the engine shaft. The collar of the<br />
check ring is directed to the internal combusti<strong>on</strong> engine. Then install the free-wheeling gear<br />
and the coupling 9515-08 as shown in graphic V.<br />
The installati<strong>on</strong> of the starter engine with the pini<strong>on</strong> 9613-01 and of the plate including<br />
transmissi<strong>on</strong> 9714-02 to the complete gearbox unit is identical with the installati<strong>on</strong> of the<br />
compact <strong>on</strong>-<strong>board</strong> starter 9713.<br />
Free weeling gear<br />
9512-05<br />
Coupling<br />
9515-08<br />
Guard ring<br />
Important hint<br />
For further in<str<strong>on</strong>g>for</str<strong>on</strong>g>mati<strong>on</strong> c<strong>on</strong>cerning<br />
c<strong>on</strong>trol and operati<strong>on</strong> see enclosed<br />
assembly <str<strong>on</strong>g>instructi<strong>on</strong>s</str<strong>on</strong>g>.<br />
To avoid a blowback of the internal<br />
combusti<strong>on</strong> engine when switching it<br />
off we recommend to build in a c<strong>on</strong>tact<br />
breaker as described at the Titan ZG-62<br />
<strong>on</strong> page 5.<br />
Additi<strong>on</strong>ally required parts: 1 NC<br />
storage battery 12V/ at least 1.0Ah.<br />
Naming 9713 9613 9714<br />
Bracket plate 9519-01 9519-01 9520-01<br />
Extensi<strong>on</strong> nut 9519-02 9519-02 -<br />
Check ring 9530-34 9530-34 9530-34<br />
Clamping ring 9530-24 9530-24 9530-24<br />
Free-wheeling gear 9512-05 9512-05 9512-05<br />
Coupling 9515-08 9515-08 9515-08<br />
Nut M 8 x 1 left - - 9520-02<br />
Starter motor including pini<strong>on</strong> 9713-01 9613-01 9613-01<br />
Plate includ. transmissi<strong>on</strong> 9713-02 9713-02 9714-02<br />
Spacer<br />
graphic V<br />
Nut M8x1 left<br />
Böhler GmbH · Obere Rebbergstr.11 · D-77709 Wolfach · Tel.07834/303 · Fax 07834/47735