Mounting instructions for the retractable undercarriage - FEMA ...
Mounting instructions for the retractable undercarriage - FEMA ...
Mounting instructions for the retractable undercarriage - FEMA ...

You also want an ePaper? Increase the reach of your titles
YUMPU automatically turns print PDFs into web optimized ePapers that Google loves.
2<br />
<strong>Mounting</strong> <strong>instructions</strong><br />
<strong>for</strong> <strong>the</strong> <strong>retractable</strong> <strong>undercarriage</strong><br />
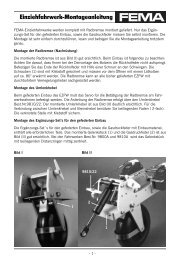
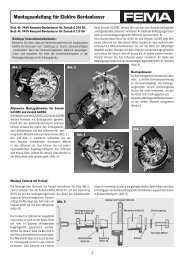
Firm attachment between two fuselage bulkheads<br />
Attach <strong>the</strong> <strong>retractable</strong> <strong>undercarriage</strong> carefully to avoid problems in flight practice. Please regard<br />
<strong>the</strong> following notes thoroughly.<br />
Up to four servos can be attached to <strong>the</strong> <strong>undercarriage</strong>s with <strong>the</strong> stock numbers 9800A, 9810A<br />
and 9820A. To <strong>the</strong> <strong>undercarriage</strong> with <strong>the</strong> stock number 9830 up to two servos can be attached.<br />
The supports have all necessary fastening bores. The wheel bow of stainless spring steel<br />
makes <strong>the</strong> retraction easier and guarantees a safe functioning of <strong>the</strong> fuselage flaps.<br />
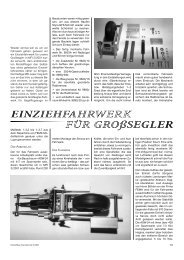
Position of <strong>the</strong> <strong>retractable</strong> <strong>undercarriage</strong> in <strong>the</strong> fuselage<br />
At most modern sail planes, <strong>the</strong> axle of <strong>the</strong> extended wheel is located just vertically below <strong>the</strong><br />
leading edge stringer strip. The aeromodelling practice, however, has shown that <strong>the</strong> model too<br />
easily bends its nose down when starting a towed flight and landing. It is advisable to mount<br />
<strong>the</strong> axle nearer to <strong>the</strong> front of <strong>the</strong> model. We recommend to shift it 5-15° to <strong>the</strong> front in relation<br />
to <strong>the</strong> vertical below <strong>the</strong> stringer strip.<br />
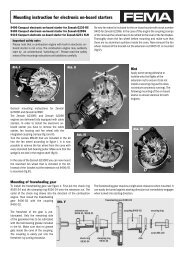
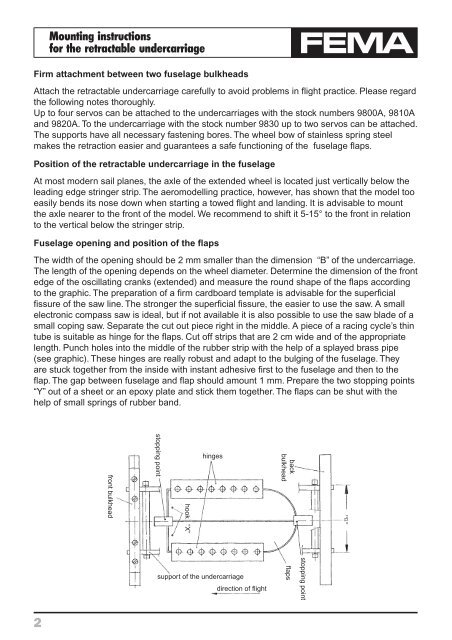
Fuselage opening and position of <strong>the</strong> fl aps<br />
The width of <strong>the</strong> opening should be 2 mm smaller than <strong>the</strong> dimension “B” of <strong>the</strong> <strong>undercarriage</strong>.<br />
The length of <strong>the</strong> opening depends on <strong>the</strong> wheel diameter. Determine <strong>the</strong> dimension of <strong>the</strong> front<br />
edge of <strong>the</strong> oscillating cranks (extended) and measure <strong>the</strong> round shape of <strong>the</strong> flaps according<br />
to <strong>the</strong> graphic. The preparation of a firm cardboard template is advisable <strong>for</strong> <strong>the</strong> superficial<br />
fissure of <strong>the</strong> saw line. The stronger <strong>the</strong> superficial fissure, <strong>the</strong> easier to use <strong>the</strong> saw. A small<br />
electronic compass saw is ideal, but if not available it is also possible to use <strong>the</strong> saw blade of a<br />
small coping saw. Separate <strong>the</strong> cut out piece right in <strong>the</strong> middle. A piece of a racing cycle’s thin<br />
tube is suitable as hinge <strong>for</strong> <strong>the</strong> flaps. Cut off strips that are 2 cm wide and of <strong>the</strong> appropriate<br />
length. Punch holes into <strong>the</strong> middle of <strong>the</strong> rubber strip with <strong>the</strong> help of a splayed brass pipe<br />
(see graphic). These hinges are really robust and adapt to <strong>the</strong> bulging of <strong>the</strong> fuselage. They<br />
are stuck toge<strong>the</strong>r from <strong>the</strong> inside with instant adhesive first to <strong>the</strong> fuselage and <strong>the</strong>n to <strong>the</strong><br />
flap. The gap between fuselage and flap should amount 1 mm. Prepare <strong>the</strong> two stopping points<br />
“Y” out of a sheet or an epoxy plate and stick <strong>the</strong>m toge<strong>the</strong>r. The flaps can be shut with <strong>the</strong><br />
help of small springs of rubber band.<br />
front bulkhead<br />
stopping point<br />
hook “X”<br />
hinges<br />
support of <strong>the</strong> <strong>undercarriage</strong><br />
direction of flight<br />
back<br />
bulkhead<br />
flaps<br />
stopping point