Mounting instructions for the retractable undercarriage - FEMA ...
Mounting instructions for the retractable undercarriage - FEMA ...
Mounting instructions for the retractable undercarriage - FEMA ...

Create successful ePaper yourself
Turn your PDF publications into a flip-book with our unique Google optimized e-Paper software.
3<br />
<strong>Mounting</strong> <strong>instructions</strong><br />
<strong>for</strong> <strong>the</strong> <strong>retractable</strong> <strong>undercarriage</strong><br />
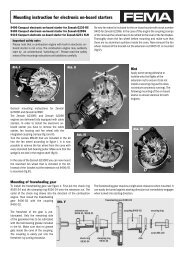
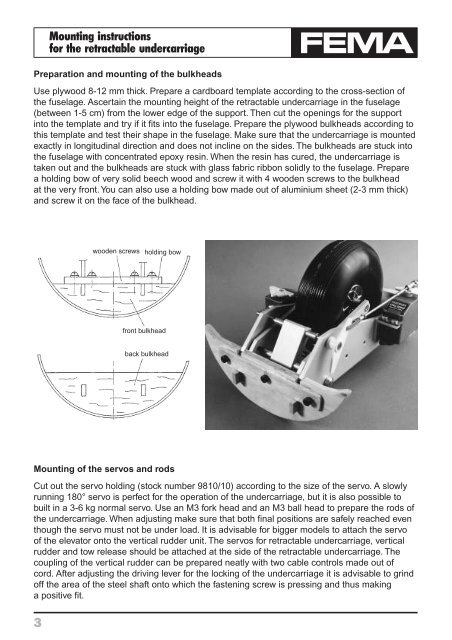
Preparation and mounting of <strong>the</strong> bulkheads<br />
Use plywood 8-12 mm thick. Prepare a cardboard template according to <strong>the</strong> cross-section of<br />
<strong>the</strong> fuselage. Ascertain <strong>the</strong> mounting height of <strong>the</strong> <strong>retractable</strong> <strong>undercarriage</strong> in <strong>the</strong> fuselage<br />
(between 1-5 cm) from <strong>the</strong> lower edge of <strong>the</strong> support. Then cut <strong>the</strong> openings <strong>for</strong> <strong>the</strong> support<br />
into <strong>the</strong> template and try if it fits into <strong>the</strong> fuselage. Prepare <strong>the</strong> plywood bulkheads according to<br />
this template and test <strong>the</strong>ir shape in <strong>the</strong> fuselage. Make sure that <strong>the</strong> <strong>undercarriage</strong> is mounted<br />
exactly in longitudinal direction and does not incline on <strong>the</strong> sides. The bulkheads are stuck into<br />
<strong>the</strong> fuselage with concentrated epoxy resin. When <strong>the</strong> resin has cured, <strong>the</strong> <strong>undercarriage</strong> is<br />
taken out and <strong>the</strong> bulkheads are stuck with glass fabric ribbon solidly to <strong>the</strong> fuselage. Prepare<br />
a holding bow of very solid beech wood and screw it with 4 wooden screws to <strong>the</strong> bulkhead<br />
at <strong>the</strong> very front. You can also use a holding bow made out of aluminium sheet (2-3 mm thick)<br />
and screw it on <strong>the</strong> face of <strong>the</strong> bulkhead.<br />
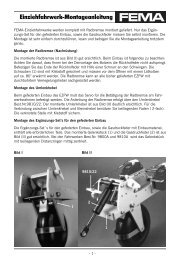
wooden screws<br />
holding bow<br />
front bulkhead<br />
back bulkhead<br />
<strong>Mounting</strong> of <strong>the</strong> servos and rods<br />
Cut out <strong>the</strong> servo holding (stock number 9810/10) according to <strong>the</strong> size of <strong>the</strong> servo. A slowly<br />
running 180° servo is perfect <strong>for</strong> <strong>the</strong> operation of <strong>the</strong> <strong>undercarriage</strong>, but it is also possible to<br />
built in a 3-6 kg normal servo. Use an M3 <strong>for</strong>k head and an M3 ball head to prepare <strong>the</strong> rods of<br />
<strong>the</strong> <strong>undercarriage</strong>. When adjusting make sure that both final positions are safely reached even<br />
though <strong>the</strong> servo must not be under load. It is advisable <strong>for</strong> bigger models to attach <strong>the</strong> servo<br />
of <strong>the</strong> elevator onto <strong>the</strong> vertical rudder unit. The servos <strong>for</strong> <strong>retractable</strong> <strong>undercarriage</strong>, vertical<br />
rudder and tow release should be attached at <strong>the</strong> side of <strong>the</strong> <strong>retractable</strong> <strong>undercarriage</strong>. The<br />
coupling of <strong>the</strong> vertical rudder can be prepared neatly with two cable controls made out of<br />
cord. After adjusting <strong>the</strong> driving lever <strong>for</strong> <strong>the</strong> locking of <strong>the</strong> <strong>undercarriage</strong> it is advisable to grind<br />
off <strong>the</strong> area of <strong>the</strong> steel shaft onto which <strong>the</strong> fastening screw is pressing and thus making<br />
a positive fit.