Download Full Splicing Guide - New England Ropes
Download Full Splicing Guide - New England Ropes
Download Full Splicing Guide - New England Ropes

Create successful ePaper yourself
Turn your PDF publications into a flip-book with our unique Google optimized e-Paper software.
FIGURE 1<br />
FIGURE 2<br />
FIGURE 3<br />
3<br />
B<br />
4<br />
0<br />
1<br />
A<br />
B<br />
3<br />
2<br />
CORE-TO-CORE EYE SPLICE<br />
1<br />
A<br />
2<br />
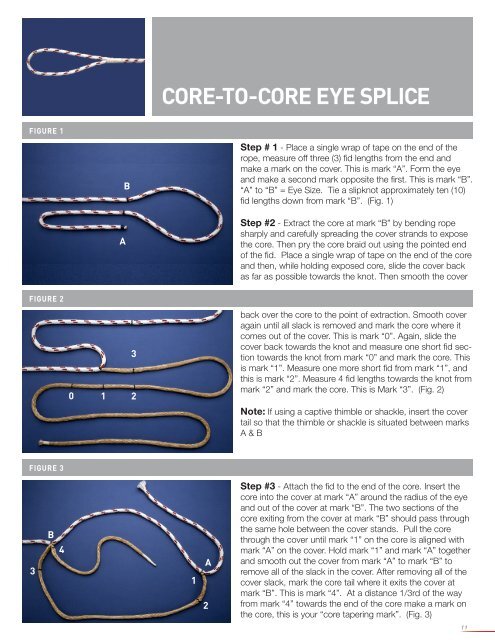
Step # 1 - Place a single wrap of tape on the end of the<br />
rope, measure off three (3) fid lengths from the end and<br />
make a mark on the cover. This is mark “A”. Form the eye<br />
and make a second mark opposite the first. This is mark “B”.<br />
“A” to “B” = Eye Size. Tie a slipknot approximately ten (10)<br />
fid lengths down from mark “B”. (Fig. 1)<br />
Step #2 - Extract the core at mark “B” by bending rope<br />
sharply and carefully spreading the cover strands to expose<br />
the core. Then pry the core braid out using the pointed end<br />
of the fid. Place a single wrap of tape on the end of the core<br />
and then, while holding exposed core, slide the cover back<br />
as far as possible towards the knot. Then smooth the cover<br />
back over the core to the point of extraction. Smooth cover<br />
again until all slack is removed and mark the core where it<br />
comes out of the cover. This is mark “0”. Again, slide the<br />
cover back towards the knot and measure one short fid section<br />
towards the knot from mark “0” and mark the core. This<br />
is mark “1”. Measure one more short fid from mark “1”, and<br />
this is mark “2”. Measure 4 fid lengths towards the knot from<br />
mark “2” and mark the core. This is Mark “3”. (Fig. 2)<br />
Note: If using a captive thimble or shackle, insert the cover<br />
tail so that the thimble or shackle is situated between marks<br />
A & B<br />
Step #3 - Attach the fid to the end of the core. Insert the<br />
core into the cover at mark “A” around the radius of the eye<br />
and out of the cover at mark “B”. The two sections of the<br />
core exiting from the cover at mark “B” should pass through<br />
the same hole between the cover stands. Pull the core<br />
through the cover until mark “1” on the core is aligned with<br />
mark “A” on the cover. Hold mark “1” and mark “A” together<br />
and smooth out the cover from mark “A” to mark “B” to<br />
remove all of the slack in the cover. After removing all of the<br />
cover slack, mark the core tail where it exits the cover at<br />
mark “B”. This is mark “4”. At a distance 1/3rd of the way<br />
from mark “4” towards the end of the core make a mark on<br />
the core, this is your “core tapering mark”. (Fig. 3)<br />
11