Download Full Splicing Guide - New England Ropes
Download Full Splicing Guide - New England Ropes
Download Full Splicing Guide - New England Ropes

You also want an ePaper? Increase the reach of your titles
YUMPU automatically turns print PDFs into web optimized ePapers that Google loves.
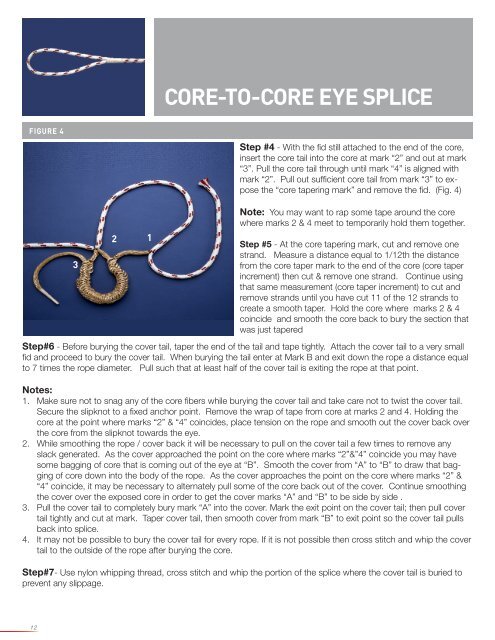
FIGURE 4<br />
3<br />
2<br />
1<br />
Step #4 - With the fid still attached to the end of the core,<br />
insert the core tail into the core at mark “2” and out at mark<br />
“3”. Pull the core tail through until mark “4” is aligned with<br />
mark “2”. Pull out sufficient core tail from mark “3” to expose<br />
the “core tapering mark” and remove the fid. (Fig. 4)<br />
Note: You may want to rap some tape around the core<br />
where marks 2 & 4 meet to temporarily hold them together.<br />
Step #5 - At the core tapering mark, cut and remove one<br />
strand. Measure a distance equal to 1/12th the distance<br />
from the core taper mark to the end of the core (core taper<br />
increment) then cut & remove one strand. Continue using<br />
that same measurement (core taper increment) to cut and<br />
remove strands until you have cut 11 of the 12 strands to<br />
create a smooth taper. Hold the core where marks 2 & 4<br />
coincide and smooth the core back to bury the section that<br />
was just tapered<br />
Step#6 - Before burying the cover tail, taper the end of the tail and tape tightly. Attach the cover tail to a very small<br />
fid and proceed to bury the cover tail. When burying the tail enter at Mark B and exit down the rope a distance equal<br />
to 7 times the rope diameter. Pull such that at least half of the cover tail is exiting the rope at that point.<br />
Notes:<br />
1. Make sure not to snag any of the core fibers while burying the cover tail and take care not to twist the cover tail.<br />
Secure the slipknot to a fixed anchor point. Remove the wrap of tape from core at marks 2 and 4. Holding the<br />
core at the point where marks “2” & “4” coincides, place tension on the rope and smooth out the cover back over<br />
the core from the slipknot towards the eye.<br />
2. While smoothing the rope / cover back it will be necessary to pull on the cover tail a few times to remove any<br />
slack generated. As the cover approached the point on the core where marks “2”&”4” coincide you may have<br />
some bagging of core that is coming out of the eye at “B”. Smooth the cover from “A” to “B” to draw that bagging<br />
of core down into the body of the rope. As the cover approaches the point on the core where marks “2” &<br />
“4” coincide, it may be necessary to alternately pull some of the core back out of the cover. Continue smoothing<br />
the cover over the exposed core in order to get the cover marks “A” and “B” to be side by side .<br />
3. Pull the cover tail to completely bury mark “A” into the cover. Mark the exit point on the cover tail; then pull cover<br />
tail tightly and cut at mark. Taper cover tail, then smooth cover from mark “B” to exit point so the cover tail pulls<br />
back into splice.<br />
4. It may not be possible to bury the cover tail for every rope. If it is not possible then cross stitch and whip the cover<br />
tail to the outside of the rope after burying the core.<br />
Step#7- Use nylon whipping thread, cross stitch and whip the portion of the splice where the cover tail is buried to<br />
prevent any slippage.<br />
12<br />
CORE-TO-CORE EYE SPLICE