Download Full Splicing Guide - New England Ropes
Download Full Splicing Guide - New England Ropes
Download Full Splicing Guide - New England Ropes

Create successful ePaper yourself
Turn your PDF publications into a flip-book with our unique Google optimized e-Paper software.
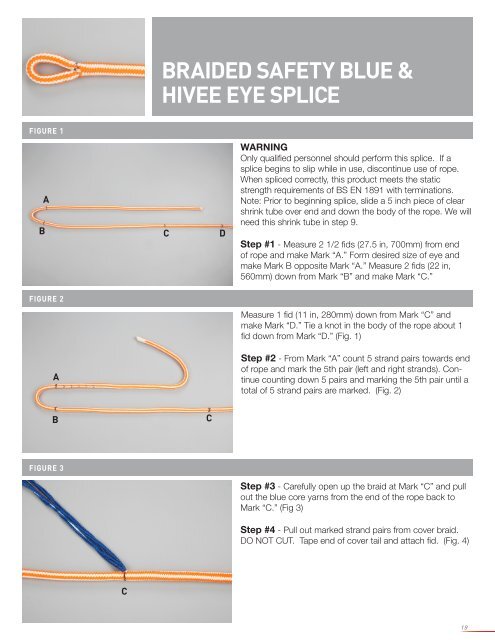
FIGURE 1<br />
A<br />
B C D<br />
FIGURE 2<br />
A<br />
B<br />
FIGURE 3<br />
C<br />
BRAIDED SAFETY BLUE &<br />
HIVEE EYE SPLICE<br />
C<br />
WARNING<br />
Only qualified personnel should perform this splice. If a<br />
splice begins to slip while in use, discontinue use of rope.<br />
When spliced correctly, this product meets the static<br />
strength requirements of BS EN 1891 with terminations.<br />
Note: Prior to beginning splice, slide a 5 inch piece of clear<br />
shrink tube over end and down the body of the rope. We will<br />
need this shrink tube in step 9.<br />
Step #1 - Measure 2 1/2 fids (27.5 in, 700mm) from end<br />
of rope and make Mark “A.” Form desired size of eye and<br />
make Mark B opposite Mark “A.” Measure 2 fids (22 in,<br />
560mm) down from Mark “B” and make Mark “C.”<br />
Measure 1 fid (11 in, 280mm) down from Mark “C” and<br />
make Mark “D.” Tie a knot in the body of the rope about 1<br />
fid down from Mark “D.” (Fig. 1)<br />
Step #2 - From Mark “A” count 5 strand pairs towards end<br />
of rope and mark the 5th pair (left and right strands). Continue<br />
counting down 5 pairs and marking the 5th pair until a<br />
total of 5 strand pairs are marked. (Fig. 2)<br />
Step #3 - Carefully open up the braid at Mark “C” and pull<br />
out the blue core yarns from the end of the rope back to<br />
Mark “C.” (Fig 3)<br />
Step #4 - Pull out marked strand pairs from cover braid.<br />
DO NOT CUT. Tape end of cover tail and attach fid. (Fig. 4)<br />
19