Download Full Splicing Guide - New England Ropes
Download Full Splicing Guide - New England Ropes
Download Full Splicing Guide - New England Ropes

You also want an ePaper? Increase the reach of your titles
YUMPU automatically turns print PDFs into web optimized ePapers that Google loves.
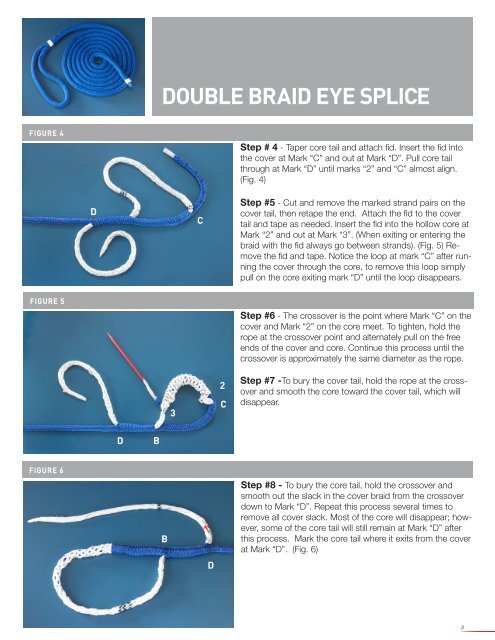
FIGURE 4<br />
FIGURE 5<br />
FIGURE 6<br />
D<br />
D B<br />
DOUBLE BRAID EYE SPLICE<br />
B<br />
3<br />
C<br />
D<br />
2<br />
C<br />
Step # 4 - Taper core tail and attach fid. Insert the fid into<br />
the cover at Mark “C” and out at Mark “D”. Pull core tail<br />
through at Mark “D” until marks “2” and “C” almost align.<br />
(Fig. 4)<br />
Step #5 - Cut and remove the marked strand pairs on the<br />
cover tail, then retape the end. Attach the fid to the cover<br />
tail and tape as needed. Insert the fid into the hollow core at<br />
Mark “2” and out at Mark “3”. (When exiting or entering the<br />
braid with the fid always go between strands). (Fig. 5) Remove<br />
the fid and tape. Notice the loop at mark “C” after running<br />
the cover through the core, to remove this loop simply<br />
pull on the core exiting mark “D” until the loop disappears.<br />
Step #6 - The crossover is the point where Mark “C” on the<br />
cover and Mark “2” on the core meet. To tighten, hold the<br />
rope at the crossover point and alternately pull on the free<br />
ends of the cover and core. Continue this process until the<br />
crossover is approximately the same diameter as the rope.<br />
Step #7 -To bury the cover tail, hold the rope at the crossover<br />
and smooth the core toward the cover tail, which will<br />
disappear.<br />
Step #8 - To bury the core tail, hold the crossover and<br />
smooth out the slack in the cover braid from the crossover<br />
down to Mark “D”. Repeat this process several times to<br />
remove all cover slack. Most of the core will disappear; however,<br />
some of the core tail will still remain at Mark “D” after<br />
this process. Mark the core tail where it exits from the cover<br />
at Mark “D”. (Fig. 6)<br />
9