Download Full Splicing Guide - New England Ropes
Download Full Splicing Guide - New England Ropes
Download Full Splicing Guide - New England Ropes

You also want an ePaper? Increase the reach of your titles
YUMPU automatically turns print PDFs into web optimized ePapers that Google loves.
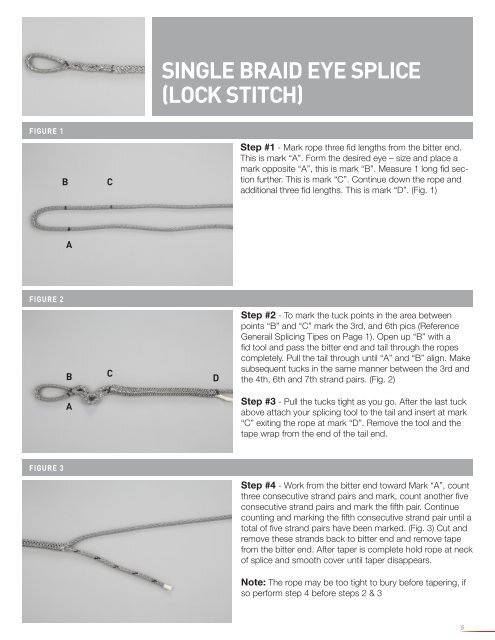
FIGURE 1<br />
FIGURE 2<br />
FIGURE 3<br />
B C<br />
A<br />
B<br />
A<br />
C<br />
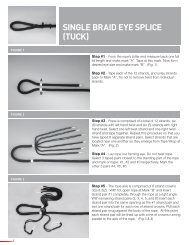
SINGLE BRAID EYE SPLICE<br />
(LOCK STITCH)<br />
D<br />
Step #1 - Mark rope three fid lengths from the bitter end.<br />
This is mark “A”. Form the desired eye – size and place a<br />
mark opposite “A”, this is mark “B”. Measure 1 long fid section<br />
further. This is mark “C”. Continue down the rope and<br />
additional three fid lengths. This is mark “D”. (Fig. 1)<br />
Step #2 - To mark the tuck points in the area between<br />
points “B” and “C” mark the 3rd, and 6th pics (Reference<br />
Generail <strong>Splicing</strong> Tipes on Page 1). Open up “B” with a<br />
fid tool and pass the bitter end and tail through the ropes<br />
completely. Pull the tail through until “A” and “B” align. Make<br />
subsequent tucks in the same manner between the 3rd and<br />
the 4th, 6th and 7th strand pairs. (Fig. 2)<br />
Step #3 - Pull the tucks tight as you go. After the last tuck<br />
above attach your splicing tool to the tail and insert at mark<br />
“C” exiting the rope at mark “D”. Remove the tool and the<br />
tape wrap from the end of the tail end.<br />
Step #4 - Work from the bitter end toward Mark “A”, count<br />
three consecutive strand pairs and mark, count another five<br />
consecutive strand pairs and mark the fifth pair. Continue<br />
counting and marking the fifth consecutive strand pair until a<br />
total of five strand pairs have been marked. (Fig. 3) Cut and<br />
remove these strands back to bitter end and remove tape<br />
from the bitter end. After taper is complete hold rope at neck<br />
of splice and smooth cover until taper disappears.<br />
Note: The rope may be too tight to bury before tapering, if<br />
so perform step 4 before steps 2 & 3<br />
5