- Page 1 and 2: Leica TCS SP5 Leica TCS SP5 X User
- Page 3 and 4: Table of Contents 1. General ......
- Page 5 and 6: 6.3.3 VIS and UV Systems with Inver
- Page 7: 11.3 Cleaning the Microscope Surfac
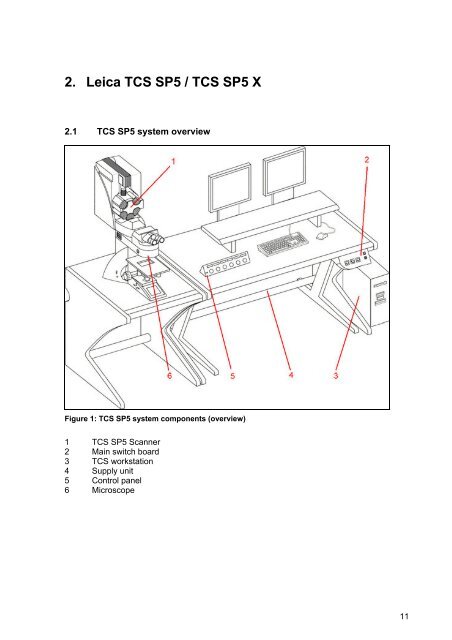
- Page 12 and 13: 2.2 TCS SP5 X system overview Figur
- Page 14 and 15: 2.5 Patents The Leica TCS SP5 produ
- Page 16 and 17: 2.7.1.3 TCS SP5 X with inverted mic
- Page 18 and 19: 2.7.3 Requirements Regarding Ambien
- Page 20 and 21: 20 The components for laser safety
- Page 22 and 23: 2.8.3 Overview of Usable VIS/UV Las
- Page 25 and 26: 3. Safety Instructions and their Me
- Page 27 and 28: 4. General Safety Instructions 4.1
- Page 29 and 30: 4.4 Safety Instructions for the Use
- Page 31 and 32: 5. Safety Devices 5.1 Disconnecting
- Page 33 and 34: The key switch for protection again
- Page 35 and 36: Immediately disconnect the system f
- Page 37 and 38: 5.6 Remote Interlock Connections on
- Page 39 and 40: 5.9 Special Laser Safety Equipment
- Page 41 and 42: 5.10 Safety labels on the system Th
- Page 43 and 44: 5.10.2 Upright microscope DM 5000/6
- Page 45 and 46: 5.10.3 Scan Head Angled front view
- Page 47 and 48: 5.10.5 External UV laser 4 Figure 2
- Page 49 and 50: 5.10.7 MP beam coupling unit Angled
- Page 51: 5.10.9 Mirror Housing Front view of
- Page 54 and 55: 54 Do not introduce any reflective
- Page 56 and 57: 6.5 Changing Specimens 56 Never cha
- Page 58 and 59: 6.7 Changing the Transmitted-Light
- Page 60 and 61:
6.8 Mirror housing on upright micro
- Page 62 and 63:
6.9 Changing Filter Cubes, Beam Spl
- Page 64 and 65:
Figure 41: Spacer on objective 64 P
- Page 66 and 67:
66 Use your personal user ID if one
- Page 68 and 69:
68 The power supply of the achromat
- Page 70 and 71:
7.2 Starting the LAS AF 70 With the
- Page 72 and 73:
7.3 Setting Up Users 72 The default
- Page 74 and 75:
74 6. Shut down the computer. On th
- Page 76 and 77:
9.2.2 Accessing the Online Help The
- Page 78 and 79:
9.3 Structure of the graphical user
- Page 81 and 82:
10. Introduction to Confocal Work 1
- Page 83 and 84:
1 Filter cube 2 Specimen 3 Objectiv
- Page 85 and 86:
10.1.3 Why Scan? Specimens must be
- Page 87 and 88:
Out of focus in focus 1 2 3 Pinhole
- Page 89 and 90:
work is required. Once all paramete
- Page 91 and 92:
Figure 67: Selecting the illuminati
- Page 93 and 94:
Exc Refl Exc1 Exc2 Em 1 Em 2 Em Fig
- Page 95 and 96:
Figure 71: Optical sections with a
- Page 97 and 98:
Numerical Aperture 1,4 1,25 0,4 Opt
- Page 99 and 100:
Figure 74: Zoom, Pan and Rotation c
- Page 101 and 102:
extremely sensitive specimens and i
- Page 103 and 104:
Figure 78: Simultaneous scan of two
- Page 105 and 106:
dominant, the selection of a differ
- Page 107 and 108:
thicknesses between 0.5 µm and 2.5
- Page 109 and 110:
10.4.5.3 Orthogonal Projections A f
- Page 111 and 112:
imposed here by a number of factors
- Page 113 and 114:
(measuring parameters) does not in
- Page 115 and 116:
11. Care and Maintenance 11.1 Gener
- Page 117 and 118:
12. Transport and Disposal 12.1 Cha
- Page 119 and 120:
Curvature of Image Field The curved
- Page 121 and 122:
Lambda Series Stack of individual i
- Page 123 and 124:
Dry Objective A microscopic objecti
- Page 125 and 126:
125
- Page 127 and 128:
127
- Page 129 and 130:
15.2 Declaration of conformity 129
- Page 131 and 132:
131