


You also want an ePaper? Increase the reach of your titles
YUMPU automatically turns print PDFs into web optimized ePapers that Google loves.
Macro Focus stacking<br />
then take the pictures by gradually<br />
racking the lens backwards,<br />
depending on the increments, until<br />
the fly becomes out of focus again at the<br />
front end,’ he explains. David always uses<br />
manual focus, because when working this<br />
close your autofocus can get easily confused<br />
and lock on to the wrong part of the subject.<br />
David’s award-winning fly was just 2.4mm<br />
in depth, and shooting at increments of<br />
0.04mm required 61 images to make up<br />
the final picture.<br />
His apparatus may look slightly comical,<br />
but watching David work his magic is<br />
amazing. From the freezer he produces<br />
a fly he caught earlier (see page 25 for<br />
information about caring for your subjects).<br />
After some early misadventures trapping<br />
insects, David now uses a Pooter, a more<br />
humane apparatus used by entomologists<br />
and pest-removal experts that gently sucks<br />
up the insects into a tube and holds them<br />
against a soft filter until the inhalation is<br />
reversed and the insects drop into a jar.<br />
Once David has his subject, he carefully<br />
places it inside one half of a ping-pong ball<br />
that has been cut in two. This helps to diffuse<br />
the two studio lights he uses to illuminate<br />
the subject, and it reduces unwanted<br />
highlights in the fly’s eyes or body. Attached<br />
to a clamp is his Canon EOS 40D, fitted with<br />
a 35mm f/2.8 bellows lens, with a special<br />
microscope thread attached to the Canon<br />
FL bellows. On the back of his camera he<br />
has an FL-to-EF adapter, while on the front<br />
he has another fitted to take the lens. With<br />
the lights on and the ISO at 100, David<br />
takes an exposure reading using AV mode.<br />
With the mirror in lock-up position and<br />
Enlarger lenses<br />
Using a bellows unit like<br />
David’s can give you a much<br />
closer look at your subject than<br />
using ordinary extension tubes,<br />
and using an old enlarger lens<br />
in reverse can give you even<br />
greater magnification at an<br />
inexpensive price. Enlarger<br />
lenses were designed for<br />
projecting magnified versions of<br />
a negative onto paper. While in<br />
the darkroom the back of the<br />
enlarger lens would be closest to<br />
your negative to project a larger<br />
version of it onto your paper,<br />
here you can turn it around so<br />
that the back of the lens faces<br />
your subject. In essence, you are<br />
using the lens within its original<br />
design conditions and exploiting<br />
its low field curvature and high<br />
resolution, thus making it idea for<br />
David’s ‘super macro’ technique.<br />
Lacewing made<br />
from 41 separate<br />
source images<br />
Canon EOS 40D,<br />
Nikon E Plan 4x/0.1<br />
microscope objective<br />
lens, 0.8sec, 0.015<br />
increments, mag<br />
7x, ISO 100<br />
‘Maybe it’s my scientific<br />
background that attracts me<br />
to the apparatus required for<br />
this super-macro work’<br />
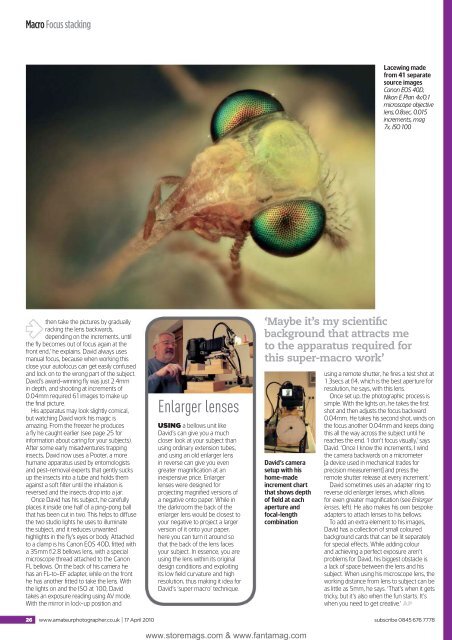
David’s camera<br />
setup with his<br />
home-made<br />
increment chart<br />
that shows depth<br />
of field at each<br />
aperture and<br />
focal-length<br />
combination<br />
using a remote shutter, he fires a test shot at<br />
1.3secs at f/4, which is the best aperture for<br />
resolution, he says, with this lens.<br />
Once set up, the photographic process is<br />
simple. With the lights on, he takes the first<br />
shot and then adjusts the focus backward<br />
0.04mm. He takes his second shot, winds on<br />
the focus another 0.04mm and keeps doing<br />
this all the way across the subject until he<br />
reaches the end. ‘I don’t focus visually,’ says<br />
David. ‘Once I know the increments, I wind<br />
the camera backwards on a micrometer<br />
[a device used in mechanical trades for<br />
precision measurement] and press the<br />
remote shutter release at every increment.’<br />
David sometimes uses an adapter ring to<br />
reverse old enlarger lenses, which allows<br />
for even greater magnification (see Enlarger<br />
lenses, left). He also makes his own bespoke<br />
adapters to attach lenses to his bellows.<br />
To add an extra element to his images,<br />
David has a collection of small coloured<br />
background cards that can be lit separately<br />
for special effects. While adding colour<br />
and achieving a perfect exposure aren’t<br />
problems for David, his biggest obstacle is<br />
a lack of space between the lens and his<br />
subject. When using his microscope lens, the<br />
working distance from lens to subject can be<br />
as little as 5mm, he says. ‘That’s when it gets<br />
tricky, but it’s also when the fun starts. It’s<br />
when you need to get creative.’ AP<br />
26 www.amateurphotographer.co.uk I 17 April 2010 subscribe 0845 676 7778<br />
www.storemags.com & www.fantamag.com


