


Create successful ePaper yourself
Turn your PDF publications into a flip-book with our unique Google optimized e-Paper software.
AP’s guide to... Adobe Photoshop Elements 8<br />
EDITING EXISTING SELECTIONS<br />
WITH some complex images, no one when using a new tool. For those who prefer<br />
selection technique will be able to isolate all to use keyboard shortcuts, holding down the<br />
the pixels required; instead, a combination Shift key while using a selection tool will add<br />
of tools is needed to make the fi nal outline. to an existing outline, whereas using the Alt/<br />
To aid with this, Adobe has included several Opt key will subtract from it.<br />
possibilities in the options bar of the various<br />
selection tools.<br />
Using these options it is possible to ‘add<br />
to’ or ‘subtract from’ an existing selection or<br />
even use the ‘intersection’ of two separate<br />
selections as the basis for a third. To do so,<br />
simply choose a different selection option<br />
All this may seem a little complex to<br />
start with, but it is important to persevere,<br />
as good selecting skills are critical for a lot<br />
of advanced editing techniques. Besides,<br />
after some practice, making multi-tool<br />
complex selections will become second<br />
nature to you.<br />
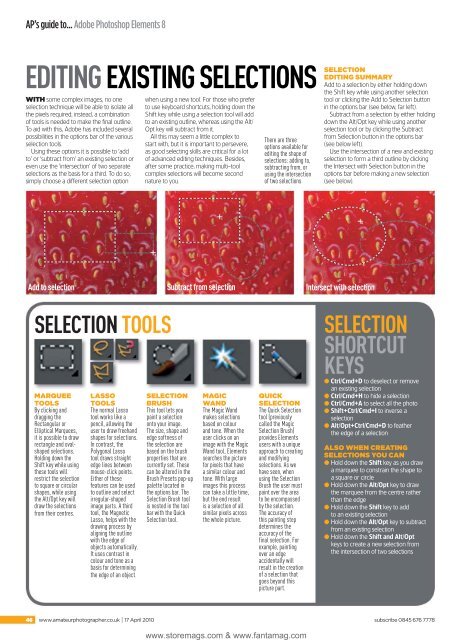
There are three<br />
options available for<br />
editing the shape of<br />
selections: adding to,<br />
subtracting from, or<br />
using the intersection<br />
of two selections<br />
Add to selection Subtract from selection Intersect with selection<br />
SELECTION TOOLS<br />
MARQUEE<br />
TOOLS<br />
By clicking and<br />
dragging the<br />
Rectangular or<br />
Elliptical Marquees,<br />
it is possible to draw<br />
rectangle and ovalshaped<br />
selections.<br />
Holding down the<br />
Shift key while using<br />
these tools will<br />
restrict the selection<br />
to square or circular<br />
shapes, while using<br />
the Alt/Opt key will<br />
draw the selections<br />
from their centres.<br />
LASSO<br />
TOOLS<br />
The normal Lasso<br />
tool works like a<br />
pencil, allowing the<br />
user to draw freehand<br />
shapes for selections.<br />
In contrast, the<br />
Polygonal Lasso<br />
tool draws straight<br />
edge lines between<br />
mouse-click points.<br />
Either of these<br />
features can be used<br />
to outline and select<br />
irregular-shaped<br />
image parts. A third<br />
tool, the Magnetic<br />
Lasso, helps with the<br />
drawing process by<br />
aligning the outline<br />
with the edge of<br />
objects automatically.<br />
It uses contrast in<br />
colour and tone as a<br />
basis for determining<br />
the edge of an object.<br />
SELECTION<br />
BRUSH<br />
This tool lets you<br />
paint a selection<br />
onto your image.<br />
The size, shape and<br />
edge softness of<br />
the selection are<br />
based on the brush<br />
properties that are<br />
currently set. These<br />
can be altered in the<br />
Brush Presets pop-up<br />
palette located in<br />
the options bar. The<br />
Selection Brush tool<br />
is nested in the tool<br />
bar with the Quick<br />
Selection tool.<br />
MAGIC<br />
WAND<br />
The Magic Wand<br />
makes selections<br />
based on colour<br />
and tone. When the<br />
user clicks on an<br />
image with the Magic<br />
Wand tool, Elements<br />
searches the picture<br />
for pixels that have<br />
a similar colour and<br />
tone. With large<br />
images this process<br />
can take a little time,<br />
but the end result<br />
is a selection of all<br />
similar pixels across<br />
the whole picture.<br />
QUICK<br />
SELECTION<br />
The Quick Selection<br />
tool (previously<br />
called the Magic<br />
Selection Brush)<br />
provides Elements<br />
users with a unique<br />
approach to creating<br />
and modifying<br />
selections. As we<br />
have seen, when<br />
using the Selection<br />
Brush the user must<br />
paint over the area<br />
to be encompassed<br />
by the selection.<br />
The accuracy of<br />
this painting step<br />
determines the<br />
accuracy of the<br />
final selection. For<br />
example, painting<br />
over an edge<br />
accidentally will<br />
result in the creation<br />
of a selection that<br />
goes beyond this<br />
picture part.<br />
SELECTION<br />
EDITING SUMMARY<br />
Add to a selection by either holding down<br />
the Shift key while using another selection<br />
tool or clicking the Add to Selection button<br />
in the options bar (see below, far left).<br />
Subtract from a selection by either holding<br />
down the Alt/Opt key while using another<br />
selection tool or by clicking the Subtract<br />
from Selection button in the options bar<br />
(see below left).<br />
Use the intersection of a new and existing<br />
selection to form a third outline by clicking<br />
the Intersect with Selection button in the<br />
options bar before making a new selection<br />
(see below).<br />
SELECTION<br />
SHORTCUT<br />
KEYS<br />
● Ctrl/Cmd+D to deselect or remove<br />
an existing selection<br />
● Ctrl/Cmd+H to hide a selection<br />
● Ctrl/Cmd+A to select all the photo<br />
● Shift+Ctrl/Cmd+I to inverse a<br />
selection<br />
● Alt/Opt+Ctrl/Cmd+D to feather<br />
the edge of a selection<br />
ALSO WHEN CREATING<br />
SELECTIONS YOU CAN<br />
● Hold down the Shift key as you draw<br />
a marquee to constrain the shape to<br />
a square or circle<br />
● Hold down the Alt/Opt key to draw<br />
the marquee from the centre rather<br />
than the edge<br />
● Hold down the Shift key to add<br />
to an existing selection<br />
● Hold down the Alt/Opt key to subtract<br />
from an existing selection<br />
● Hold down the Shift and Alt/Opt<br />
keys to create a new selection from<br />
the intersection of two selections<br />
46 www.amateurphotographer.co.uk I 17 April 2010 subscribe 0845 676 7778<br />
www.storemags.com & www.fantamag.com


