


You also want an ePaper? Increase the reach of your titles
YUMPU automatically turns print PDFs into web optimized ePapers that Google loves.
AP’s guide to... Adobe Photoshop Elements 8<br />
TRANSFORM<br />
THE SHAPE OF<br />
YOUR PHOTOS<br />
THE RECOMPOSE feature<br />
(Image>Recompose) is new for<br />
Photoshop Elements 8. Although not<br />
strictly a selection tool, it can be used<br />
when transforming the shape of a<br />
picture to isolate the parts of the image<br />
that you want to change, and those you<br />
don’t, during the reshaping process.<br />
You simply select the feature and paint<br />
over the areas marked for protection<br />
using a special green-coloured brush.<br />
The rest of the photo is left untouched,<br />
signifying to Elements that this detail can<br />
be adjusted during the transformation.<br />
After<br />
The Recompose tool uses the same<br />
edge and corner handles as the Free<br />
Transform tool, so after areas are<br />
marked for protection, the format of the<br />
picture can be adjusted by dragging on<br />
the handles.<br />
Before<br />
PRO’S TIP<br />
When creating a composition that is larger than the original photo, use the Crop tool and first drag<br />
it out to make a larger canvas before then using the Recompose tool to extend the picture<br />
RECOMPOSE<br />
IN ACTION<br />
48 www.amateurphotographer.co.uk I 17 April 2010 subscribe 0845 676 7778<br />
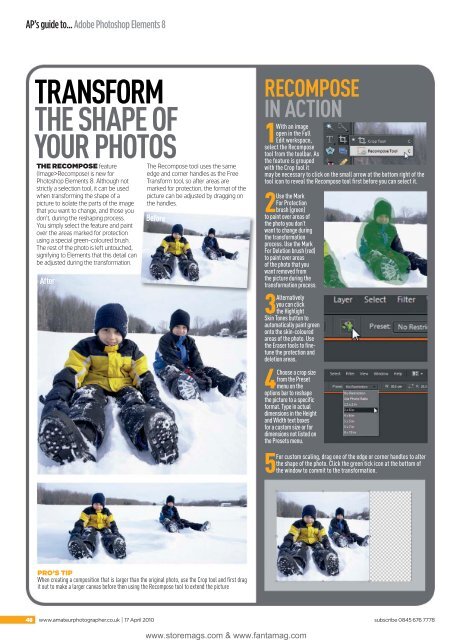
1<br />
With an image<br />
open in the Full<br />
Edit workspace,<br />
select the Recompose<br />
tool from the toolbar. As<br />
the feature is grouped<br />
with the Crop tool it<br />
may be necessary to click on the small arrow at the bottom right of the<br />
tool icon to reveal the Recompose tool first before you can select it.<br />
2<br />
Use the Mark<br />
For Protection<br />
brush (green)<br />
to paint over areas of<br />
the photo you don’t<br />
want to change during<br />
the transformation<br />
process. Use the Mark<br />
For Deletion brush (red)<br />
to paint over areas<br />
of the photo that you<br />
want removed from<br />
the picture during the<br />
transformation process.<br />
3 Alternatively<br />
you can click<br />
the Highlight<br />
Skin Tones button to<br />
automatically paint green<br />
onto the skin-coloured<br />
areas of the photo. Use<br />
the Eraser tools to finetune<br />
the protection and<br />
deletion areas.<br />
4<br />
Choose a crop size<br />
from the Preset<br />
menu on the<br />
options bar to reshape<br />
the picture to a specific<br />
format. Type in actual<br />
dimensions in the Height<br />
and Width text boxes<br />
for a custom size or for<br />
dimensions not listed on<br />
the Presets menu.<br />
5<br />
www.storemags.com & www.fantamag.com<br />
For custom scaling, drag one of the edge or corner handles to alter<br />
the shape of the photo. Click the green tick icon at the bottom of<br />
the window to commit to the transformation.


