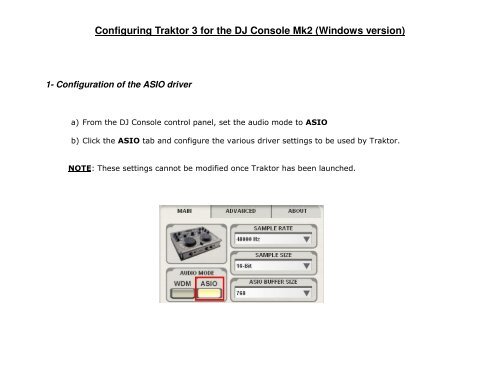
Configuring Traktor 3 for the DJ Console Mk2 (Windows ... - Hercules
Configuring Traktor 3 for the DJ Console Mk2 (Windows ... - Hercules
Configuring Traktor 3 for the DJ Console Mk2 (Windows ... - Hercules

You also want an ePaper? Increase the reach of your titles
YUMPU automatically turns print PDFs into web optimized ePapers that Google loves.
<strong>Configuring</strong> <strong>Traktor</strong> 3 <strong>for</strong> <strong>the</strong> <strong>DJ</strong> <strong>Console</strong> <strong>Mk2</strong> (<strong>Windows</strong> version)<br />
1- Configuration of <strong>the</strong> ASIO driver<br />
a) From <strong>the</strong> <strong>DJ</strong> <strong>Console</strong> control panel, set <strong>the</strong> audio mode to ASIO<br />
b) Click <strong>the</strong> ASIO tab and configure <strong>the</strong> various driver settings to be used by <strong>Traktor</strong>.<br />
NOTE: These settings cannot be modified once <strong>Traktor</strong> has been launched.
2- Audio configuration in <strong>Traktor</strong><br />
a) From <strong>the</strong> FILE menu, select AUDIO SETUP<br />
b) In Soundcard, select <strong>Hercules</strong> <strong>DJ</strong> <strong>Console</strong> MK2 ASIO as Audio Device. Notice that <strong>the</strong><br />
SAMPLE RATE and AUDIO LATENCY should reflect <strong>the</strong> configuration previously made in <strong>the</strong><br />
Control panel<br />
c) Under Output Routing, set Output 3 & 4 <strong>for</strong> Monitor and Output 1 & 2 <strong>for</strong> Master<br />
d) If you are using external sources, in Input Routing, select <strong>the</strong> <strong>DJ</strong> <strong>Console</strong> inputs <strong>for</strong> channels<br />
A&B.
3- Configuration of <strong>the</strong> Midi controllers in <strong>Traktor</strong><br />
a. Expand Hotkey and MIDI setup and select MIDI Interface. Make sure <strong>Hercules</strong> <strong>DJ</strong><br />
<strong>Console</strong> <strong>Mk2</strong> MIDI is marked with an X in <strong>the</strong> ACTIVE column <strong>for</strong> both MIDI IN and OUT.<br />
b. From MIDI Setup, click <strong>the</strong> Load button. Locate and select <strong>the</strong> TKS file, <strong>the</strong>n press OK<br />
c. <strong>Traktor</strong> is now configured to use <strong>the</strong> <strong>DJ</strong> <strong>Console</strong> Rmx.
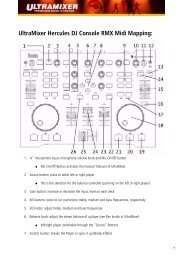
Main Configuration:<br />
A- Secondary Function (See below)<br />
B- Deck Tempo<br />
C- EQ (Bass/ Mid/ Treble)<br />
D- Deck Loop – Loop Active/Out<br />
E- Browser List Select Up/Down<br />
F- Deck Time Stretch ON<br />
G- Deck Volume<br />
H-Deck Pitch Bend<br />
I- Deck Load Selected<br />
J- Deck Tempo - Sync<br />
K- Deck Seek Position<br />
L- Deck load Previous / Next<br />
M- Deck Cue/Pause<br />
N- Deck Play/Pause<br />
O- X-Fader<br />
P- Headphone:<br />
- Deck Monitor Cue (Deck A)<br />
- Deck Monitor Cue (Deck B)<br />
- Mix<br />
- Split<br />
MIDI Layout <strong>for</strong> <strong>the</strong> <strong>DJ</strong> <strong>Console</strong> <strong>Mk2</strong> and <strong>Traktor</strong>3<br />
NOTE: The terms used are those employed in <strong>Traktor</strong>
Secondary functions:<br />
Press and hold <strong>the</strong> button “1” to access <strong>the</strong> effects (FX) functions:<br />
A- Master Effect Knob 1<br />
B- Master Effect Knob 3<br />
C- Master Effect button 1<br />
D- Master Effect button 4<br />
E- Master Effect Previous /Next<br />
F- Master Effect Knob 4
Press and hold <strong>the</strong> button “2” to access additional controls:<br />
A- Deck Gain (A)<br />
B- Deck Gain (B)<br />
C- Browser Tree Select<br />
Up/Down/Expand/Collapse<br />
D- Monitor Mix<br />
E- Monitor Volume<br />
F- Deck Cue Set (A)<br />
G- Deck Cue Set (B)
Press and hold <strong>the</strong> button “3” to enable <strong>the</strong> Scratch function on <strong>the</strong> jog wheel.
Midi controllers map

![[English - PC] 290 Kb - Hercules](https://img.yumpu.com/26583395/1/184x260/english-pc-290-kb-hercules.jpg?quality=85)