1 DJ Console MK2 – OS X Audio Firmware Update ... - Hercules
1 DJ Console MK2 – OS X Audio Firmware Update ... - Hercules
1 DJ Console MK2 – OS X Audio Firmware Update ... - Hercules
Create successful ePaper yourself
Turn your PDF publications into a flip-book with our unique Google optimized e-Paper software.
<strong>Hercules</strong> Technical Support http://ts.hercules.com<br />
<strong>DJ</strong> <strong>Console</strong> <strong>MK2</strong> <strong>–</strong> <strong>OS</strong> X <strong>Audio</strong> <strong>Firmware</strong> <strong>Update</strong> Procedure<br />
1) Download the latest package from the web: ts.hercules.com<br />
2) Install the package. When asked to connect your <strong>DJ</strong> <strong>Console</strong> <strong>MK2</strong>, just let the<br />
timer go (do NOT plug in the device) until it reaches the end and completes the<br />
installation process<br />
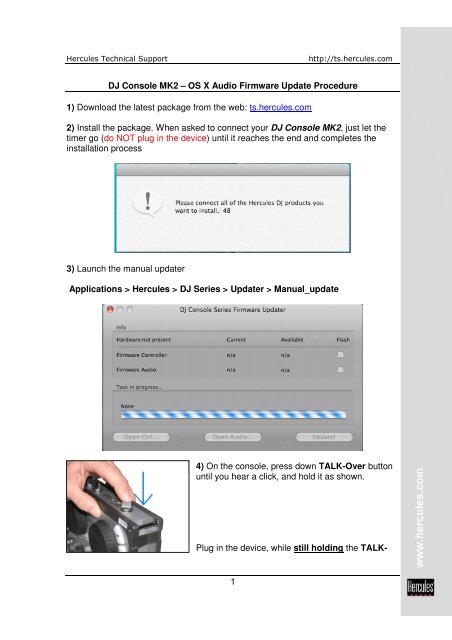
3) Launch the manual updater<br />
Applications > <strong>Hercules</strong> > <strong>DJ</strong> Series > <strong>Update</strong>r > Manual_update<br />
4) On the console, press down TALK-Over button<br />
until you hear a click, and hold it as shown.<br />
Plug in the device, while still holding the TALK-<br />
1
<strong>Hercules</strong> Technical Support http://ts.hercules.com<br />
Over button.<br />
5) Wait until the manual updater sees the device and is refreshed<br />
a) If the updater sees the device, it should say boot in the Current column<br />
*** If this is correct, proceed to step 6)<br />
b) If the Current column does not show boot<br />
OR the device is still not detected, unplug<br />
and re-plug again following the same<br />
procedure, making sure to press and hold<br />
the TALK-Over button before plugging in the<br />
device, and still maintaining the hold once<br />
connected<br />
2
<strong>Hercules</strong> Technical Support http://ts.hercules.com<br />
6) Click the Open <strong>Audio</strong>… button, then browse for the <strong>MK2</strong>_TUSB_15.dja<br />
firmware, then click Open<br />
7) Check the Flash box and press <strong>Update</strong>! to apply the new firmware to the device<br />
THE CONSOLE MUST NOT BE UNPLUGGED until the manual updater<br />
confirms completion and advises to do so<br />
3
<strong>Hercules</strong> Technical Support http://ts.hercules.com<br />
When prompted by the updater, unplug the device<br />
8) Plug in the console back to the USB port<br />
9) At this moment the console should be correctly recognized and installed<br />
You can also confirm that the Mk2 is correctly installed by verifying the <strong>MK2</strong> Control<br />
Panel or in <strong>OS</strong> X <strong>Audio</strong>/MIDI Setup<br />
Applications> Utilities > <strong>Audio</strong> MIDI Setup<br />
> If however the console doesn’t appear to have been updated<br />
correctly, then start the procedure again from the beginning<br />
4


![[English - PC] 290 Kb - Hercules](https://img.yumpu.com/26583395/1/184x260/english-pc-290-kb-hercules.jpg?quality=85)

