LCP Dia-Meta Volar Distal Radius Plates. Long volar ... - Synthes
LCP Dia-Meta Volar Distal Radius Plates. Long volar ... - Synthes
LCP Dia-Meta Volar Distal Radius Plates. Long volar ... - Synthes

You also want an ePaper? Increase the reach of your titles
YUMPU automatically turns print PDFs into web optimized ePapers that Google loves.
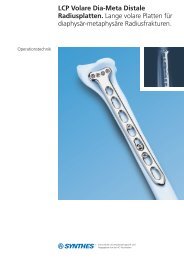
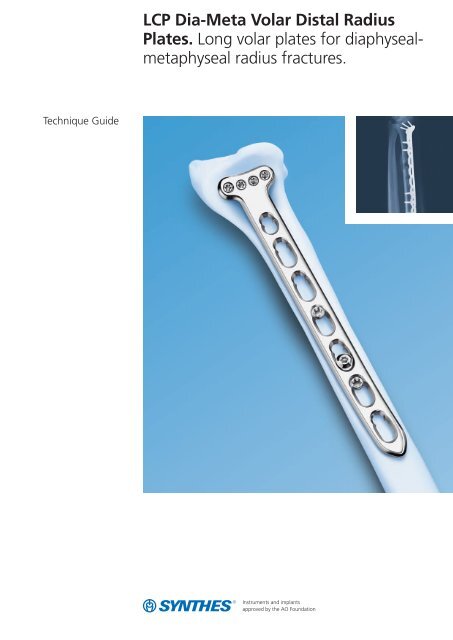
Technique Guide<br />
<strong>LCP</strong> <strong>Dia</strong>-<strong>Meta</strong> <strong>Volar</strong> <strong>Distal</strong> <strong>Radius</strong><br />
<strong>Plates</strong>. <strong>Long</strong> <strong>volar</strong> plates for diaphysealmetaphyseal<br />
radius fractures.
Table of Contents<br />
Introduction<br />
Surgical Technique<br />
Product Information<br />
Image intensifier control<br />
Warning<br />
This description alone does not provide sufficient background<br />
for direct use of the product. Instruction by<br />
a surgeon experienced in handling this product is highly<br />
recommended.<br />
<strong>LCP</strong> <strong>Dia</strong>-<strong>Meta</strong> <strong>Volar</strong> <strong>Distal</strong> <strong>Radius</strong> <strong>Plates</strong> 2<br />
Feature and Benefits 3<br />
<strong>Synthes</strong> Biomaterials Overview 4<br />
AO Principles 5<br />
Indications 6<br />
Clinical Cases 7<br />
Contour Plate (Optional) 10<br />
Position Patient and Approach 11<br />
Reduce Fracture 12<br />
Insert Proximal Screws 13<br />
Insert <strong>Distal</strong> Screws 14<br />
Bone Void Filler Insertion (Optional) 16<br />
Implant Removal<br />
Screws 17<br />
Implants 18<br />
Required 3.5 mm <strong>LCP</strong> Small Fragment Instruments 20<br />
Required 2.4 mm <strong>LCP</strong> Instruments 22<br />
<strong>Synthes</strong> 1
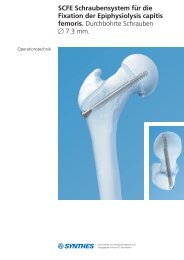
<strong>LCP</strong> <strong>Dia</strong>-<strong>Meta</strong> <strong>Volar</strong> <strong>Distal</strong> <strong>Radius</strong> <strong>Plates</strong><br />
The <strong>LCP</strong> <strong>Dia</strong>-<strong>Meta</strong> (<strong>Dia</strong>physeal–<strong>Meta</strong>physeal) <strong>Volar</strong> <strong>Distal</strong><br />
<strong>Radius</strong> Plate is an anatomic plate designed for fractures of<br />
the distal radius that extend into the radial shaft.<br />
The plate design combines 2.4 mm locking technology in the<br />
distal radius with 3.5 mm <strong>LCP</strong> technology in the radial shaft.<br />
<strong>Dia</strong>-<strong>Meta</strong> plates are left and right specific and are offered in<br />
six different lengths to address a wide variety of fractures.<br />
2 <strong>Synthes</strong> <strong>LCP</strong> <strong>Dia</strong>-<strong>Meta</strong> <strong>Volar</strong> <strong>Distal</strong> <strong>Radius</strong> <strong>Plates</strong> Technique Guide
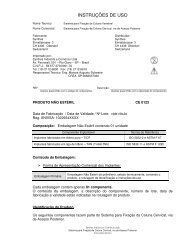
Features and Benefits<br />
– Precontoured plate offers an anatomic fit in the distal<br />
radius and radial shaft<br />
– All plates are straight up to 5 holes. Beyond the fifth hole<br />
the shaft is precontoured to match the radial bow<br />
– 4-hole head configuration is similar to the 2.4 mm<br />
<strong>LCP</strong> extra-articular <strong>volar</strong> distal radius plate<br />
– <strong>Distal</strong> locking screws offer a fixed angle construct to<br />
support the articular surface<br />
2.4 mm locking<br />
holes in head of<br />
plate<br />
*all plates available in sterile only<br />
3.5 mm combi-holes in plate<br />
shaft can accept 3.5 mm<br />
cortex, 3.5 mm locking, or<br />
4.0 mm cancellous screws<br />
Plate head<br />
– 25° angulation in head of plate fits <strong>volar</strong> distal radius<br />
– Screw angles are identical to the angles in the 4-hole head<br />
2.4 mm <strong>LCP</strong> extra-articular <strong>volar</strong> distal radius plate<br />
– Smooth surface finishing and rounded edges minimize<br />
tendon irritation and adhesion<br />
– Available left or right, with 5, 7, 9, 11, 13, or 15 hole shaft<br />
lengths*<br />
– Available in stainless steel or pure titanium*<br />
100˚<br />
(2x)<br />
Relief notches at alternating<br />
holes after the 7th hole, to<br />
facilitate additional contouring<br />
90˚<br />
80˚<br />
5˚<br />
25˚<br />
5˚<br />
7.5˚<br />
15˚<br />
combi-holes can provide<br />
angular stability with<br />
locking screws or compression<br />
with cortex<br />
screws<br />
<strong>Synthes</strong> 3
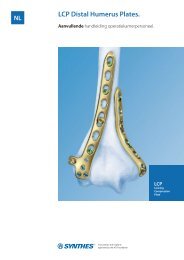
<strong>Synthes</strong> Biomaterials Overview<br />
Synthetic and allogenic bone replacement<br />
materials have the advantage of<br />
uniform quality, unlimited availability<br />
and absence of potential complications<br />
at a donor site.<br />
<strong>Synthes</strong> offers a wide range of synthetic<br />
biomaterial products in different application<br />
forms and with distinct biological<br />
properties:<br />
chronOS<br />
Osteoconductive, resorbable, synthetic Enhancing chronOS with biological factors Injectable remodelling<br />
Norian SRS<br />
Injectable stability<br />
Furthermore a comprehensive portfolio<br />
of allograft products is available in<br />
selected countries.<br />
Additionally, the application of synthetic<br />
and allogenic bone graft substitutes<br />
reduces the duration of the surgery.<br />
Osteoinductive power<br />
For more detailed information about a<br />
specific product or availability of allografts<br />
please contact your local <strong>Synthes</strong><br />
representative.<br />
4 <strong>Synthes</strong> <strong>LCP</strong> <strong>Dia</strong>-<strong>Meta</strong> <strong>Volar</strong> <strong>Distal</strong> <strong>Radius</strong> <strong>Plates</strong> Technique Guide<br />
chronOS Perfusion Concept chronOS Inject<br />
DBX*<br />
*Facilitated through <strong>Synthes</strong>
AO Principles<br />
In 1958, the AO formulated four basic principles, which have<br />
become the guidelines for internal fixation. 1 Those principles,<br />
as applied to the <strong>LCP</strong> <strong>Dia</strong>-<strong>Meta</strong> <strong>Volar</strong> <strong>Distal</strong> <strong>Radius</strong> Plate, are:<br />
Anatomic reduction<br />
The anatomic plate facilitates restoration of the articular surface<br />
with locking screws. Multiple plate lengths facilitate<br />
restoration of the radial bow.<br />
Stable fixation<br />
Locking screws create a fixed-angle construct, providing angular<br />
stability.<br />
Preservation of blood supply<br />
Limited contact plate design reduces plate-to-bone contact.<br />
Additionally, locked plates do not need close contact with<br />
the bone, which helps limit vascular trauma.<br />
Early, active mobilization<br />
Early mobilization per standard AO technique creates an environment<br />
for bone healing, expediting a return to optimal<br />
function.<br />
1 Müller ME, Allgöwer M, Schneider R, Willenegger H (1995) Manual of Internal<br />
Fixation. 3rd, expanded and completely revised ed. 1991. Berlin, Heidelberg,<br />
New York: Springer<br />
<strong>Synthes</strong> 5
Indications<br />
<strong>LCP</strong> <strong>Dia</strong>-<strong>Meta</strong> <strong>Volar</strong> <strong>Distal</strong> <strong>Radius</strong> <strong>Plates</strong> are indicated for<br />
fractures, osteotomies, and nonunions of the radius.<br />
6 <strong>Synthes</strong> <strong>LCP</strong> <strong>Dia</strong>-<strong>Meta</strong> <strong>Volar</strong> <strong>Distal</strong> <strong>Radius</strong> <strong>Plates</strong> Technique Guide
Clinical Cases<br />
Case 1<br />
– 61-year-old female, distal radius fracture<br />
– Used a 7-hole shaft dia-meta plate<br />
Preoperative AP Preoperative lateral Postoperative AP Postoperative lateral<br />
Case 2<br />
– 19-year-old male, gunshot wound<br />
– Good bone quality<br />
– Used a 9-hole shaft dia-meta plate<br />
Preoperative AP Preoperative lateral Postoperative AP Postoperative lateral<br />
<strong>Synthes</strong> 7
Clinical Cases<br />
Case 3<br />
– 81-year-old female, cycling accident<br />
– Used a 7-hole shaft dia-meta plate with DBX<br />
Preoperative AP Preoperative lateral Postoperative AP Postoperative lateral<br />
8 <strong>Synthes</strong> <strong>LCP</strong> <strong>Dia</strong>-<strong>Meta</strong> <strong>Volar</strong> <strong>Distal</strong> <strong>Radius</strong> <strong>Plates</strong> Technique Guide
Contour Plate (Optional)<br />
1<br />
Instruments<br />
329.040 Bending Iron for <strong>Plates</strong> 2.4 to 3.5,<br />
length 145 mm<br />
and<br />
329.050 Bending Iron for <strong>Plates</strong> 2.4 to 3.5,<br />
length 145 mm<br />
329.150* Bending Pliers for <strong>Plates</strong> 2.4 to 4.0,<br />
length 230 mm<br />
If necessary, carefully contour the plate to fit the patient’s<br />
radial anatomy using the bending irons or bending pliers.<br />
Be careful to avoid overbending of the plate which could<br />
cause damage to the plate threads.<br />
* Also available<br />
10 <strong>Synthes</strong> <strong>LCP</strong> <strong>Dia</strong>-<strong>Meta</strong> <strong>Volar</strong> <strong>Distal</strong> <strong>Radius</strong> <strong>Plates</strong> Technique Guide
Position Patient and Approach<br />
2<br />
Position patient<br />
Place the patient in the supine position with the hand and<br />
arm on a hand table, preferably radiolucent for fluoroscopic<br />
imaging. The elbow should be fully extended and in full<br />
supination. 2<br />
3<br />
Approach<br />
Make a longitudinal incision slightly radial to the flexor carpi<br />
radialis tendon (FCR). Dissect between the FCR and the radial<br />
artery, exposing the pronator quadratus. Detach the pronator<br />
quadratus from the lateral border of the radius and elevate it<br />
toward the ulna. The incision can be extended proximally<br />
depending on the fracture pattern and length of plate used.<br />
To get better exposure of the radius, it is helpful to pronate<br />
the forearm. 2<br />
Important: Leave the <strong>volar</strong> wrist capsule intact to avoid<br />
devascularization of the fracture fragments and destabilization<br />
of the <strong>volar</strong> wrist ligaments.<br />
2 Ruedi TP, Buckley RE, Moran CG (2002) AO Principles of Fracture Management,<br />
2nd Edition. New York: Thieme: 348<br />
<strong>Synthes</strong> 11
Reduce Fracture<br />
4<br />
Reduce fracture and position plate<br />
Instruments<br />
310.250 Drill Bit � 2.5 mm, length 110/85 mm,<br />
2-flute, for Quick Coupling<br />
323.360 Universal Drill Guide 3.5<br />
319.010 Depth Gauge for Screws � 2.7 to 4.0 mm,<br />
measuring range up to 60 mm<br />
314.020 Screwdriver, hexagonal, small,<br />
with Holding Sleeve<br />
After reducing the fracture, apply the plate to fit the <strong>volar</strong><br />
surface and insert a 3.5 mm cortex screw into the first appropriate<br />
elongated combi-hole.<br />
Drill for a 3.5 mm cortex screw.<br />
Insert a 3.5 mm cortex screw in the nonthreaded portion of<br />
an elongated combi-hole.<br />
Adjust the plate as necessary and tighten the screw.<br />
Note: The fracture pattern will dictate the appropriate site<br />
for this first screw.<br />
12 <strong>Synthes</strong> <strong>LCP</strong> <strong>Dia</strong>-<strong>Meta</strong> <strong>Volar</strong> <strong>Distal</strong> <strong>Radius</strong> <strong>Plates</strong> Technique Guide
Insert Proximal Screws<br />
5<br />
Insert proximal screws<br />
Instruments<br />
310.250 Drill Bit � 2.5 mm, length 110/85 mm,<br />
2-flute, for Quick Coupling<br />
310.288 Drill Bit � 2.8 mm, length 165 mm, for<br />
Quick Coupling<br />
323.360 Universal Drill Guide 3.5<br />
312.648 <strong>LCP</strong> Drill Sleeve 3.5, for Drill Bits � 2.8 mm<br />
319.010 Depth Gauge for Screws � 2.7 to 4.0 mm,<br />
measuring range up to 60 mm<br />
311.431 Handle with Quick Coupling<br />
314.116 Screwdriver Shaft Stardrive 3.5, T15,<br />
self-holding, for Quick Coupling<br />
314.036 Screwdriver Shaft 2.5, hexagonal, self-holding<br />
511.773 Torque Limiter, 1.5 Nm, for Quick Coupling<br />
Determine where 3.5 mm locking or 3.5 mm cortex screws<br />
will be used in the shaft of the plate. Insert these screws as<br />
needed, according to the fracture pattern. If a combination<br />
of locking and cortex screws is planned, a cortex screw<br />
should be used first to pull the plate to the bone.<br />
Drill for a 3.5 mm cortex screw using the 2.5 mm drill bit,<br />
with the 3.5 mm universal drill guide. Use the hexagonal<br />
screwdriver to insert the screw.<br />
3.5 mm locking screws may be placed in the threaded portion<br />
of the combi-hole. Drill using the 2.8 mm drill bit with<br />
the 2.8 mm threaded drill guide. Use the 3.5 T15 Stardrive<br />
screwdriver to insert the locking screws.<br />
Note: Use the 1.5 Nm torque limiter to insert the 3.5 mm<br />
proximal locking screws.<br />
<strong>Synthes</strong> 13
Insert <strong>Distal</strong> Screws<br />
6<br />
Insert distal screws and confirm joint reconstruction<br />
Instruments<br />
310.509 Drill Bit � 1.8 mm, with marking, length<br />
110/85 mm, 2-flute, for Quick Coupling<br />
323.029 <strong>LCP</strong> Drill Sleeve 2.4, with Scale up to 30 mm,<br />
for Drill Bits � 1.8 mm<br />
311.430 Handle with Quick Coupling, length 110 mm<br />
314.467 Screwdriver Shaft, Stardrive, T8, self-holding<br />
319.005 Depth Gauge for Screws � 2.0 and 2.4 mm,<br />
measuring range up to 40 mm<br />
Insert 2.4 mm locking screws into the distal portion (head) of<br />
the plate. The order of screw insertion in the metaphysis may<br />
vary depending on the fracture pattern and reduction technique.<br />
Verify plate and distal screw location with the drill bit<br />
or K-wires before inserting multiple screws.<br />
Technique tip: Use the 0.8 Nm torque limiter to insert the<br />
2.4 mm distal locking screws.<br />
Optional instruments<br />
511.776 Torque Limiter, 0.8 Nm, with Quick Coupling<br />
14 <strong>Synthes</strong> <strong>LCP</strong> <strong>Dia</strong>-<strong>Meta</strong> <strong>Volar</strong> <strong>Distal</strong> <strong>Radius</strong> <strong>Plates</strong> Technique Guide
Alternative instrument<br />
323.035* <strong>LCP</strong> Drill Sleeve 2.4, short, for Drill Bits<br />
� 1.8 mm, for <strong>LCP</strong> <strong>Distal</strong> <strong>Radius</strong> <strong>Plates</strong><br />
The short 2.4 mm threaded drill guide can also be used in<br />
the distal locking holes. Use of the short, threaded drill guide<br />
allows drill guides to be inserted in all four distal locking<br />
holes simultaneously.<br />
Drill for a 2.4 mm locking screw using the 1.8 mm drill bit,<br />
with a 2.4 mm threaded drill guide. Use the T8 Stardrive<br />
screwdriver to insert the screw.<br />
Confirm proper joint reconstruction, screw placement and<br />
screw length using multiple C-arm views. To assure the most<br />
distal screws are not in the joint, use additional views such as<br />
10° tilted PA, 20° inclined lateral, and 45° pronated oblique.<br />
* Also available<br />
7<br />
Close incision<br />
Use the appropriate method for surgical closure of the<br />
incision.<br />
<strong>Synthes</strong> 15
Bone Void Filler Insertion (Optional)<br />
Implant Removal<br />
Optional bone void filler insertion<br />
Determine if there is a bone void that requires filling to maintain<br />
reduction and aid in bone healing. Use autogenous<br />
bone graft or a synthetic bone graft or allograft product (see<br />
page 4).<br />
Implant removal<br />
To remove locking screws, unlock all screws from the plate<br />
and then begin to remove the screws completely from the<br />
bone. This avoids rotation of the plate when removing the<br />
last locking screw.<br />
16 <strong>Synthes</strong> <strong>LCP</strong> <strong>Dia</strong>-<strong>Meta</strong> <strong>Volar</strong> <strong>Distal</strong> <strong>Radius</strong> <strong>Plates</strong> Technique Guide
Screws Used with the <strong>LCP</strong> <strong>Dia</strong>-<strong>Meta</strong><br />
<strong>Volar</strong> <strong>Distal</strong> <strong>Radius</strong> <strong>Plates</strong><br />
(Stainless Steel and Titanium)<br />
2.4 mm locking screws, Stardrive<br />
– For use in distal (head) round locking holes only<br />
– Threaded, conical head locks securely into the plate to<br />
provide angular stability<br />
– Locked screws allow unicortical screw fixation and load<br />
transfer to the near cortex<br />
– T8 Stardrive recess mates with self-retaining screwdriver<br />
– Stardrive recess provides improved torque transmission<br />
– Self-tapping<br />
– Implant-quality 316L stainless steel or titanium alloy<br />
(Ti-6Al-7Nb)<br />
– 6 mm–30 mm lengths (2 mm increments)<br />
3.5 mm locking screws, Stardrive or hex<br />
– For use in the locking portion of combi-holes in<br />
the plate shaft<br />
– Threaded, conical head locks securely into the plate<br />
to provide angular stability<br />
– Locked screws allow unicortical screw fixation and load<br />
transfer to the near cortex<br />
– T15 Stardrive or hex recess mates with self-retaining screwdriver<br />
and provides improved torque transmission<br />
– Self-tapping<br />
– Implant-quality 316L stainless steel or titanium alloy<br />
(Ti-6Al-7Nb)<br />
– 10 mm–30 mm lengths (2 mm increments)<br />
3.5 mm cortex screws, hex<br />
– For use in nonlocking portion of combi-holes in<br />
the plate shaft<br />
– Used to provide compression or neutral fixation<br />
– Self-tapping<br />
– Implant-quality 316L stainless steel or titanium alloy<br />
(Ti-6Al-7Nb)<br />
– 10 mm–30 mm lengths (2 mm increments)<br />
X = 2 for stainless steel<br />
X = 4 for titanium<br />
X12.806 – X12.830<br />
X12.101– X12.111<br />
X13.010– X13.030<br />
X04.810 – X04.830<br />
<strong>Synthes</strong> 17
Implants<br />
Left plates<br />
<strong>LCP</strong> <strong>Dia</strong>-<strong>Meta</strong> <strong>Volar</strong> <strong>Distal</strong> <strong>Radius</strong> <strong>Plates</strong><br />
<strong>Plates</strong> are available in stainless steel or pure titanium.<br />
Sterile versions only.<br />
5 holes shaft, left,<br />
approximate overall<br />
length: 95 mm<br />
(0x.110.105S)<br />
x = 2 for stainless steel<br />
x = 4 for CP titanium<br />
7 holes shaft, left,<br />
approximate overall<br />
length: 125 mm<br />
(0x.110.107S)<br />
9 holes shaft, left,<br />
approximate overall<br />
length: 154 mm<br />
(0x.110.109S)<br />
11 holes shaft, left,<br />
approximate overall<br />
length: 184 mm<br />
(0x.110.111S)<br />
13 holes shaft, left,<br />
approximate overall<br />
length: 212 mm<br />
(0x.110.113S)<br />
18 <strong>Synthes</strong> <strong>LCP</strong> <strong>Dia</strong>-<strong>Meta</strong> <strong>Volar</strong> <strong>Distal</strong> <strong>Radius</strong> <strong>Plates</strong> Technique Guide<br />
15 holes shaft, left,<br />
approximate overall<br />
length: 240 mm<br />
(0x.110.115S)
Right plates<br />
7 holes shaft, right,<br />
approximate overall<br />
length: 125 mm<br />
(0x.110.007S)<br />
9 holes shaft, right,<br />
approximate overall<br />
length: 154 mm<br />
(0x.110.009S)<br />
11 holes shaft, right,<br />
approximate overall<br />
length: 184 mm<br />
(0x.110.011S)<br />
13 holes shaft, right,<br />
approximate overall<br />
length: 212 mm<br />
(0x.110.013S)<br />
15 holes shaft, right,<br />
approximate overall<br />
length: 240 mm<br />
(0x.110.015S)<br />
5 holes shaft, right,<br />
approximate overall<br />
length: 95 mm<br />
(0x.110.005S)<br />
<strong>Synthes</strong> 19
Required 3.5 mm <strong>LCP</strong> Small Fragment<br />
Instruments<br />
310.250 Drill Bit � 2.5 mm, length 110/85 mm,<br />
2-flute, for Quick Coupling<br />
310.288 Drill Bit � 2.8 mm, length 165 mm,<br />
for Quick Coupling<br />
311.430 Handle with Quick Coupling,<br />
length 110 mm<br />
311.431 Handle with Quick Coupling<br />
312.648 <strong>LCP</strong> Drill Sleeve 3.5, for Drill Bits � 2.8 mm<br />
314.020 Screwdriver, hexagonal, small,<br />
with Holding Sleeve<br />
319.010 Depth Gauge for Screws � 2.7 to 4.0 mm,<br />
measuring range up to 60 mm<br />
20 <strong>Synthes</strong> <strong>LCP</strong> <strong>Dia</strong>-<strong>Meta</strong> <strong>Volar</strong> <strong>Distal</strong> <strong>Radius</strong> <strong>Plates</strong> Technique Guide
323.360 Universal Drill Guide 3.5<br />
329.040 Bending Iron for <strong>Plates</strong> 2.4 to 3.5,<br />
length 145 mm<br />
329.050 Bending Iron for <strong>Plates</strong> 2.4 to 3.5,<br />
length 145 mm<br />
511.773 Torque Limiter, 1.5 Nm, for Quick Coupling<br />
314.036 Screwdriver Shaft 2.5, hexagonal,<br />
self-holding<br />
314.116 Screwdriver Shaft Stardrive 3.5, T15,<br />
self-holding, for Quick Coupling<br />
Note: All of these instruments are available in any 3.5 mm<br />
<strong>LCP</strong> Small Fragment Set<br />
<strong>Synthes</strong> 21
Required 2.4 mm <strong>LCP</strong> Instruments<br />
310.509 Drill Bit � 1.8 mm, with marking, length<br />
110/85 mm, 2-flute, for Quick Coupling<br />
314.467 Screwdriver Shaft, Stardrive, T8,<br />
self-holding<br />
319.005 Depth Gauge for Screws � 2.0 and<br />
2.4 mm, measuring range up to 40 mm<br />
323.029 <strong>LCP</strong> Drill Sleeve 2.4, with Scale up to<br />
30 mm, for Drill Bits � 1.8 mm<br />
22 <strong>Synthes</strong> <strong>LCP</strong> <strong>Dia</strong>-<strong>Meta</strong> <strong>Volar</strong> <strong>Distal</strong> <strong>Radius</strong> <strong>Plates</strong> Technique Guide
Optional instruments<br />
323.035 <strong>LCP</strong> Drill Sleeve 2.4, short, for Drill Bits<br />
� 1.8 mm, for <strong>LCP</strong> <strong>Distal</strong> <strong>Radius</strong> <strong>Plates</strong><br />
511.776 Torque Limiter, 0.8 Nm, with Quick<br />
Coupling<br />
329.150 Bending Pliers for <strong>Plates</strong> 2.4 to 4.0,<br />
length 230 mm<br />
Note: All of these instruments are available in the 2.4 mm<br />
<strong>LCP</strong> <strong>Distal</strong> <strong>Radius</strong> Set<br />
<strong>Synthes</strong> 23
Ö036.000.844öAALä<br />
0123<br />
Presented by: 036.000.844<br />
SE_151889 AA 30080017 © 05/2008 <strong>Synthes</strong>, Inc. or its affiliates All rights reserved <strong>Synthes</strong>, <strong>LCP</strong> and Stardrive are trademarks of <strong>Synthes</strong>, Inc. or its affiliates