
You also want an ePaper? Increase the reach of your titles
YUMPU automatically turns print PDFs into web optimized ePapers that Google loves.
<strong>LaCie</strong> hard disk MAX • DESIGN BY NEIL POULTON RAID<br />
<strong>Manual</strong> <strong>de</strong> Usuario página 28<br />
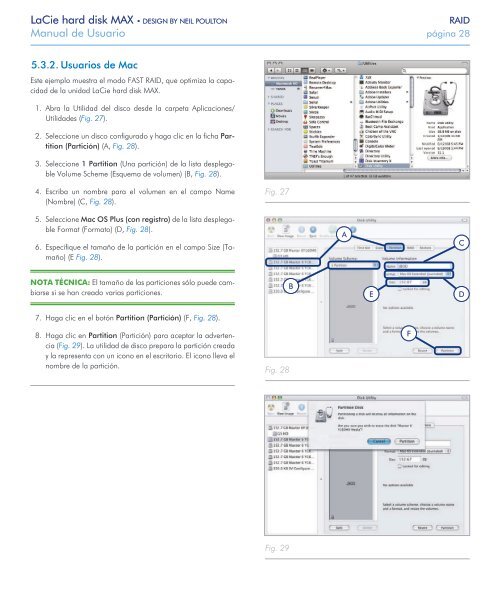
5.3.2. Usuarios <strong>de</strong> Mac<br />
Este ejemplo muestra el modo FAST RAID, que optimiza la capacidad<br />
<strong>de</strong> la unidad <strong>LaCie</strong> hard disk MAX.<br />
1. Abra la Utilidad <strong>de</strong>l disco <strong>de</strong>s<strong>de</strong> la carpeta Aplicaciones/<br />
Utilida<strong>de</strong>s (Fig. 27).<br />
2. Seleccione un disco configurado y haga clic en la ficha Partition<br />
(Partición) (A, Fig. 28).<br />
3. Seleccione 1 Partition (Una partición) <strong>de</strong> la lista <strong>de</strong>splegable<br />
Volume Scheme (Esquema <strong>de</strong> volumen) (B, Fig. 28).<br />
4. Escriba un nombre para el volumen en el campo Name<br />
(Nombre) (C, Fig. 28).<br />
5. Seleccione Mac OS Plus (con registro) <strong>de</strong> la lista <strong>de</strong>splegable<br />
Format (Formato) (D, Fig. 28).<br />
6. Especifique el tamaño <strong>de</strong> la partición en el campo Size (Tamaño)<br />
(E Fig. 28).<br />
NOTA TÉCNICA: El tamaño <strong>de</strong> las particiones sólo pue<strong>de</strong> cambiarse<br />
si se han creado varias particiones.<br />
7. Haga clic en el botón Partition (Partición) (F, Fig. 28).<br />
8. Haga clic en Partition (Partición) para aceptar la advertencia<br />
(Fig. 29). La utilidad <strong>de</strong> disco prepara la partición creada<br />
y la representa con un icono en el escritorio. El icono lleva el<br />
nombre <strong>de</strong> la partición.<br />
Fig. 27<br />
Fig. 28<br />
B<br />
Fig. 29<br />
A<br />
E<br />
F<br />
C<br />
D