Injection Arm - 3B Scientific
Injection Arm - 3B Scientific
Injection Arm - 3B Scientific

Create successful ePaper yourself
Turn your PDF publications into a flip-book with our unique Google optimized e-Paper software.
<strong>Injection</strong> <strong>Arm</strong><br />
English<br />
Congratulations on the product you have chosen. The injection arm is made of <strong>3B</strong> SKINlike TM silicone and is<br />
extremely durable. The injection arm can be used to train intravenous injections, punctures of the peripheral<br />
veins [basilic v., cephalic v., median cubital v., hand (dorsal venous network)].<br />
Accessories:<br />
• 1 injection arm<br />
• 1 infusion bottle<br />
• 1 suspension net<br />
• 1 rubber cork<br />
• 1 infusion system with air filter<br />
• 1 stand (with 2 height-adjustable hanging devices)<br />
• 1 bottle of artificial blood<br />
• 1 cup<br />
• 1 disposable syringe<br />
• 2 injection cannulas (recommended cannula size: 20 and 21 gauge)<br />
• 2 tubing systems with (white) sealing caps as replacement parts<br />
• 4 (white) sealing caps as replacement parts<br />
• 1 can of talcum powder<br />
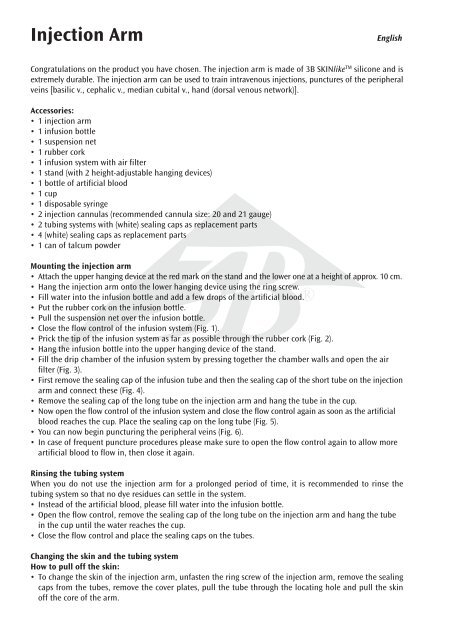
Mounting the injection arm<br />
• Attach the upper hanging device at the red mark on the stand and the lower one at a height of approx. 10 cm.<br />
• Hang the injection arm onto the lower hanging device using the ring screw.<br />
• Fill water into the infusion bottle and add a few drops of the artificial blood. ®<br />
• Put the rubber cork on the infusion bottle.<br />
• Pull the suspension net over the infusion bottle.<br />
• Close the flow control of the infusion system (Fig. 1).<br />
• Prick the tip of the infusion system as far as possible through the rubber cork (Fig. 2).<br />
• Hang the infusion bottle into the upper hanging device of the stand.<br />
• Fill the drip chamber of the infusion system by pressing together the chamber walls and open the air<br />
filter (Fig. 3).<br />
• First remove the sealing cap of the infusion tube and then the sealing cap of the short tube on the injection<br />
arm and connect these (Fig. 4).<br />
• Remove the sealing cap of the long tube on the injection arm and hang the tube in the cup.<br />
• Now open the flow control of the infusion system and close the flow control again as soon as the artificial<br />
blood reaches the cup. Place the sealing cap on the long tube (Fig. 5).<br />
• You can now begin puncturing the peripheral veins (Fig. 6).<br />
• In case of frequent puncture procedures please make sure to open the flow control again to allow more<br />
artificial blood to flow in, then close it again.<br />
Rinsing the tubing system<br />
When you do not use the injection arm for a prolonged period of time, it is recommended to rinse the<br />
tubing system so that no dye residues can settle in the system.<br />
• Instead of the artificial blood, please fill water into the infusion bottle.<br />
• Open the flow control, remove the sealing cap of the long tube on the injection arm and hang the tube<br />
in the cup until the water reaches the cup.<br />
• Close the flow control and place the sealing caps on the tubes.<br />
Changing the skin and the tubing system<br />
How to pull off the skin:<br />
• To change the skin of the injection arm, unfasten the ring screw of the injection arm, remove the sealing<br />
caps from the tubes, remove the cover plates, pull the tube through the locating hole and pull the skin<br />
off the core of the arm.