Van de Graaff Generator with Discharge Electrode (115 V, 50/60 Hz)
Van de Graaff Generator with Discharge Electrode (115 V, 50/60 Hz)
Van de Graaff Generator with Discharge Electrode (115 V, 50/60 Hz)

You also want an ePaper? Increase the reach of your titles
YUMPU automatically turns print PDFs into web optimized ePapers that Google loves.
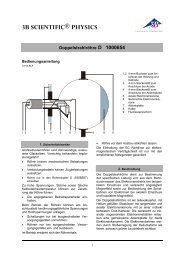
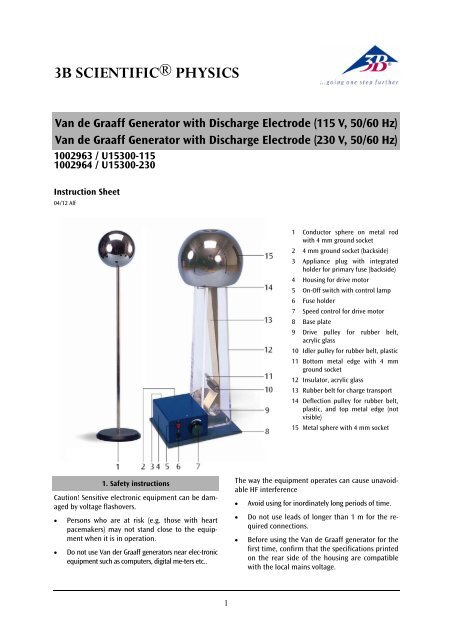
3B SCIENTIFIC® PHYSICS<strong>Van</strong> <strong>de</strong> <strong>Graaff</strong> <strong>Generator</strong> <strong>with</strong> <strong>Discharge</strong> Electro<strong>de</strong> (<strong>115</strong> V, <strong>50</strong>/<strong>60</strong> <strong>Hz</strong>)<strong>Van</strong> <strong>de</strong> <strong>Graaff</strong> <strong>Generator</strong> <strong>with</strong> <strong>Discharge</strong> Electro<strong>de</strong> (230 V, <strong>50</strong>/<strong>60</strong> <strong>Hz</strong>)1002963 / U15300-<strong>115</strong>1002964 / U15300-230Instruction Sheet04/12 Alf1 Conductor sphere on metal rod<strong>with</strong> 4 mm ground socket2 4 mm ground socket (backsi<strong>de</strong>)3 Appliance plug <strong>with</strong> integratedhol<strong>de</strong>r for primary fuse (backsi<strong>de</strong>)4 Housing for drive motor5 On-Off switch <strong>with</strong> control lamp6 Fuse hol<strong>de</strong>r7 Speed control for drive motor8 Base plate9 Drive pulley for rubber belt,acrylic glass10 Idler pulley for rubber belt, plastic11 Bottom metal edge <strong>with</strong> 4 mmground socket12 Insulator, acrylic glass13 Rubber belt for charge transport14 Deflection pulley for rubber belt,plastic, and top metal edge (notvisible)15 Metal sphere <strong>with</strong> 4 mm socket1. Safety instructionsCaution! Sensitive electronic equipment can be damagedby voltage flashovers.• Persons who are at risk (e.g. those <strong>with</strong> heartpacemakers) may not stand close to the equipmentwhen it is in operation.• Do not use <strong>Van</strong> <strong>de</strong>r <strong>Graaff</strong> generators near elec-tronicequipment such as computers, digital me-ters etc..The way the equipment operates can cause unavoidableHF interference• Avoid using for inordinately long periods of time.• Do not use leads of longer than 1 m for the requiredconnections.• Before using the <strong>Van</strong> <strong>de</strong> <strong>Graaff</strong> generator for thefirst time, confirm that the specifications printedon the rear si<strong>de</strong> of the housing are compatible<strong>with</strong> the local mains voltage.1
• Only use in dry rooms where there is no risk ofexplosion.• Do not operate the machine if there is any visibledamage.• The instrument may only be connected to themains via a socket that has an earth connection.• Assemble circuits completely before switching onthe <strong>Van</strong> <strong>de</strong> <strong>Graaff</strong> generator.• Do not touch the circuits while running the generator.• Replace a faulty fuse only <strong>with</strong> one matching thespecifications stated at the rear of the housing.• Disconnect the equipment from the mains beforereplacing a fuse.• Never short the fuse or the fuse hol<strong>de</strong>r.2. DescriptionThe <strong>Van</strong> <strong>de</strong> <strong>Graaff</strong> generator serves as a electrostaticcharge generator for high DC voltages (up to 100 kVif the experimental conditions are i<strong>de</strong>al) <strong>with</strong> lowcurrent (not contact hazardous) for numerous experimentsin the area of electrostatics.The <strong>Van</strong> <strong>de</strong> <strong>Graaff</strong> generator is ma<strong>de</strong> up of a baseplate on which the drive motor <strong>with</strong> controllablespeed and the acrylic glass insulator are mounted.The <strong>de</strong>tachable metal sphere <strong>with</strong> 4 mm socket, fortapping voltage, is mounted on the insulator. Therubber belt runs between the drive pulley and the<strong>de</strong>flection pulley. The <strong>de</strong>flection pulley and the topmetal edge are height adjustable (only required forretensioning the rubber belt). The metal edge isconnected to the metal rod on which the sphere ismounted. The idler pulley and the bottom metaledge <strong>with</strong> 4-mm socket are located above the drivepulley. The conductor sphere on metal rod is used to<strong>de</strong>monstrate the flashover.The <strong>Van</strong> <strong>de</strong> <strong>Graaff</strong> <strong>Generator</strong> 1002963 / U15300-<strong>115</strong>is for operation <strong>with</strong> a mains voltage of <strong>115</strong> V (±10%),and the 1002964 / U15300-230 unit is for operation<strong>with</strong> a mains voltage of 230 V (±10%).1 <strong>Van</strong> <strong>de</strong> <strong>Graaff</strong> generator1 Condutor sphere on rod1 Mains power lead1 Dust cover3. Equipment suppliedRubber Belt for<strong>Van</strong> <strong>de</strong> <strong>Graaff</strong> <strong>Generator</strong>4. Spare parts5. Technical data1002965 / U15301Voltage:up to approx. 100 kVShort circuit current: 15 µADrive motor:Mains connection: <strong>115</strong> V, <strong>50</strong>/<strong>60</strong> <strong>Hz</strong> resp.230 V, <strong>50</strong>/<strong>60</strong> <strong>Hz</strong>Power consumption: 13 VAPrimary protection: fuse T 1<strong>60</strong> mADimensions:<strong>Generator</strong>: 240 x 190 x 620 mm 3Metal sphere: 190 mm dia.Conductor:90 mm dia.Height:4<strong>60</strong> mmWeight:<strong>Generator</strong>:5.8 kgConductor:0.5 kg6. Operation6.1 General informationThe performance of a <strong>Van</strong> <strong>de</strong>r <strong>Graaff</strong> generator canbe adversely affected by humidity, sud<strong>de</strong>n temperaturefluctuations (precipitation) or dirt. To keep themachine working properly, all dirt (dust or grease,e.g. fingerprints) must be removed from the si<strong>de</strong>walls, the spheres, the rollers and the rubber belt.• Before switching on the <strong>Van</strong> <strong>de</strong> <strong>Graaff</strong> generatorremove the metal sphere by lifting it straight up.• Clean the surface of the pulleys <strong>with</strong> warm waterand some dish washing liquid and dry themthoroughly (<strong>with</strong> a hair dryer). Never use solvents.• Align the metal edges as shown in Fig. 1. Positionthem as close to the belt as possible <strong>with</strong>outtouching it.• Put the metal sphere back on.• Ground the sockets at the bottom metal edgeand the conductor.• Switch on the drive motor and choose the drivespeed.• Move the conductor slowly to the metal sphereto <strong>de</strong>monstrate charge balancing across a sparkgap.• In case of high humidity dry the <strong>Van</strong> <strong>de</strong> <strong>Graaff</strong>generator <strong>with</strong> warm air (hair dryer).2
6.2 Replacing the primary fuse• Pull the mains plug.• Pry out the insert <strong>with</strong> hol<strong>de</strong>r for the primaryfuse and spare fuse <strong>with</strong> a broad screw driver.• Check the data plate on base plate and replace<strong>de</strong>fective fuse using the spare fuse in the hol<strong>de</strong>r.• Place a new fuse in the hol<strong>de</strong>r for the spare fuse.• Put the insert back into its place.6.3 Retensioning the rubber belt• Remove the metal sphere by lifting it straightup.• Loosen Phillips-head screws and retension therubber belt by moving the bracket for the <strong>de</strong>flectionpulley.• Retighten the screws, align the metal edges andmount the metal sphere.214Fig.1 Positioning the edges (1 Idler pulley, 2 Bottom metaledge, 3 Top metal edge, 4 Deflection pulley)37. Storage and maintenance• Clean the van <strong>de</strong> <strong>Graaff</strong> generator <strong>with</strong> warmwater and some dish washing liquid and dry itthoroughly (<strong>with</strong> a hair dryer). Never use solvents.• In case the generator is not in use for a longerperiod of time, remove the rubber belt and storeit in a dark place.• Store the <strong>Van</strong> <strong>de</strong> <strong>Graaff</strong> generator at a dry placeand always cover it <strong>with</strong> the dust cover. Do notexpose the generator to direct heat sources (sun,radiator).4533218. Rectifying errors leading to insufficient chargingFig. 2 Retensioning the rubber belt (1 Rubber belt, 2 Deflectionpulley, 3 Phillips-head screws, 4 Bracket for <strong>de</strong>flectionpulley, 5 Top metal edge)CauseDampDirtMetal edgepositionsJud<strong>de</strong>ring ofthe beltMeasuresDry out the generator <strong>with</strong> dry air(e.g. using a hair dryer).Rollers, insulators, conductorspheres and rubber belt should becleaned and then dried.Check the metal edges. Set themup as close as possible to the belt<strong>with</strong>out actually touching itTighten up the belt as <strong>de</strong>scribedun<strong>de</strong>r 6.3.9. Disposal• The packaging should be disposed of at localrecycling points.• Should you need to dispose of the equipmentitself, never throw it away in normal domesticwaste. Local regulations for the disposal of electricalequipment will apply.3B Scientific GmbH • Rudorffweg 8 • 21031 Hamburg • Germany • www.3bscientific.comSubject to technical amendments© Copyright 2012 3B Scientific GmbH