

Submerged Area/Velocity Sensor and AV9000 Area ... - Hachflow
Submerged Area/Velocity Sensor and AV9000 Area ... - Hachflow
Submerged Area/Velocity Sensor and AV9000 Area ... - Hachflow

Create successful ePaper yourself
Turn your PDF publications into a flip-book with our unique Google optimized e-Paper software.
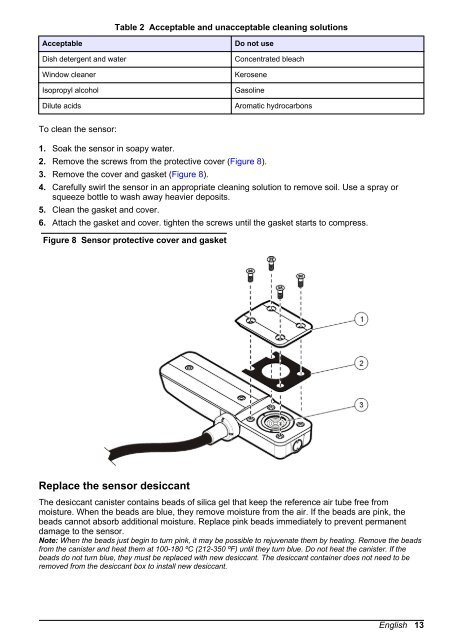
Table 2 Acceptable <strong>and</strong> unacceptable cleaning solutionsAcceptableDish detergent <strong>and</strong> waterWindow cleanerIsopropyl alcoholDilute acidsDo not useConcentrated bleachKeroseneGasolineAromatic hydrocarbonsTo clean the sensor:1. Soak the sensor in soapy water.2. Remove the screws from the protective cover (Figure 8).3. Remove the cover <strong>and</strong> gasket (Figure 8).4. Carefully swirl the sensor in an appropriate cleaning solution to remove soil. Use a spray orsqueeze bottle to wash away heavier deposits.5. Clean the gasket <strong>and</strong> cover.6. Attach the gasket <strong>and</strong> cover. tighten the screws until the gasket starts to compress.Figure 8 <strong>Sensor</strong> protective cover <strong>and</strong> gasketReplace the sensor desiccantThe desiccant canister contains beads of silica gel that keep the reference air tube free frommoisture. When the beads are blue, they remove moisture from the air. If the beads are pink, thebeads cannot absorb additional moisture. Replace pink beads immediately to prevent permanentdamage to the sensor.Note: When the beads just begin to turn pink, it may be possible to rejuvenate them by heating. Remove the beadsfrom the canister <strong>and</strong> heat them at 100-180 ºC (212-350 ºF) until they turn blue. Do not heat the canister. If thebeads do not turn blue, they must be replaced with new desiccant. The desiccant container does not need to beremoved from the desiccant box to install new desiccant.English 13


