Personal Space Air Cleaner - Hunter Fan
Personal Space Air Cleaner - Hunter Fan
Personal Space Air Cleaner - Hunter Fan
- No tags were found...

You also want an ePaper? Increase the reach of your titles
YUMPU automatically turns print PDFs into web optimized ePapers that Google loves.
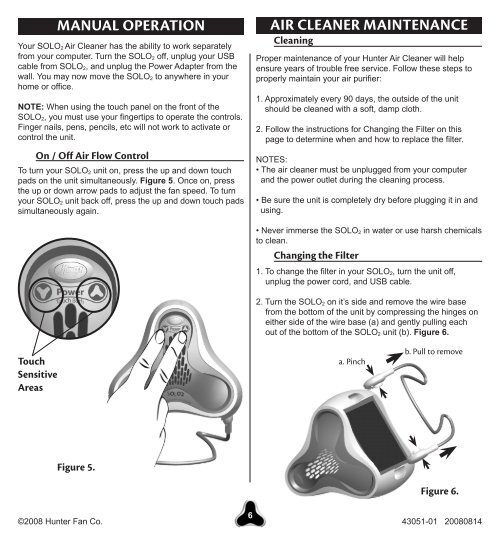
Manual OperationYour SOLO 2 <strong>Air</strong> <strong>Cleaner</strong> has the ability to work separatelyfrom your computer. Turn the SOLO 2 off, unplug your USBcable from SOLO 2, and unplug the Power Adapter from thewall. You may now move the SOLO 2 to anywhere in yourhome or office.NOTE: When using the touch panel on the front of theSOLO 2, you must use your fingertips to operate the controls.Finger nails, pens, pencils, etc will not work to activate orcontrol the unit.On / Off <strong>Air</strong> Flow ControlTo turn your SOLO 2 unit on, press the up and down touchpads on the unit simultaneously. Figure 5. Once on, pressthe up or down arrow pads to adjust the fan speed. To turnyour SOLO 2 unit back off, press the up and down touch padssimultaneously again.<strong>Air</strong> <strong>Cleaner</strong> MaintenanceCleaningProper maintenance of your <strong>Hunter</strong> <strong>Air</strong> <strong>Cleaner</strong> will helpensure years of trouble free service. Follow these steps toproperly maintain your air purifier:1. Approximately every 90 days, the outside of the unitshould be cleaned with a soft, damp cloth.2. Follow the instructions for Changing the Filter on thispage to determine when and how to replace the filter.NOTES:• The air cleaner must be unplugged from your computerand the power outlet during the cleaning process.• Be sure the unit is completely dry before plugging it in andusing.• Never immerse the SOLO 2 in water or use harsh chemicalsto clean.Changing the Filter1. To change the filter in your SOLO 2, turn the unit off,unplug the power cord, and USB cable.2. Turn the SOLO 2 on it’s side and remove the wire basefrom the bottom of the unit by compressing the hinges oneither side of the wire base (a) and gently pulling eachout of the bottom of the SOLO 2 unit (b). Figure 6.TouchSensitiveAreasa. Pinchb. Pull to removeFigure 5.Figure 6.6©2008 <strong>Hunter</strong> <strong>Fan</strong> Co. 43051-01 20080814