Kit for the maxillary sinus lift with crestal approach - Osteogenics
Kit for the maxillary sinus lift with crestal approach - Osteogenics
Kit for the maxillary sinus lift with crestal approach - Osteogenics
- No tags were found...

You also want an ePaper? Increase the reach of your titles
YUMPU automatically turns print PDFs into web optimized ePapers that Google loves.
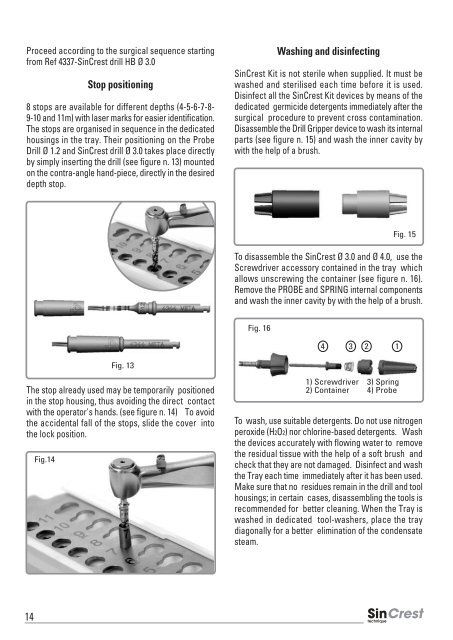
Proceed according to <strong>the</strong> surgical sequence startingfrom Ref 4337-SinCrest drill HB Ø 3.0Stop positioning8 stops are available <strong>for</strong> different depths (4-5-6-7-8-9-10 and 11m) <strong>with</strong> laser marks <strong>for</strong> easier identification.The stops are organised in sequence in <strong>the</strong> dedicatedhousings in <strong>the</strong> tray. Their positioning on <strong>the</strong> ProbeDrill Ø 1.2 and SinCrest drill Ø 3.0 takes place directlyby simply inserting <strong>the</strong> drill (see figure n. 13) mountedon <strong>the</strong> contra-angle hand-piece, directly in <strong>the</strong> desireddepth stop.Washing and disinfectingSinCrest <strong>Kit</strong> is not sterile when supplied. It must bewashed and sterilised each time be<strong>for</strong>e it is used.Disinfect all <strong>the</strong> SinCrest <strong>Kit</strong> devices by means of <strong>the</strong>dedicated germicide detergents immediately after <strong>the</strong>surgical procedure to prevent cross contamination.Disassemble <strong>the</strong> Drill Gripper device to wash its internalparts (see figure n. 15) and wash <strong>the</strong> inner cavity by<strong>with</strong> <strong>the</strong> help of a brush.Fig. 15To disassemble <strong>the</strong> SinCrest Ø 3.0 and Ø 4.0, use <strong>the</strong>Screwdriver accessory contained in <strong>the</strong> tray whichallows unscrewing <strong>the</strong> container (see figure n. 16).Remove <strong>the</strong> PROBE and SPRING internal componentsand wash <strong>the</strong> inner cavity by <strong>with</strong> <strong>the</strong> help of a brush.Fig. 16Fig. 13The stop already used may be temporarily positionedin <strong>the</strong> stop housing, thus avoiding <strong>the</strong> direct contact<strong>with</strong> <strong>the</strong> operator's hands. (see figure n. 14) To avoid<strong>the</strong> accidental fall of <strong>the</strong> stops, slide <strong>the</strong> cover into<strong>the</strong> lock position.Fig.141) Screwdriver2) Container3) Spring4) ProbeTo wash, use suitable detergents. Do not use nitrogenperoxide (H2O2) nor chlorine-based detergents. Wash<strong>the</strong> devices accurately <strong>with</strong> flowing water to remove<strong>the</strong> residual tissue <strong>with</strong> <strong>the</strong> help of a soft brush andcheck that <strong>the</strong>y are not damaged. Disinfect and wash<strong>the</strong> Tray each time immediately after it has been used.Make sure that no residues remain in <strong>the</strong> drill and toolhousings; in certain cases, disassembling <strong>the</strong> tools isrecommended <strong>for</strong> better cleaning. When <strong>the</strong> Tray iswashed in dedicated tool-washers, place <strong>the</strong> traydiagonally <strong>for</strong> a better elimination of <strong>the</strong> condensatesteam.14