Atlas OCAP 5-Device Universal Remote Control with Learning
Atlas OCAP 5-Device Universal Remote Control with Learning
Atlas OCAP 5-Device Universal Remote Control with Learning
- No tags were found...

You also want an ePaper? Increase the reach of your titles
YUMPU automatically turns print PDFs into web optimized ePapers that Google loves.
TABLE OF CONTENTSIntroduction . . . . . . . . . . . . . . . . . . . . . . . . . . . . . . . . . . . . . . . . . . . . 4Features and Functions . . . . . . . . . . . . . . . . . . . . . . . . . . . . . . . . . . . 5Key Charts. . . . . . . . . . . . . . . . . . . . . . . . . . . . . . . . . . . . . . . . . 6<strong>Device</strong> Table . . . . . . . . . . . . . . . . . . . . . . . . . . . . . . . . . . . . . . . 8Installing Batteries . . . . . . . . . . . . . . . . . . . . . . . . . . . . . . . . . . . . . . . 9Programming <strong>Device</strong> <strong>Control</strong> . . . . . . . . . . . . . . . . . . . . . . . . . . . . . . 10Setting Up a Combo Unit. . . . . . . . . . . . . . . . . . . . . . . . . . . . . . . . . . 11Searching for Your Code . . . . . . . . . . . . . . . . . . . . . . . . . . . . . . . . . 12Checking the Codes . . . . . . . . . . . . . . . . . . . . . . . . . . . . . . . . . . . . . 14Using <strong>Learning</strong> . . . . . . . . . . . . . . . . . . . . . . . . . . . . . . . . . . . . . . . . . 14<strong>Learning</strong> Precautions . . . . . . . . . . . . . . . . . . . . . . . . . . . . . . . 14Programming a Learned Key . . . . . . . . . . . . . . . . . . . . . . . . . 15Deleting a Single <strong>Learning</strong> Key. . . . . . . . . . . . . . . . . . . . . . . . 16Deleting All Learned Keys in a Specific Mode . . . . . . . . . . . . 17Programming Channel <strong>Control</strong> Lock . . . . . . . . . . . . . . . . . . . . . . . . 17Unlocking Channel <strong>Control</strong>. . . . . . . . . . . . . . . . . . . . . . . . . . . 17Locking Channel <strong>Control</strong> to CBL. . . . . . . . . . . . . . . . . . . . . . . 18Changing Volume Lock . . . . . . . . . . . . . . . . . . . . . . . . . . . . . . . . . . . 18Unlocking Volume <strong>Control</strong> for a Single <strong>Device</strong> (IndividualVolume Unlock) . . . . . . . . . . . . . . . . . . . . . . . . . . . . . . . . . 18Unlocking All Volume <strong>Control</strong> (Global Volume Unlock) . . . . . 19Locking Volume <strong>Control</strong> To One Mode (Global Volume Lock) 19Programming Cable ID Lock. . . . . . . . . . . . . . . . . . . . . . . . . . . . . . . 20Programming Macro Keys . . . . . . . . . . . . . . . . . . . . . . . . . . . . . . . . 20Programming a Macro Key. . . . . . . . . . . . . . . . . . . . . . . . . . . 21Clearing a Macro Key . . . . . . . . . . . . . . . . . . . . . . . . . . . . . . . 21Using the Master Power Key. . . . . . . . . . . . . . . . . . . . . . . . . . . . . . . 22Programming the Master Power Key . . . . . . . . . . . . . . . . . . . 22Using the Master Power Key. . . . . . . . . . . . . . . . . . . . . . . . . . 23Clearing the Master Power Key . . . . . . . . . . . . . . . . . . . . . . . 23Re-Assigning <strong>Device</strong> Keys. . . . . . . . . . . . . . . . . . . . . . . . . . . . . . . . . 23Clearing Custom Programming . . . . . . . . . . . . . . . . . . . . . . . . . . . . 24Activating Backlighting (Optional) . . . . . . . . . . . . . . . . . . . . . . . . . . 25Troubleshooting . . . . . . . . . . . . . . . . . . . . . . . . . . . . . . . . . . . . . . . . 25FCC Notice . . . . . . . . . . . . . . . . . . . . . . . . . . . . . . . . . . . . . . . . . . . . 26Additional Information . . . . . . . . . . . . . . . . . . . . . . . . . . . . . . . . . . . 27Manufacturer’s Codes (Códigos de Fabricante) . . . . . . . . . . . . . . . 57Setup Codes for Audio Amplifiers. . . . . . . . . . . . . . . . . . . . . . 57Setup Codes for Audio Receivers. . . . . . . . . . . . . . . . . . . . . . 57Setup Codes for Audio Accessories . . . . . . . . . . . . . . . . . . . . 60Setup Codes for Cable Boxes/Converters . . . . . . . . . . . . . . . 60Setup Codes for DVD Players . . . . . . . . . . . . . . . . . . . . . . . . . 62Setup Codes for DVD Recorders. . . . . . . . . . . . . . . . . . . . . . . 67Setup Codes for DVD Combos. . . . . . . . . . . . . . . . . . . . . . . . . 67Satellite Receivers and DVR/PVR Systems. . . . . . . . . . . . . . . 68www.urcsupport.com/atlasocap2
Setup Codes for Satellite Receivers . . . . . . . . . . . . . . . . . . . 68Setup Codes for TVs . . . . . . . . . . . . . . . . . . . . . . . . . . . . . . . . 70Setup Codes for TVs (DLP) . . . . . . . . . . . . . . . . . . . . . . . . . . . 78Setup Codes for TVs (HDTV) . . . . . . . . . . . . . . . . . . . . . . . . . . 78Setup Codes for TVs (LCD) . . . . . . . . . . . . . . . . . . . . . . . . . . . 81Setup Codes for TV/DVD Combos . . . . . . . . . . . . . . . . . . . . . . 81Setup Codes for TV/VCR Combos . . . . . . . . . . . . . . . . . . . . . . 82Setup Codes for TV/VCR/DVD Combos . . . . . . . . . . . . . . . . . . 84Setup Codes for VCRs. . . . . . . . . . . . . . . . . . . . . . . . . . . . . . . 85BACKLIGHTING TIPSSome <strong>Atlas</strong> <strong>OCAP</strong> models include backlighting forkeypad illumination. If you have backlighting, you willsee a light bulb on the SETUP key, as shown below.To Enable Backlighting1. Press the SETUP key twice.2. Backlighting will now turn on after any keypress.To Disable Backlighting1. Press the SETUP key twice.2. Backlighting is now off.www.urcsupport.com/atlasocap3
INTRODUCTIONThe <strong>Atlas</strong> <strong>OCAP</strong> 5-<strong>Device</strong> <strong>Remote</strong> <strong>Control</strong> <strong>with</strong> <strong>Learning</strong>by <strong>Universal</strong> Electronics is our latest generationuniversal remote control. Its sophisticated technologyallows you to consolidate up to five of your originalhome entertainment remote controls into one easy-touseproduct. Moreover, its packed <strong>with</strong> advancedfeatures such as:• Preprogrammed control to operate the cableconverter supplied by your cable service provider• Dedicated keys to control popular functions on yourDVR/PVR (Digital/Personal Video Recorder)• Programmable Master Power key for master on/offcontrol of your home entertainment equipment <strong>with</strong>a single keystroke• Programmable Macro Keys to allow you to activatecertain keys in a specific order• Channel Lock to lock channel selection only to thecable converter• Volume Lock to lock volume controls to one mode orindividual modes• <strong>Device</strong> Key Re-Assignment to remotely control asecond (duplicate) device• Code Search to help program control of older ordiscontinued components• Color-coded keys to quickly locate popularfunctions• Code library for popular video and audio devices• Backlighting (not available on all remotes)Before using the product, you will need to install theenclosed batteries and also perform some programmingto operate the specific home entertainment devices youwish to control.Please follow the instructions detailed in this manual toset up the unit and then start enjoying your new remotecontrol and cable service.www.urcsupport.com/atlasocap4
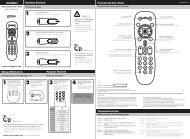
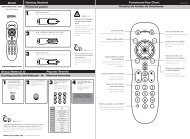
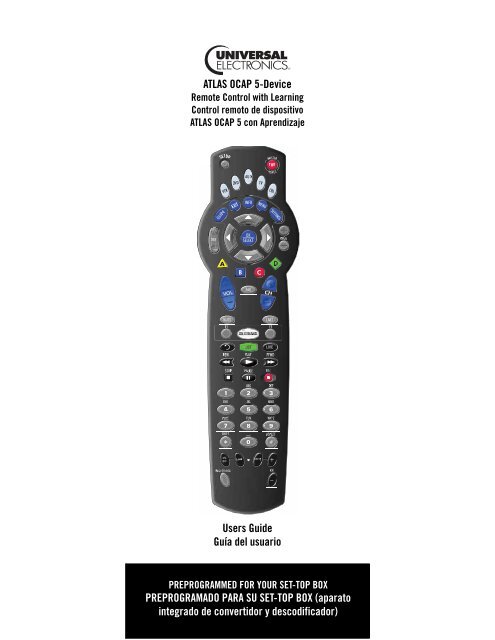
FEATURES AND FUNCTIONSUse the illustration below to locate features on the <strong>Atlas</strong><strong>OCAP</strong> 5-<strong>Device</strong> <strong>Remote</strong> <strong>Control</strong> <strong>with</strong> <strong>Learning</strong> and thenstudy the Key Charts (on the next three pages) to learnhow they function.To find out what type of devices can be controlled byeach device key after programming, see “<strong>Device</strong> Table”on page 8 .www.urcsupport.com/atlasocap5
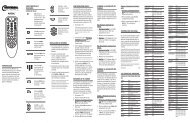
Key ChartsKeyFunctionUse SETUP for all programmingsequences. Also use to turnbacklighting on and off, if applicable.Press PWR once to turn on or off a homeentertainment device. For MASTERPOWER control, see “Using the MasterPower Key” on page 22.Press VCR, DVD, AUD, TV, or CBL once toselect a home entertainment device tocontrol. Also see “<strong>Device</strong> Table” onpage 8.Each device key has an embedded LED(red light) that blinks upon selectionand indicates the remote control isworking and (after programming) issending signals.Use GUIDE to display the programguide.Press SETTINGS once to display availableinteractive services.Use INFO to display the current channeland program information.Use DAY+ (or DAY-) to move a dayforward (or back) on your cableconverter’s program guide.Use the Cursor keys to move the cursorin the program guide and menu screensand to navigate <strong>with</strong>in the interactiveservice.Use OK/SELECT to choose options, PPVevents, and to tune to programs fromthe program guide.Use PAGE+ (or PAGE-) to page up (orpage down) through menu screens andthe program guide.Use EXIT to exit out of your cableconverters menu and guide.Use A, B, C, or D to access additionalcable features (see your cableconverter’s manual).Use VOL+ (or VOL-) to raise (or lower)the audio volume.www.urcsupport.com/atlasocap6
KeyFunctionUse FAV to cycle through your favoritechannels stored in your cable converter.Use CH+ (or CH-) to select the nexthigher (or lower) channel.For DVD players, use these keys to skipforward (or reverse) through chapters.For amplifiers/receivers, use these keysto select the next higher (or lower)preset station.Press MUTE once to turn the sound offor on.Press LAST once to recall the lastchannel.Press ON DEMAND to access Video onDemand services.Reserved for use as Macro keys (see“Programming Macro Keys” onpage 20).Use to command your PVR/DVRcable box to instantly replay the last 7seconds of a program you are watching.Press LIST once to display a list ofrecorded shows on your PVR/DVR cablebox.Press LIVE to command your PVR/DVRcable box to return to watching live TV.In all modes except CBL, use REW, PLAY,FFWD, STOP, and PAUSE to control aVCR, DVD player, or a PVR (afterselecting a desired device). To record inthe VCR mode, press REC twice.In the CBL mode, use these keys tocontrol the DVR/PVR functions of theset-top box.Use the keypad numbers (1-9, and 0) todirectly tune channels (e.g., 09).For amplifiers/receivers, use the keypadnumbers to select inputs 1 through 10.Press ASPECT once to change the aspectratio of the show you are watching. (Notavailable on all set-top boxes).www.urcsupport.com/atlasocap7
KeyFunctionPress SHIFT to access additional cablefeatures (see your cable converter’smanual).Use PIP ON-OFF to switch the Picture-In-Picture feature on or off (if availableon your TV or cable service).Use PIP SWAP to switch images andsound between the main and windowpictures (if available on your TV orcable service).Use PIP MOVE to move the window pictureto different positions in the main picture(if available on your TV or cableservice).Use PIP CH+ (or CH-) to select the nexthigher (or lower) PIP channel (ifavailable on your TV or cable service).In the CBL mode, use VIDEO SOURCE toview other video sources (A or B)instead of cable.In all TV mode, use VIDEO SOURCE towatch TV or video/DVD programs on adesired device.For amplifiers/receivers, use VIDEOSOURCE to select an input source.<strong>Device</strong> TableNOTE: Please refer to the table below whenperforming the instructions in“Programming <strong>Device</strong> <strong>Control</strong>” on page 10 or“Setting Up a Combo Unit” on page 11.After programming, the <strong>Atlas</strong> <strong>OCAP</strong> 5-<strong>Device</strong> <strong>Remote</strong><strong>Control</strong> <strong>with</strong> <strong>Learning</strong> will be able to control thefollowing types of devices:<strong>Device</strong> Key<strong>Control</strong>s these types of devicesVCR, TV/VCR Combo, PVR (PersonalVideo Recorder), or extra DVD PlayerDVD Player, or extra VCR, TV/VCRCombo or PVRAudio Amplifier, Tuner, or ReceiverTelevisionwww.urcsupport.com/atlasocap8
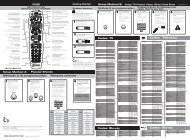
<strong>Device</strong> Key<strong>Control</strong>s these types of devicesINSTALLING BATTERIESCable Box (Converter) or SatelliteReceiver❶❷❸1. On the back of the remote control, push thetab and lift off the battery cover.2. Locate the two (2) enclosed AA batteries.Match the + and - marks <strong>with</strong> those in thebattery case, then insert them.3. Align the covers keys <strong>with</strong> the cases holes andpress the cover back into place. The tab shouldclick when the cover is locked.4. Test the remote control by pressing any modekey (e.g., TV). If the batteries are insertedcorrectly, the LED (red light) will blink once.NOTE:When batteries need replacement, the remotecontrol will cease to operate. Replace thebatteries and the unit will be restored to itsfull functionality, complete <strong>with</strong> your favoritesettings.www.urcsupport.com/atlasocap9
PROGRAMMING DEVICE CONTROLThe <strong>Atlas</strong> <strong>OCAP</strong> 5-<strong>Device</strong> <strong>Remote</strong> <strong>Control</strong> <strong>with</strong> <strong>Learning</strong>is preprogrammed to operate the cable box (converter)provided by your cable system, an RCA TV, a ToshibaDVD player, an RCA VCR, and a Pioneer audio receiver.To control devices other than the default brands,perform the following steps; otherwise skip this section.NOTES: For control of a Combo device (for example, aTV/VCR combo), skip this section and performthe instructions on “Setting Up a ComboUnit” on page 11. Also refer to “<strong>Device</strong> Table”on page 8 to find out which devices can beprogrammed onto each device key.If you have another brand of cable converteror a satellite receiver you would like to control,you’ll need to unlock the cable ID Lock beforechanging the converter code (see “ProgrammingCable ID Lock” on page 20).1. Turn on a device and, if applicable, insertvideo media, (e.g., cassette or disc).NOTE: Please read steps 2 through 4 completelybefore proceeding. Highlight or write downthe codes and device you wish to programbefore moving on to step 2.2. On the remote control, press a device key once(i.e., VCR, DVD, AUD, TV, or CBL); it will blinkonce. Then press and hold SETUP until theselected mode key blinks twice.3. Use the “Manufacturer’s Codes (Códigos deFabricante)” starting on page 57) to locate thetype of device and brand name and then enterthe first four-digit code for your device. Ifperformed correctly, the selected mode keywill blink twice.NOTE: If the selected mode key emits a long blink,the entry is invalid. Repeat steps 2 through 3and try entering the same code again.4. Aim the remote control at the device andpress PWR once. The device should turn off. Ifit does not, repeat steps 2 through 3, tryingeach code for your brand until you find onethat works. If it still does not respond, trysearching for the code (see “Searching forYour Code” on page 12).NOTE: If the device does not have a PWR key, pressthe(Play) key.5. Repeat steps 1 through 4 for each device youwant the remote control to operate. For futurereference, write down each working devicecode in the boxes on the following page.www.urcsupport.com/atlasocap10
VCR Code<strong>Device</strong> Type:___________________DVD Code<strong>Device</strong> Type:___________________AUD Code<strong>Device</strong> Type:___________________CBL Code<strong>Device</strong> Type:___________________TV Code<strong>Device</strong> Type:___________________SETTING UP A COMBO UNITIf you own a combo unit such as a TV/VCR Combo or aTV/DVD Combo, you need to follow special steps to setit up. Perform the following instructions to controlcombo device:1. For a TV/VCR Combo, turn on your TV/VCRCombo and insert a video cassette. (For a TV/DVD Combo, insert a DVD).2. On the remote control, press VCR once; it willblink once. Then press and hold SETUP untilthe VCR key blinks twice.3. Use the “Manufacturer’s Codes (Códigos deFabricante)” starting on page 57 to locate thebrand name and enter the first four-digit codefor your combo device (for example, TV/VCR). If you perform this procedure correctly,the VCR key will blink twice.www.urcsupport.com/atlasocap11
NOTE:If the VCR key did not blink twice after enteringthe codes last digit, repeat steps 2 through3 and try entering the same code again.If you’ve located a setup code that works foryour combo device (for example, a TV/VCRCombo) and a separate TV code is also listed,you’ll need to program this code into theremote control to access volume control (see“Programming <strong>Device</strong> <strong>Control</strong>” starting onpage 10).4. Aim the remote control at your combo device(for example, TV/VCR Combo) and pressPWR once. The device should turn off. If itdoes not respond, repeat steps 2 through 3,trying each code listed for your brand untilyou find one that works. If it still does notrespond, try searching for the code(“Searching for Your Code” starting onpage 12).5. For future reference, write down each workingdevice code in the boxes below:TV/VCR or TV/DVD CodeTV Code (if used)SEARCHING FOR YOUR CODEIf your home entertainment device does not respond tothe <strong>Atlas</strong> <strong>OCAP</strong> 5-<strong>Device</strong> <strong>Remote</strong> <strong>Control</strong> <strong>with</strong> <strong>Learning</strong>after trying all of the codes listed for your brand, or ifyour brand is not listed at all, try searching for yourcode.For example, to search for a code for your TV:1. Turn on your TV.2. On the remote control, press TV once; it willblink once. Then press and hold SETUP untilthe TV key blinks twice.3. Enter 9 9 1. The TV key will blink twice.www.urcsupport.com/atlasocap12
4. Aim the remote control at the TV and pressPWR once.5. Press and release the CH+ key continuously,then stop when the TV turns off.NOTE: In the search mode, the remote control willsend IR codes from its library to the selecteddevice, starting <strong>with</strong> the most popular codefirst.6. Press PWR. The TV should turn on, then pressSETUP to lock in the code.NOTE:If the TV does not turn on during step 6, thenslowly press and release CH- to go backthrough the codes, then press SETUP when theTV turns on.7. To search for the codes of your other devices,repeat steps 1 through 6, but substitute theappropriate key (e.g., VCR, DVD, AUD, or CBL)for the device you are searching for.www.urcsupport.com/atlasocap13
CHECKING THE CODESIf you have set up the <strong>Atlas</strong> <strong>OCAP</strong> 5-<strong>Device</strong> <strong>Remote</strong><strong>Control</strong> <strong>with</strong> <strong>Learning</strong> by searching for your device code(on the previous page), you may need to find out whichfour-digit code is operating your equipment.For example, to find out which code is operating your TV:1. On the remote control, press TV once; it willblink once. Then press and hold SETUP untilthe TV key blinks twice.2. Enter 9 9 0. The TV key will blink twice.3. To view the code for the first digit, press 1once. Count the number of times the TV keyblinks (e.g., 3 blinks = 3) and write down thenumber in the leftmost TV Code box onpage 11.NOTE: If a code digit is 0, the selected mode key willnot blink.4. Repeat step 3 three more times for theremaining digits. Use 2 for the second digit, 3for the third digit, and 4 for the fourth digit.Finish writing down the code in the TV Codeboxes on page 11.5. To check for other device codes, repeat steps 1through 4, but substitute the appropriate key(e.g., VCR, DVD, AUD, or CBL) for the deviceyou are checking. Write down the codes in theappropriate boxes on page 11.USING LEARNINGThe <strong>Atlas</strong> <strong>OCAP</strong> 5-<strong>Device</strong> <strong>Remote</strong> <strong>Control</strong> <strong>with</strong> <strong>Learning</strong>includes a <strong>Learning</strong> feature so you can add functionsthat are unique to your home entertainment devices(e.g.,VCR Tracking Up or Down). However, there are someconsiderations.<strong>Learning</strong> Precautions• Your original remote controls must be in workingorder for learning to work properly.• Learned keys are mode-specific, so each one canstore a unique function for each mode.• Do not use the following keys for learning: <strong>Device</strong>Keys, SETUP, Record (•), Tune-In Keys.www.urcsupport.com/atlasocap14
• <strong>Learning</strong> capacity is approximately 16 to 25 keys,depending on the code being learned.• Certain device functions are not learnable includingmulti-frequency types, some high frequency ones,and other unusual formats.• For optimum learning, avoid high levels of ambientlight such as natural sunlight or energy-efficientfluorescent lights.NOTE: Please have your original remote controlshandy before programming learning.Programming a Learned KeyNOTE: If more than 15 seconds pass between keypresses, the remote exits programming.1. Press and hold SETUP until the last-selectedmode key blinks twice, then press 9 7 5.NOTE: If the LED displays one long flash instead,either your batteries are low, or the <strong>Atlas</strong><strong>OCAP</strong> 5-<strong>Device</strong> <strong>Remote</strong> <strong>Control</strong> <strong>with</strong> <strong>Learning</strong>has a memory fault.2. Press a mode key once (i.e., VCR, DVD, AUD,TV, or CBL) to assign a mode for learning.3. Then press the key on your <strong>Atlas</strong> <strong>OCAP</strong><strong>Remote</strong> <strong>Control</strong> that learns the new code.4. Place the <strong>Atlas</strong> <strong>OCAP</strong> 5-<strong>Device</strong> <strong>Remote</strong><strong>Control</strong> <strong>with</strong> <strong>Learning</strong> head-to-head (about 2"apart) from your original remote control. Alsolocate the key (on your original remotecontrol) that you want the <strong>Atlas</strong> <strong>OCAP</strong> 5-<strong>Device</strong> <strong>Remote</strong> <strong>Control</strong> <strong>with</strong> <strong>Learning</strong> tolearn.2"5. On the original remote, press and hold the keyto be learned. The <strong>Atlas</strong> <strong>OCAP</strong> 5-<strong>Device</strong><strong>Remote</strong> <strong>Control</strong> <strong>with</strong> <strong>Learning</strong>’s LED willblink rapidly, then turn off. Continue holdingwww.urcsupport.com/atlasocap15
the key on the original remote until the <strong>Atlas</strong><strong>OCAP</strong> 5-<strong>Device</strong> <strong>Remote</strong> <strong>Control</strong> <strong>with</strong><strong>Learning</strong>’s LED blinks twice.NOTE: If the LED displays one long blink, a learningerror has occurred. Try repeating this stepagain until a successful capture occurs. If thefunction is still not captured, press and holdSETUP to exit programming and review the“<strong>Learning</strong> Precautions” on the previous page.If needed, also see “Troubleshooting” onpage 25. After review, start programmingagain at step 1.6. Repeat steps 2 through 5 for another modeand/or key or press and hold SETUP to exitprogramming.Deleting a Single <strong>Learning</strong> KeyThis process returns the key to its original programmingfor the mode you select. You can also delete learnedprogramming by teaching a different function to the key(see “Programming a Learned Key” on page 15)NOTE: If more than 15 seconds pass between keypresses, the remote exits programming.1. Press and hold SETUP until the last-selectedmode key blinks twice, then press 9 7 6.2. Press a mode key once (i.e., VCR, DVD, AUD,TV, or CBL).3. Press the key containing the learned functionto be deleted twice. The remote will blinktwice.4. Repeat steps 2 through 3 for another key orpress and hold SETUP to exit programming.www.urcsupport.com/atlasocap16
Deleting All Learned Keys in a Specific ModeNOTE: If more than 15 seconds pass between keypresses, the remote exits programming.1. Press and hold SETUP until the last-selectedmode key blinks twice, then press 9 7 6.2. Press a mode key twice (i.e., VCR, DVD, AUD,TV, or CBL) to clear all the learned keys forthat mode. The LED blinks twice.3. Repeat step 2 for another mode or press andhold SETUP to exit programming.PROGRAMMING CHANNEL CONTROL LOCKBy default, the remote control’s channel-controlcapabilities are locked to the cable converter. Theaffected keys* are 1 through 0, CH+, CH-, and LAST. Thiswill guarantee that you do not inadvertently change achannel on your TV or VCR. However, you can deactivatethis feature to allow full access to these keys inthe TV and VCR modes.*NOTE: This feature does not affect the AUD mode.Unlocking Channel <strong>Control</strong>1. On the remote control, press CBL once; it willblink once. Press and hold SETUP until theCBL key blinks twice.2. Enter 9 7 3. The CBL key will blink twice.3. Press CH- once. The CBL key will blink fourtimes.Now the remote control will provide TV and VCRchannel-control capabilities while in the TV or VCRmode.www.urcsupport.com/atlasocap17
Locking Channel <strong>Control</strong> to CBL1. On the remote control, press CBL once; it willblink once. Press and hold SETUP until theCBL key blinks twice.2. Enter 9 7 3.The CBL key will blink twice.3. Press CH+ once. The CBL key will blink twice.Now, regardless of what mode you select (except AUD),the channel keys will only change channels on your cableconverter.CHANGING VOLUME LOCKVolume Lock allows you to control the volume throughthe device identified as having your primary speaker(s),regardless of which mode you are using. On the <strong>Atlas</strong><strong>OCAP</strong> 5-<strong>Device</strong> <strong>Remote</strong> <strong>Control</strong> <strong>with</strong> <strong>Learning</strong>, GlobalVolume Lock is set to TV, so you can control TV volumewhile in the VCR, DVD, TV or CBL mode. You can performIndividual Volume Unlock on a selected device to set itsvolume control for independent operation.NOTE: The audio mode’s (AUD) volume controls areactive regardless of Volume Lock settings.However, if you lock the volume controls tothe AUD mode, you will have control of theaudio device’s volume in all other modes (i.e.,VCR, DVD, TV, and CBL). This can be an advantageif, for example, you always listen to homeentertainment devices through your receiver’sspeakers.Unlocking Volume <strong>Control</strong> for a Single <strong>Device</strong>(Individual Volume Unlock)1. Assuming Global Volume Lock is active, selecta mode on the remote control that you want tounlock (e.g., CBL) and press it once. Next,press and hold SETUP until the device keyblinks twice.2. Enter 9 9 3. The last-selected device key willblink twice.www.urcsupport.com/atlasocap18
3. Press VOL- once. The last-selected device keywill blink four times.4. Repeat steps 1 through 3 for each device youwant volume to be unlocked.Now, after you select a device that has volume unlocked(e.g., CBL), pressing VOL+, VOL-,or MUTE, will controlonly that device’s volume.Unlocking All Volume <strong>Control</strong> (Global Volume Unlock)NOTE: Performing these instructions will set independentvolume control for all programmeddevices.1. On the remote control, press and hold SETUPuntil the last-selected device key blinks twice.2. Enter 9 9 3. The last-selected device key willblink twice.3. Press VOL+ once. The last-selected device keywill blink four times.Locking Volume <strong>Control</strong> To One Mode (GlobalVolume Lock)NOTE: The audio mode’s volume controls are activeregardless of Volume Lock settings. However,if you lock the volume controls to the AUDmode, you will control the audio device’s volumein all other modes (i.e., VCR, DVD, TV, orCBL). This can be an advantage if, for example,you always listen to home entertainmentdevices through your receiver’s speakers.1. On the remote control, press and hold SETUPuntil the last-selected device key blinks twice.2. Enter 9 9 3. The last-selected device key willblink twice.3. Select a mode (e.g., TV or AUD) which youwant to use to control the volume. Theselected device key will blink twice.Now, when you press VOL+, VOL-,or MUTE, the volume ofthe selected device (e.g., TV) is controlled regardless ofmode.www.urcsupport.com/atlasocap19
PROGRAMMING CABLE ID LOCKThe <strong>Atlas</strong> <strong>OCAP</strong> 5-<strong>Device</strong> <strong>Remote</strong> <strong>Control</strong> <strong>with</strong> <strong>Learning</strong>is locked at the factory to operate your cable provider’sset top box. However, if you have another brand ormodel of cable converter or satellite service that youwould like to control, then you’ll need to perform thefollowing steps to unlock the ID Lock, enter a newmanufacturer’s code, and lock the ID Lock again.1. Turn on the cable converter.2. On the remote control, press CBL once; it willblink once. Then press and hold SETUP untilthe CBL key blinks twice.3. Enter 9 8 2. The CBL key will blink fourtimes, indicating ID Lock is unlocked.4. Perform the instructions under“Programming <strong>Device</strong> <strong>Control</strong>” on page 10 toprogram device control for the desired cableconverter or satellite receiver.When you are done, perform steps 5 and 6 onthis page to again lock the cable ID Lock.5. On the remote control, press CBL once; it willblink once. Then press and hold SETUP untilthe CBL key blinks twice.6. Enter 9 8 2. The CBL key will blink twice,indicating ID Lock is again locked.PROGRAMMING MACRO KEYSThe <strong>Atlas</strong> <strong>OCAP</strong> 5-<strong>Device</strong> <strong>Remote</strong> <strong>Control</strong> <strong>with</strong> <strong>Learning</strong>includes two macro keys (located directly below theMUTE and LAST keys). Macro keys allow you to set up keymacros to activate certain keys in a specific order. Forexample, you can set up a key macro to change thechannels on your TV, raise or lower the volume, andstart recording on your VCR, all <strong>with</strong> the touch of onekey. If you want to change the macros stored in apreviously-programmed macro key, you’ll need to clearthe key first (see “Clearing a Macro Key” on page 21).www.urcsupport.com/atlasocap20
Programming a Macro Key1. On the remote control, press and hold SETUPuntil it blinks twice.2. Enter 9 9 5. The SETUP key blinks twice.3. Select a macro key (for example, F1) andpress it once.4. Press the key sequence you want to programinto the macro. For example, to turn on yourTV and raise its volume, press TV followed byVOL+.NOTE: You can program up to 15 key presses into onemacro.5. Press and hold SETUP until it blinks twice.6. To add another macro, repeat steps 1 through5, substituting the new key sequence to beadded in step 4.NOTE: Programming more than five macros on thesame macro key overwrites previous settings.Clearing a Macro Key1. On the remote control, press and hold SETUPuntil it blinks twice.2. Enter 9 9 5. The SETUP key blinks twice.3. Press the macro key you want to clear once.4. Press and hold SETUP until it blinks twice.This macro key is now clear and ready forreprogramming (see “Programming a Macro Key” onpage 21). If desired, repeat these to clear another Tune-In key.www.urcsupport.com/atlasocap21
USING THE MASTER POWER KEYThe <strong>Atlas</strong> <strong>OCAP</strong> 5-<strong>Device</strong> <strong>Remote</strong> <strong>Control</strong> <strong>with</strong> <strong>Learning</strong>has a unique feature that allows you to sequentially turnup to five of your home entertainment devices on or off<strong>with</strong> a single key press.NOTE: MASTER POWER (PWR) only works in the CBLmode. If it is not programmed, only the cableconverter will turn on or off. In any othermode, pressing MASTER POWER (PWR) oncewill turn the selected device on or off.Programming the Master Power Key1. On the remote control, press and hold SETUPuntil the last-selected device key blinks twice.2. Enter 9 9 5. The last-selected device keyblinks twice.3. Press PWR once.4. For the first device you want in the power onsequence, press a device key (e.g., CBL) once.Then press PWR once. For the second devicein the power sequence, press its key once (e.g,TV). Then press PWR.5. Repeat step 4 up to four more times to add thesecond, third, fourth, and fifth device, asdesired.6. To save the settings and exit the program:a. Press CBL once.b. Press and hold SETUP until the CBL key blinkstwice.www.urcsupport.com/atlasocap22
Using the Master Power Key1. After programming, point the remote controlat the devices. Press CBL once.2. Press PWR once to sequentially turn theprogrammed home entertainment devices onor off.You will see the devices turn on or off according to theprogrammed sequence.Clearing the Master Power Key1. On the remote control, press and hold SETUPuntil the last-selected device key blinks twice.2. Enter 9 9 5. The last-selected device keyblinks twice.3. Press and release PWR.4. Press and hold SETUP until the CBL key blinkstwice.RE-ASSIGNING DEVICE KEYSThe <strong>Atlas</strong> <strong>OCAP</strong> 5-<strong>Device</strong> <strong>Remote</strong> <strong>Control</strong> <strong>with</strong> <strong>Learning</strong>can be set up to control a second device of an alreadyassignedtype. For example, to have the unit control aTV, a Cable Converter, and two audio devices (forexample, two audio receivers), re-assign the unused VCRkey to operate the second audio device as follows:NOTE: VCR is preset at the factory to control an RCAVCR. Performing the steps below will overwritethose settings.1. On the remote control, press VCR once; it willblink once. Then press and hold SETUP untilthe VCR key blinks twice.2. Enter 9 9 2. The VCR key will blink twice.www.urcsupport.com/atlasocap23
3. Press AUD once, then press VCR once. The VCRkey will blink twice.The VCR key is now ready to be programmed for yoursecond audio device. See “Programming <strong>Device</strong><strong>Control</strong>” on page 10. To re-assign other device keys,repeat these and substitute the key sequence using thefollowing chart:NOTE: Only one device can be assigned to an unuseddevice key at a time.To Re-AssignVCR as 2ndAUD keyVCR as 2ndTV keyVCR as 2ndCBL keyVCR back toVCRPerform Key SequenceVCRSETUP992AUDVCRVCRSETUP992TVVCRVCRSETUP992CBLVCRVCRSETUP992VCRVCRTo re-assign another unused device key, substitute it forthe VCR key above and then perform the sequence. Forexample, to re-assign an unused AUD key as a secondDVD key, performAUDSETUP992DVDAUD.When a re-assignment is done, the selected device key(e.g., AUD) will blink twice to confirm your choice. Atthat time, you will need to program device control (see“Programming <strong>Device</strong> <strong>Control</strong>” on page 10).CLEARING CUSTOM PROGRAMMINGThe <strong>Atlas</strong> <strong>OCAP</strong> 5-<strong>Device</strong> <strong>Remote</strong> <strong>Control</strong> <strong>with</strong> <strong>Learning</strong>contains a Custom Programming Reset program. You canuse it to remove all custom programming, except yoursetup codes and reassigned device keys.IMPORTANT: Executing this program will erase all customsettings for Volume Lock, Learned Keys,Tune-In Keys, and Channel Lock. However,your device programming remains.1. On the remote control, press and hold SETUPuntil the last-selected device key blinks twice.www.urcsupport.com/atlasocap24
2. Enter 9 8 0. The last-selected device keyblinks twice, pauses, and blinks twice again toconfirm that all custom programming iscleared.ACTIVATING BACKLIGHTING (OPTIONAL)On some models of your <strong>Atlas</strong> <strong>OCAP</strong> 5-<strong>Device</strong> <strong>Remote</strong><strong>Control</strong> <strong>with</strong> <strong>Learning</strong>, you can activate backlighting.Backlighting enables your remote’s keypad to remain litfor five seconds after you press any key. To enablebacklighting on a remote <strong>with</strong> that feature, perform thefollowing step:1. Press SETUP twice <strong>with</strong>in one second.Backlighting is turned on.To disable backlighting, perform the following step:1. Press SETUP twice <strong>with</strong>in one second.Backlighting is turned off.TROUBLESHOOTINGPROBLEM: <strong>Device</strong> key does not blink when you press akey.SOLUTION: Replace the batteries <strong>with</strong> two (2) new AAbatteries (see “Installing Batteries” on page 9).PROBLEM: <strong>Device</strong> key blinks when you press a key, buthome entertainment device does not respond.SOLUTION: Make sure you are aiming the remote controlat your home entertainment device and that you are<strong>with</strong>in 15 feet of the device you are trying to control.PROBLEM: The remote control does not control homeentertainment devices or commands are not performingproperly.SOLUTION: Try all listed codes for the device brandbeing set up. Make sure all devices can be operated <strong>with</strong>an infrared remote control.PROBLEM: TV/VCR Combo does not respond properly.SOLUTION: Use the VCR codes for your brand. Somecombo units may require both a TV code and a VCRcode for full operation (see page 11).PROBLEM: No volume on a second TV.SOLUTION: Follow instructions under “ChangingVolume Lock” on page 18.www.urcsupport.com/atlasocap25
PROBLEM: PLAY and STOP keys do not work on aMotorola DCT-2000 cable converter.SOLUTION: Re-program the CBL key for cable code 0476(see “Programming <strong>Device</strong> <strong>Control</strong>” on page 10).PROBLEM: Tried Search Method and still could not finda working code.SOLUTION: Try the Search Method again after clearingout the device key as follows:a. Press and hold SETUP until device key blinks twice.b. Enter 9 9 2.c. Press and release the device key to be cleared twice.PROBLEM: <strong>Remote</strong> control does not turn on Sony orSharp TV/VCR Combo.SOLUTION: For power on, these products requireprogramming TV codes on the remote control. For Sony,use TV code 0000 and VCR code 0032. For Sharp, useTV code 0093 and VCR code 0048.FCC NOTICEThis equipment has been tested and found to comply<strong>with</strong> the limits for a class B digital device, pursuant topart 15 of the FCC Rules. These limits are designed toprovide reasonable protection against harmfulinterference in a residential installation. This equipmentgenerates, uses and can radiate radio frequency energyand if not installed and used in accordance <strong>with</strong> theinstructions, may cause harmful interference to radiocommunications.However, there is no guarantee that interference will notoccur in a particular installation. If this equipment doescause harmful interference to radio or televisionreception, which can be determined by turning theequipment off and on, the user is encouraged to try tocorrect the interference by one or more of the followingmeasures:• Reorient or relocate the receiving antenna.• Increase the separation between the equipment andreceiver.• Connect the equipment into an outlet on a circuitdifferent from that to which the receiver isconnected.• Consult the dealer or an experienced radio/TVtechnician for help.This equipment has been verified to comply <strong>with</strong> thelimits for a class B computing device, pursuant to FCCRules. In order to maintain compliance <strong>with</strong> FCCregulations, shielded cables must be used <strong>with</strong> thisequipment. Operation <strong>with</strong> non-approved equipment orunshielded cables is likely to result in interference towww.urcsupport.com/atlasocap26
adio and TV reception. The user is cautioned thatchanges and modifications made to the equipment<strong>with</strong>out the approval of manufacturer could void theuser’s authority to operate this equipment.ADDITIONAL INFORMATIONThis product does not have any user-serviceable parts.Opening the case, except for the battery cover, may causepermanent damage to your <strong>Atlas</strong> <strong>OCAP</strong> 5-<strong>Device</strong> <strong>Remote</strong><strong>Control</strong> <strong>with</strong> <strong>Learning</strong>.• For help via the Internet, visit us at:www.urcsupport.com©Copyright 2006 by <strong>Universal</strong> Electronics Inc. No part of thispublication may be reproduced, transmitted, transcribed,stored in any retrieval system, or translated to any language, inany form or by any means, electronic, mechanical, magnetic,optical, manual, or otherwise, <strong>with</strong>out prior writtenpermission of <strong>Universal</strong> Electronics Inc.M1056L 12/06www.urcsupport.com/atlasocap27
ÍNDICEIntroducción . . . . . . . . . . . . . . . . . . . . . . . . . . . . . . . . . . . . . . . . . . . 30Características y Funciones. . . . . . . . . . . . . . . . . . . . . . . . . . . . . . . 31Gráficos de botones . . . . . . . . . . . . . . . . . . . . . . . . . . . . . . . . 32Tabla del dispositivo . . . . . . . . . . . . . . . . . . . . . . . . . . . . . . . . 35Instalación De Baterías . . . . . . . . . . . . . . . . . . . . . . . . . . . . . . . . . . 36<strong>Control</strong> del Dispositivo de Programación . . . . . . . . . . . . . . . . . . . . 37Configuración de una Unidad Combinada . . . . . . . . . . . . . . . . . . . . 39Búsqueda de Su Código . . . . . . . . . . . . . . . . . . . . . . . . . . . . . . . . . . 40Revisión de los Códigos . . . . . . . . . . . . . . . . . . . . . . . . . . . . . . . . . . 41Uso de Aprendizaje . . . . . . . . . . . . . . . . . . . . . . . . . . . . . . . . . . . . . . 42Precauciones de aprendizaje . . . . . . . . . . . . . . . . . . . . . . . . 42Programación de un botón aprendido . . . . . . . . . . . . . . . . . . 42Eliminación de un botón de aprendizaje individual. . . . . . . . 44Eliminación de todos los botones aprendidos en un modoespecífico . . . . . . . . . . . . . . . . . . . . . . . . . . . . . . . . . . . . . 44Programación del Bloqueo de <strong>Control</strong> de Canales . . . . . . . . . . . . . 45Desbloqueo del control remoto . . . . . . . . . . . . . . . . . . . . . . . 45Bloqueo de control de canales a CBL . . . . . . . . . . . . . . . . . . 45Cambio del Bloqueo de Volumen . . . . . . . . . . . . . . . . . . . . . . . . . . . 46Desbloqueo del control de volumen para un dispositivoindividual (Desbloqueo del volumen individual)) . . . . . . . 46Desbloqueo de todo el control de volumen (Desbloqueo globaldel volumen) . . . . . . . . . . . . . . . . . . . . . . . . . . . . . . . . . . . 47Bloqueo del control de volumen a un modo (Bloqueo global delvolumen) . . . . . . . . . . . . . . . . . . . . . . . . . . . . . . . . . . . . . . 47Programación del Bloqueo de Id de Cable . . . . . . . . . . . . . . . . . . . 48Programación de Botones Macro. . . . . . . . . . . . . . . . . . . . . . . . . . . 48Programación de un botón macro . . . . . . . . . . . . . . . . . . . . . 49Borrado de un botón macro . . . . . . . . . . . . . . . . . . . . . . . . . . 50Uso del Botón de Encendido Maestro. . . . . . . . . . . . . . . . . . . . . . . . 50Programación del botón de encendido maestro . . . . . . . . . . 51Uso del botón de encendido maestro . . . . . . . . . . . . . . . . . . 51Borrado del botón de encendido maestro . . . . . . . . . . . . . . . 52Reasignación de los Botones de Dispositivo . . . . . . . . . . . . . . . . . . 52Reasignación de los Botones de Dispositivo . . . . . . . . . . . . . . . . . . 52Activación de la Iluminación de Fondo (Opcional) . . . . . . . . . . . . . 54Solución de Problemas. . . . . . . . . . . . . . . . . . . . . . . . . . . . . . . . . . . 54AVISO de FCC. . . . . . . . . . . . . . . . . . . . . . . . . . . . . . . . . . . . . . . . . . . 55Información Adicional . . . . . . . . . . . . . . . . . . . . . . . . . . . . . . . . . . . 56Manufacturer’s Codes (Códigos de Fabricante) . . . . . . . . . . . . . . . 57Códigos de configuración para los amplificadores de audio 57Códigos de configuración para los receptores de audio . . . 57Códigos de configuración para los accesorios de audio . . . 60Códigos de configuración para los convertidores/cajas decable . . . . . . . . . . . . . . . . . . . . . . . . . . . . . . . . . . . . . . . . . 60Códigos de configuración para reproductores de DVD. . . . . 62Códigos de configuración para grabadoras de DVD . . . . . . . 67www.urcsupport.com/atlasocap28
Códigos de configuración para conjuntos de DVD . . . . . . . . 67Receptores de satélite y sistemas de DVR/PVR. . . . . . . . . . . 68Códigos de configuración para los receptores de satélite. . 68Códigos de configuración para los sistemas de DVR/PVR . . 69Códigos de configuración para Televisor . . . . . . . . . . . . . . . 70Códigos de configuración para Televisor (DLP). . . . . . . . . . . 78Códigos de configuración para Televisor (HDTV). . . . . . . . . . 78Códigos de configuración para Televisor (LCD). . . . . . . . . . . 78Códigos de configuración para conjuntos de TV/DVD . . . . . . 81Códigos de configuración para conjuntos de TV/VCR . . . . . . 82Códigos de configuración para conjuntos de TV/VCR/DVD . . 84Códigos de configuración para VCR . . . . . . . . . . . . . . . . . . . 85www.urcsupport.com/atlasocap29
INTRODUCCIÓNEl control remoto del dispositivo <strong>Atlas</strong> <strong>OCAP</strong> 5 conAprendizaje por <strong>Universal</strong> Electronics es nuestro controlremoto universal de generación más reciente. Latecnología sofisticada con la que cuenta le permiteconsolidar hasta cinco de los controles remotosoriginales de entretenimiento del hogar en un productoque fácil de utilizar. Además, cuenta con característicasavanzadas como:• <strong>Control</strong> preprogramado para poner enfuncionamiento elconvertidordecableque leproporcionasuproveedordeservicio decable• Botonesdedicadosparacontrolar lasfuncionespopularesen suDVR/PVR(Grabadoradevídeodigital/personal)• Botónprogramable dewww.urcsupport.com/atlasocap30
encendido maestro para el control maestro deencendido/apagado de su equipo deentretenimiento en el hogar con una sola pulsación• Botones de sintonización instantánea para laasignación de sus canales favoritos• Bloqueo de volumen para bloquear los controles devolumen a un modo o modos individuales• Bloqueo de canales para bloquear la selección decanales únicamente para el convertidor de cables• Reasignación de botones de dispositivo paracontrolar de manera remota un segundo dispositivo(duplicado)• Búsqueda de código para ayudar al control deprogramas de componentes antiguos odescontinuados• Botones codificados por color para localizarrápidamente las funciones más utilizadas• Biblioteca de códigos para dispositivos de vídeo yaudio más conocidos• Iluminación de fondo (no disponible para todos loscontroles remotos)Es necesario instalar las baterías que se incluyen antesde utilizar el producto y también realizar algunaprogramación para poner en funcionamiento losdispositivos específicos de entretenimiento en el hogarque desea controlar.Siga las instrucciones que se describen en este manualpara configurar la unidad y luego empezar a disfrutar desu nuevo control remoto y servicio de cable.CARACTERÍSTICAS Y FUNCIONESUtilice la ilustración que aparece a continuación paralocalizar las características en el <strong>Control</strong> remoto dedispositivos <strong>Atlas</strong> <strong>OCAP</strong> 5 con aprendizaje y luegoestudie los gráficos de botones (en las siguientes trespáginas) para saber cómo funcionan.Para averiguar cuáles son los dispositivos que puedecontrolar cada botón del dispositivo luego de laprogramación, consulte la "Tabla de dispositivos" que seencuentra en el página 35.www.urcsupport.com/atlasocap31
Gráficos de botonesBotónFunciónUtilice SETUP (Configuración) paratodas las secuencias de programación.También utilícelo para encender yapagar la iluminación de fondo, siaplica.Presione PWR (Encendido) una vez paraencender o apagar un dispositivo deentretenimiento del hogar. Para elcontrol de MASTER POWER (Encendidomaestro), consulte "Uso del botónmaestro" en la página 51.Presione VCR, DVD, AUD, TV o CBL unavez para seleccionar el dispositivo deentretenimiento en el hogar que deseacontrolar. Consulte también la "Tabla deldispositivo" en la página 35.Cada botón del dispositivo tiene undiodo fotoemisor incorporado (luz roja)que brilla intermitentemente alseleccionarlo e indica que el controlremoto está en funcionamiento y(después de la programación) envíaseñales.Utilice GUIDE (Guía) para visualizar laguía del programa.Presione SETTINGS (Configuraciones)una vez para visualizar los serviciosinteractivos disponibles.Utilice INFO para visualizar el canalactual y la información del programa.Utilice DAY+ (o DAY-) (Día + o Día -)para adelantar (o retroceder) en la guíade programa del convertidor de cable.Utilice los botones del cursor paramover el cursor en la guía del programay las pantallas de menú y para navegardentro del servicio interactivo.Utilice OK/SELECT (Aceptar/seleccionar) para escoger las opciones,eventos PPV y para sintonizar losprogramas de la guía de programa.Utilice PAGE+ (o PAGE-) (Página + oPágina -) para avanzar hacia arriba (oavanzar hacia abajo) a través de laspantallas de menú y la guía deprograma.www.urcsupport.com/atlasocap32
BotónFunciónUtilice EXIT (Salir) para salir del menú yguía de los convertidores de cable.Utilice A, B, C o D para obtener acceso alas funciones adicionales de cable(consulte el manual del convertidor decable).Utilice VOL+ (o VOL-) para subir (obajar) el volumen del audio.Utilice FAV (Favoritos) para cambiar através de sus canales favoritosalmacenados en su convertidor decable.Utilice CH+ (o CH-) para seleccionar elsiguiente canal más alto (o más bajo).Para los reproductores de DVD, utiliceestos botones para adelantar (oretroceder) a través de los capítulos.Para amplificadores/receptores, utiliceestos botones para seleccionar lasiguiente estación preestablecida másalta (o más baja).Presione MUTE (Silencioso) una vezpara encender o apagar el sonido.Presione LAST (Último) una vez pararegresar al último canal.Presione ON DEMAND (A demanda) paraacceder a los servicios de Vídeo ademanda.Reservado para el uso de los botonesMacro (consulte "Programación de losbotones macro" en la página 49).Utilice el comando de su caja decable de PVR/DVR para reproducirinstantáneamente los últimos 7segundos de un programa que estéviendo.Presione LIST (Lista) una vez paravisualizar una lista de los programasgrabados en su caja de cable de PVR/DVR.www.urcsupport.com/atlasocap33
BotónFunciónPresione LIVE (En vivo) para dirigirse asu caja de cable de PVR/DVR y regresara ver el televisor en vivo.En todos los modos excepto CBL, utiliceREW (rebobinar), PLAY (reproducir),FFWD (adelantar), STOP (detener) yPAUSE (pausa) para controlar unreproductor de VCR, DVD o PVR(después de seleccionar un dispositivodeseado). Para grabar en el modo VCR,presione dos veces REC (Grabar).En el modo CBL, utilice estos botonespara controlar las funciones de DVR/PVR de STB (aparato integrado deconvertidor y descodificador).Utilice los números de tecladonumérico (1-9, y 0) para sintonizardirectamente los canales (por ejemplo,09).Para los amplificadores/receptores,utilice los números del tecladonumérico y así seleccionar las entradasdel 1 al 10.Presione ASPECT (Aspecto) una vezpara cambiar la proporción del aspectodel programa que está viendo. (No estádisponible en todos los STB).Presione SHIFT (Cambiar) para accedera las funciones adicionales de cable(consulte su manual del convertidor decable).Utilice PIP ON-OFF (Encendido yapagado de PIP) para cambiar elencendido o apagado de lacaracterística de imagen en imagen (sise encuentra disponible en su televisoro servicio de cable).Utilice PIP SWAP (Cambio de PIP) paracambiar las imágenes y sonido entre lasimágenes principales y de ventana (si seencuentra disponible en su televisor oservicio de cable).www.urcsupport.com/atlasocap34
BotónFunciónUtilice PIP MOVE (Mover PIP) paramover la imagen de la ventana adiferentes posiciones en la imagenprincipal (si se encuentra disponible ensu televisor o servicio de cable)..Utilice PIP CH+ (o CH-) paraseleccionar el siguiente canal PIP másalto (o más bajo) (si se encuentradisponible en su TV o servicio decable).En el modo CBL, utilice VIDEO SOURCE(Fuente de vídeo) para ver otrasfuentes de vídeo (A o B) en lugar delcable.En todo el modo TV, utilice VIDEOSOURCE (Fuente de vídeo) para ver TVo programas de vídeo/DVD en undispositivo deseado.Para los amplificadores/receptores,utilice VIDEO SOURCE (Fuente devídeo) para seleccionar un origen devídeo.Tabla del dispositivoNOTA: Consulte la tabla que se encuentra a continuacióncuando lleve a cabo las instrucciones en"Programación de control del dispositivo" enla página 37 o "Configuración de una unidadcombinada" en la página 39.Después de la programación, el <strong>Control</strong> remoto deldispositivo <strong>Atlas</strong> <strong>OCAP</strong> 5 con Aprendizaje podrácontrolar los siguientes tipos de dispositivos:El botón deldispositivocontrola estos tipos de dispositivosVCR, conjuntos de TV/VCR, PVR(grabadora de video personal) oreproductor de DVD, reproductor deDVD adicional o VCR, conjunto de TV/VCR o PVR adicional, amplificador deaudio, sintonizador o receptorReproductor de DVD, reproductor deDVD adicional o VCR, conjunto de TV/VCR o PVR adicionalAmplificador de audio, sintonizador oreceptorwww.urcsupport.com/atlasocap35
El botón deldispositivocontrola estos tipos de dispositivosTelevisiónCaja de cable (convertidor) o satélitereceptorINSTALACIÓN DE BATERÍAS❶❷❸1. En la parte posterior del control remoto,empuje la lengüeta y levante la cubierta de lasbaterías.2. Localice las dos (2) baterías AA que seincluyen. Coloque correctamente las bateríasdel lado + y - con lo indicado en la caja debaterías, luego insértelas.3. Alinee las lengüetas de las cubiertas con losagujeros en la caja y presione la cubierta denuevo en su lugar. La lengüeta debe hacer unsonido cuando esté asegurada.4. Revise el control remoto al presionarcualquier botón de modo (por ejemplo, TV). Silas baterías se insertan correctamente, eldiodo fotoemisor (luz roja) brillará una vezintermitentemente.www.urcsupport.com/atlasocap36
NOTA:Cuando sea necesario reemplazar las baterías,el control remoto dejará de funcionar.Reemplace las baterías y la unidad restablecerásu funcionalidad completa, realice susconfiguraciones favoritas.CONTROL DEL DISPOSITIVO DEPROGRAMACIÓNEl control remoto del dispositivo <strong>Atlas</strong> <strong>OCAP</strong> 5 conAprendizaje está previamente programado para poneren funcionamiento la caja del cable (convertidor) que leproporcionar su sistema de cable, un TV RCA, unreproductor de DVD Toshiba, un VCR RCA y un receptorde audio Pioneer.Para controlar otros dispositivos que no sean las marcaspredeterminadas, realice los siguientes pasos; de locontrario, pase a la siguiente sección.NOTAS: Para controlar un dispositivo combinado (porejemplo, un conjunto de TV/VCR), obvie estasección y lleve a cabo las instrucciones en"Configuración de una unidad combinada" enla página 39. Consulte también la "Tabla dedispositivo" en la página 35 para averiguarqué dispositivos se pueden programar encada botón de dispositivo.Si tiene otra marca de convertidor de cable oun receptor de satélite que le gustaría controlar,será necesario que desbloquee el Bloqueode ID de cable antes de cambiar el código deconvertidor (consulte "Programación de bloqueode ID de cable" en la página 45).1. Encienda un dispositivo y, si aplica, inserte elmedio de vídeo (por ejemplo, cassette odisco).NOTA: Lea completamente los pasos del 2 al 4 antesde continuar. Marque con resaltador o escribalos códigos y el dispositivo que desea programarantes de continuar con el paso 2.2. En el control remoto, presione una vez elbotón de dispositivo (es decir, VCR, DVD, AUD,TV o CBL); el cual brillará intermitentementeuna vez. Luego mantenga presionado SETUP(Configuración) hasta que el botón de modoseleccionado brille intermitentemente dosveces.3. Utilice los "Códigos del fabricante" (queempiezan en la página 57) para localizar eltipo de dispositivo y el nombre de la marca yluego ingrese el primer código de cuatrowww.urcsupport.com/atlasocap37
dígitos para su dispositivo. Si lo realizacorrectamente, el botón de modoseleccionado brillará intermitente dos veces.NOTA: Si el botón de modo seleccionado emite unbrillo intermitente largo, la entrada no es válida.Repita los pasos del 2 al 3 e intenteingresar de nuevo el mismo código.4. Dirija el control remoto al dispositivo ypresione PWR (encendido) una vez. Eldispositivo se debe apagar. Si no se apaga,repita los pasos del 2 al 3, intente todos loscódigos de su marca hasta que encuentre elque funcione. Si aún así no responde, intentebuscar el código (consulte "Búsqueda de sucódigo" en la página 40).NOTA: Si el dispositivo no tiene el botón PWR(encendido), presione el botón (Reproducir).5. Repita los pasos del 1 al 4 para cadadispositivo que desea que su control remotoponga en funcionamiento. Para una referenciafutura, escriba cada código defuncionamiento en los cuadros de la siguientepágina.Código de VCRTipo de dispositivo:__________________Código de DVDTipo de dispositivo:__________________Código de AUDTipo de dispositivo:__________________Código de CBLTipo de dispositivo:__________________www.urcsupport.com/atlasocap38
Código de TVTipo de dispositivo:__________________CONFIGURACIÓN DE UNA UNIDAD COMBINADASi cuenta con una unidad combinada como un conjuntode TV/VCR o un conjunto de TV/DVD, es necesario querealice los siguientes pasos especiales para configurarlo.Realice las siguientes instrucciones para controlar eldispositivo combinado:1. Para un conjunto de TV/VCR, encienda suconjunto de TV/VCR e inserte un cassette devídeo. (Para un conjunto de TV/DVD, inserteun DVD).2. En el control remoto, presione una vez VCR;brillará intermitentemente una vez. Luegomantenga presionado SETUP (Configuración)hasta que el botón VCR brilleintermitentemente dos veces.3. Utilice los "Códigos del fabricante" queempiezan en la página 57 para localizar elnombre de la marca e ingrese el primer códigode cuatro dígitos para su dispositivocombinado (por ejemplo, TV/VCR). Si realizacorrectamente este procedimiento, el botónVCR brillará intermitentemente dos veces.NOTA: Si el botón VCR no brilla intermitentementedos veces después de ingresar el último dígitodel código, repita los pasos del 2 al 3 y luegoingrese el mismo código nuevamente.Si localizó un código de configuración quefunciona para su dispositivo combinado (porejemplo, un conjunto de TV/VCR) y se enumeratambién un código separado de TV, seránecesario programar este código en el controlremoto para obtener acceso al control de volumen(consulte "Programación de control deldispositivo" empezando en la página 45).www.urcsupport.com/atlasocap39
4. Dirija el control remoto en su dispositivocombinado (por ejemplo, conjunto de TV/VCR) y presione una vez PWR (encendido). Eldispositivo se debe apagar. Si no responde,repita los pasos del 2 al 3, intente todos loscódigos enumerados para su marca hasta queencuentre el que funcione. Si aún así noresponde, intente buscar el código("Búsqueda de su código" que empieza en lapágina 40).5. Para una referencia futura, escriba cadacódigo de dispositivo que funciona en loscuadros de la siguiente página:Código de TV/VCR o TV/DVDCódigo de TV (si lo utiliza)BÚSQUEDA DE SU CÓDIGOSi su dispositivo de entretenimiento en el hogar noresponde al <strong>Control</strong> remoto de dispositivo <strong>Atlas</strong> <strong>OCAP</strong> 5con Aprendizaje después de intentar todos los códigosenumerados para su marca o si su marca no estáenumerada, intente buscar su código.Por ejemplo, para buscar un código para su TV:1. Encienda su TV..2. En el control remoto, presione una vez TV; éstebrillará intermitentemente una vez. Luegomantenga presionado SETUP (Configuración)hasta que el botón TV brille intermitentementedos veces.3. Ingrese 9 9 1. El botón TV brillaráintermitentemente dos veces.4. Dirija el control remoto al televisor y presionePWR (encendido) una vez.5. Presione y suelte el botón CH+continuamente, luego deténgase cuando eltelevisor se apague.www.urcsupport.com/atlasocap40
NOTE: En el modo de búsqueda, el control remotoenviará códigos IR desde su biblioteca al dispositivoseleccionado, empezando primerocon el código más utilizado.6. Presione PWR (encendido). El televisor debeencender, luego presione SETUP(configuración) para bloquear el código.NOTE: Si el televisor no enciende durante el paso 6,entonces presione y suelte lentamente CHpararegresar a través de los códigos, luegopresione SETUP (Configuración) cuando eltelevisor se encienda.Para buscar los códigos de sus otros dispositivos,repita los pasos del 1 al 6, pero sustituyael botón apropiado (por ejemplo, VCR, DVD,AUD o CBL) para el dispositivo que busca.REVISIÓN DE LOS CÓDIGOSSi configura el <strong>Control</strong> remoto del dispositivo <strong>Atlas</strong><strong>OCAP</strong> 5 con Aprendizaje al buscar su código dedispositivo (en la página anterior), es posible quenecesite averiguar cuál código de cuatro dígitos pone enfuncionamiento su equipo.Por ejemplo, para averiguar qué código pone enfuncionamiento su televisor:1. En el control remoto, presione una vez TV;éste brillará intermitentemente una vez.Luego mantenga presionado SETUP(Configuración) hasta que el botón TV brilleintermitentemente dos veces.2. Ingrese 9 9 0. El botón TV brillaráintermitentemente dos veces.3. Para ver el primer dígito del código, presioneuna vez 1. Cuente el número de veces que elbotón TV brilla intermitentemente (porejemplo, 3 brillos intermitentes = 3) y escribael número en el extremo izquierdo del cuadrode Código de TV que se encuentra en lapágina 39.NOTE: Si el dígito del código es 0, el botón de modoseleccionado no brillará intermitentemente.4. Repita el paso 3 tres veces más para los dígitosrestantes. Utilice 2 para el segundo dígito, 3para el tercer dígito y 4 para el cuarto dígito.Termine de escribir el código en los cuadrosde Código de TV en la página 39.www.urcsupport.com/atlasocap41
5. Para revisar los otros códigos de dispositivos,repita los pasos del 1 al 4, pero sustituya elbotón apropiado (por ejemplo, VCR, DVD, AUDo CBL) para el dispositivo que está revisando.Escriba los códigos en los cuadros apropiadosen la página 38.USO DE APRENDIZAJEEl <strong>Control</strong> remoto de dispositivo <strong>Atlas</strong> <strong>OCAP</strong> 5 conAprendizaje incluye la característica de Aprendizaje demanera que pueda agregar funciones que son únicaspara sus dispositivos de entretenimiento en el hogar(por ejemplo, búsqueda de VCR). Sin embargo, hay quetomar en cuenta algunas consideraciones..Precauciones de aprendizaje• Los botones aprendidos son específicos de modo, demanera que cada uno pueda almacenar una funciónúnica para cada modo.• Sus controles remoto originales deben estar enfuncionamiento para el aprendizaje a fin de quefuncionen correctamente.• No utilice los siguientes botones para aprendizaje:Botones de dispositivo, botones SETUP(configuración), Record (Grabación) (o), Tune-In(Sintonización).• La capacidad de aprendizaje es aproximadamentede 16 a 25 botones, dependiendo del código que seva a aprender.• Algunas funciones de dispositivo no se puedenaprender incluso los tipos de multi-frecuencia,algunas frecuencias altas y otros formatos pococomunes.• Para el aprendizaje óptimo, evite los altos niveles deluz ambiente como la luz solar natural o las lucesfluorescentes de rendimiento energético.NOTA: Tenga a la mano sus controles remotos originalesantes de realizar la programación deaprendizaje.Programación de un botón aprendidoNOTA: Si pasan más de 15 segundos entre las presionesdel botón, el control remoto sale de laprogramación..1. Mantenga presionado SETUP (Configuración)hasta que el botón del modo recientementeseleccionado brille intermitentemente dosveces, luego presione 9 7 5.www.urcsupport.com/atlasocap42
NOTA: Si el diodo fotoemisor muestra una luz conintermitencia larga, es posible que sus bateríasestén bajas o el <strong>Control</strong> remoto del dispositivo<strong>Atlas</strong> <strong>OCAP</strong> 5 con Aprendizaje tengauna falla de memoria.2. Presione una vez el botón de modo (es decir,VCR, DVD, AUD, TV o CBL) para asignar unmodo de aprendizaje.3. Luego presione el botón en su <strong>Control</strong> remoto<strong>Atlas</strong> <strong>OCAP</strong> para que aprenda el nuevo código.4. Coloque el control remoto de dispositivo <strong>Atlas</strong><strong>OCAP</strong> 5 con Aprendizaje cabeza a cabeza(aproximadamente con 2" de separación) desu control remoto original. Ubique también elbotón (en su control remoto original) quedesea que aprenda el <strong>Control</strong> remoto dedispositivo <strong>Atlas</strong> <strong>OCAP</strong> 5 con Aprendizaje..2"5. En el control remoto original, mantengapresionado el botón que va a aprender. Eldiodo fotoemisor del <strong>Control</strong> remoto dedispositivo <strong>Atlas</strong> <strong>OCAP</strong> 5 con Aprendizajebrillará intermitentemente de manera rápida,luego se apagará. Continúe sosteniendo elbotón en el control remoto original hasta queel diodo fotoemisor del <strong>Control</strong> remoto dedispositivo <strong>Atlas</strong> <strong>OCAP</strong> 5 con Aprendizajebrille intermitentemente dos veces.NOTA: Si el diodo fotoemisor muestra un brillo intermitentelargo, quiere decir que ocurrió unerror de aprendizaje. Intente repetir este pasode nuevo hasta que ocurra una captura conéxito. Si la función todavía no se captura,mantenga presionado SETUP (Configuración)para salir de programación y revisar "Precaucionesde aprendizaje" en la página anterior.Si es necesario, consulte también "Solución deproblemas" en la página 54. Después derevisar, inicie de nuevo la programación en elpaso 1.6. Repita los pasos del 2 al 5 para otro modo oclave o mantenga presionado SETUP(Configuración) para salir de laprogramación.www.urcsupport.com/atlasocap43
Eliminación de un botón de aprendizaje individualEste proceso regresa el botón a su programaciónoriginal para el modo que seleccione. También puedeeliminar la programación aprendida al enseñar unafunción diferente al botón (consulte "Programación deun botón aprendido" en la página 42).NOTA: Si pasan más de 15 segundos entre las presionesdel botón, el control remoto sale de laprogramación..1. Mantenga presionado SETUP (Configuración)hasta que el botón del modo recientementeseleccionado brille intermitentemente dosveces, luego presione 9 7 6.2. Presione una vez el botón de modo (es decir,VCR, DVD, AUD, TV o CBL).3. Presione dos veces el botón que contiene lafunción aprendida que va a eliminar. Elcontrol remoto brillará intermitentemente dosveces.4. Repita los pasos del 2 al 3 para otro botón omantenga presionado SETUP (Configuración)para salir de la programación.Eliminación de todos los botones aprendidos en unmodo específicoNOTA: Si pasan más de 15 segundos entre las presionesdel botón, el control remoto sale de laprogramación..1. Mantenga presionado SETUP (Configuración)hasta que el botón del modo recientementeseleccionado brille intermitentemente dosveces, luego presione 9 7 6.2. Presione dos veces un botón de modo (esdecir, VCR, DVD, AUD, TV o CBL) para borrartodos los botones aprendidos para ese modo.El diodo fotoemisor brilla intermitentementedos veces.3. Repita el paso 2 para otro modo o mantengapresionado SETUP (Configuración) para salirde la programación.www.urcsupport.com/atlasocap44
PROGRAMACIÓN DEL BLOQUEO DE CONTROLDE CANALESComo valor predeterminado, las capacidades de controlde canales del control remoto están bloqueadas para elconvertidor de cable. Los botones afectados* son 1 al 0,CH+, CH- y LAST (último). Esto le garantizará que nocambie inadvertidamente un canal en su TV o VCR. Sinembargo, puede desactivar esta característica parapermitir el acceso completo a estos botones en el modode TV y VCR.*NOTA: Esta característica no afecta el modo AUD.Desbloqueo del control remoto1. En el control remoto, presione una vez CBL;éste brillará intermitentemente una vez.Mantenga presionado SETUP (Configuración)hasta que el botón CBL brilleintermitentemente dos veces.2. Ingrese 9 7 3. El botón CBL brillaráintermitentemente dos veces.3. Presione una vez CH-. El botón CBL brillaráintermitentemente cuatro veces..Ahora el control remoto proporcionará las capacidadesde control de canales de TV y VCR mientras seencuentra en el modo de TV o VCR.Bloqueo de control de canales a CBL1. En el control remoto, presione una vez CBL;éste brillará intermitentemente una vez.Mantenga presionado SETUP (Configuración)hasta que el botón CBL brilleintermitentemente dos veces.2. Ingrese 9 7 3. El botón CBL brillaráintermitentemente dos veces.3. Presione una vez CH+. El botón CBL brillaráintermitentemente dos veces.Ahora, sin importar qué modo seleccione (exceptoAUD), los botones de canal cambiarán únicamente loscanales en su convertidor de cable.www.urcsupport.com/atlasocap45
CAMBIO DEL BLOQUEO DE VOLUMENEl bloqueo de volumen le permite controlar el volumen através del dispositivo que se identificó como el de lasbocinas principales, sin importar qué modo estéutilizando. En el control remoto de dispositivo <strong>Atlas</strong><strong>OCAP</strong> 5 con Aprendizaje, el bloqueo de volumen globalse establece en el Televisor, de manera que puedacontrolar el volumen del televisor mientras se encuentraen el modo VCR, DVD, TV o CBL. Puede realizar eldesbloqueo de volumen individual en un dispositivoseleccionado para establecer el control de su volumenpara un funcionamiento independiente.NOTA: Los controles de volumen del modo de audio(AUD) están activos sin importar las configuracionesde Bloqueo de volumen. Sinembargo, si bloquea los controles de volumenen el modo AUD, tendrá el control del volumendel dispositivo de audio en todos los otrosmodos (es decir, VCR, DVD, TV y CBL). Estopuede ser una ventaja si, por ejemplo, siempreescucha los dispositivos de entretenimientoen el hogar a través de las bocinas de su receptor.Desbloqueo del control de volumen para un dispositivoindividual (Desbloqueo del volumen individual))1. Asumiendo que el Bloqueo de volumen globalestá activo, seleccione un modo que deseadesbloquear en el control remoto (porejemplo, CBL) y presiónelo una vez. Luego,mantenga presionado SETUP (Configuración)hasta que el botón del dispositivo brilleintermitentemente dos veces.2. Ingrese 9 9 3. El botón del dispositivoseleccionado por última vez brillaráintermitentemente dos veces.3. Presione una vez VOL-. El botón deldispositivo seleccionado por última vezbrillará intermitentemente cuatro veces.4. Repita los pasos del 1 al 3 para cadadispositivo en el que desea desbloquear elvolumen.Ahora, después de seleccionar un dispositivo que tieneel volumen desbloqueado (por ejemplo, CBL), alpresionar VOL+, VOL- o MUTE (Silencioso), controlaráúnicamente el volumen de ese dispositivo.www.urcsupport.com/atlasocap46
Desbloqueo de todo el control de volumen(Desbloqueo global del volumen)NOTA: Cuando lleva a cabo estas instrucciones configurael control independiente del volumenpara todos los dispositivos programados.1. En el control remoto, mantenga presionadoSETUP (Configuración) hasta que el botón delúltimo dispositivo seleccionado brilleintermitentemente dos veces..2. Ingrese 9 9 3. El botón del dispositivoseleccionado por última vez brillaráintermitentemente dos veces.3. Presione una vez VOL+. El botón deldispositivo seleccionado por última vezbrillará intermitentemente cuatro veces.Bloqueo del control de volumen a un modo (Bloqueoglobal del volumen)NOTA: Los controles de volumen del modo de audioestán activos sin importar las configuracionesde Bloqueo de volumen. Sin embargo, si bloquealos controles de volumen al modo AUD,controlará el volumen del dispositivo de audioen todos los demás modos (es decir, VCR,DVD, TV o CBL). Esto puede ser una ventajasi, por ejemplo, siempre escucha los dispositivosde entretenimiento en el hogar a través delas bocinas de su receptor.1. En el control remoto, mantenga presionadoSETUP (Configuración) hasta que el botón delúltimo dispositivo seleccionado brilleintermitentemente dos veces.2. Ingrese 9 9 3. El botón del dispositivoseleccionado por última vez brillaráintermitentemente dos veces.3. Seleccione un modo (por ejemplo, TV o AUD)que desea utilizar para controlar el volumen.El botón del dispositivo seleccionado brillaráintermitentemente dos veces.Ahora, cuando presiona VOL+, VOL- o MUTE(Silencioso), el volumen del dispositivo seleccionado(por ejemplo, Televisor) se controla sin tomar en cuentael modo.www.urcsupport.com/atlasocap47
PROGRAMACIÓN DEL BLOQUEO DE ID DECABLEEl control remoto del dispositivo <strong>Atlas</strong> <strong>OCAP</strong> 5 conAprendizaje está bloqueado de fábrica para funcionarcon el set top box del proveedor de cable. Sin embargo, sitiene otra marca o modelo de convertidor de cable oservicio de satélite que le gustaría controlar, entonces,será necesario realizar los siguientes pasos paradesbloquear el bloqueo de ID, ingresar un nuevo códigode fabricante y bloquear de nuevo el bloqueo de ID.1. Encienda el convertidor de cable.2. En el control remoto, presione una vez CBL;brillará intermitentemente una vez. Luegomantenga presionado SETUP (Configuración)hasta que el botón CBL brilleintermitentemente dos veces.3. Introduzca 9 8 2. El botón CBL brillaráintermitentemente cuatro veces, indicandoque el bloqueo de ID está desbloqueado.4. Lleve a cabo las instrucciones de"Programación de control del dispositivo" enla página 37 para programar el control deldispositivo para el convertidor de cable oreceptor de satélite seleccionado.Cuando termine, realice los pasos 5 y 6 que seencuentran en esta página para bloquear denuevo el Bloqueo de ID de cable.5. En el control remoto, presione una vez CBL;brillará intermitentemente una vez. Luegomantenga presionado SETUP (Configuración)hasta que el botón CBL brilleintermitentemente dos veces.6. Introduzca 9 8 2. El botón CBL brillaráintermitentemente dos veces, indicando queel bloqueo de ID está bloqueado.PROGRAMACIÓN DE BOTONES MACROEl control remoto de dispositivo <strong>Atlas</strong> <strong>OCAP</strong> 5 conAprendizaje incluye dos botones macro (que seencuentran directamente debajo de los botones MUTE(Silencioso) y LAST (Último). Los botones macro lepermiten configurar macros para activar determinadosbotones en un orden específico. Por ejemplo, puedeconfigurar un botón macro para cambiar los canales enwww.urcsupport.com/atlasocap48
su televisor, subir o bajar volumen e iniciar la grabaciónen su VCR, todo con el toque de un botón. Si deseacambiar las macros almacenados en un botón macroprogramada previamente, será necesario borrarprimero el botón (consulte "Borrado de un botónmacro" en la página 50).Programación de un botón macro1. En el control remoto, mantenga presionadoSETUP (Configuración) hasta que ésta brilleintermitentemente dos veces.2. Ingrese 9 9 5. El botón SETUP(Configuración) brilla intermitentemente dosveces.3. Seleccione un botón macro (por ejemplo, F1)y presiónelo una vez.4. Presione la secuencia de botones que deseaprogramar en el macro. Por ejemplo, paraencender el televisor y subir el volumen,presione TV seguido de VOL+.NOTA: Puede programar hasta 15 presiones de botonesen una macro.5. Mantenga presionado SETUP (Configuración)hasta que éste brille intermitentemente dosveces.6. Para agregar otra macro, repita los pasos del 1al 5, sustituyendo la nueva secuencia debotones a agregar en el paso 4.NOTA: La programación de más de cinco macros enel mismo botón de macro reemplaza las configuracionesanteriores.www.urcsupport.com/atlasocap49
Borrado de un botón macro1. En el control remoto, mantenga presionadoSETUP (Configuración) hasta que éste brilleintermitentemente dos veces.2. Ingrese 9 9 5. El botón SETUP(Configuración) brilla intermitentemente dosveces.3. Presione una vez el botón macro que deseaborrar..4. Mantenga presionado SETUP (Configuración)hasta que éste brille intermitentemente dosvecesEste botón macro ahora está borrado y listo para unanueva programación (consulte "Programación de unbotón macro" en la página 50). Si lo desea, repita estopara borrar otro botón de sintonización.USO DEL BOTÓN DE ENCENDIDO MAESTROEl control remoto de dispositivo <strong>Atlas</strong> <strong>OCAP</strong> 5 conAprendizaje tiene una característica única que lepermite encender o apagar en secuencia hasta cinco desus dispositivos de entretenimiento del hogar con lapresión de un botón individual.NOTA: El ENCENDIDO MAESTRO (PWR) únicamentefunciona en el modo CBL. Si no está programado,únicamente se encenderá o apagará elconvertidor de cable. En cualquier otro modo,la presión del ENCENDIDO MAESTRO (PWR)una vez encenderá o apagará el dispositivoseleccionado.www.urcsupport.com/atlasocap50
Programación del botón de encendido maestro1. En el control remoto, mantenga presionadoSETUP (Configuración) hasta que el botón delúltimo dispositivo seleccionado brilleintermitentemente dos veces.2. Ingrese 9 9 5. El botón del dispositivoseleccionado por última vez brillaintermitentemente dos veces.3. Presione una vez PWR (encendido).4. Para el primer dispositivo que desea en lasecuencia de encendido, presione una vez elbotón de un dispositivo (por ejemplo, CBL).Luego, presione una vez PWR (encendido).Para el segundo dispositivo en la secuencia deencendido, presione una vez su botón (porejemplo, TV). Luego, presione PWR(encendido).5. Repita el paso 4 hasta cuatro veces más paraagregar un segundo, tercer, cuarto y quintodispositivo, si así lo desea.6. Para guardar las configuraciones y salir delprograma:a. Presione CBL una vez.b. Mantenga presionado SETUP (Configuración)hasta que el botón CBL brilleintermitentemente dos veces.Uso del botón de encendido maestro1. Después de realizar la programación, apunteel control remoto a los dispositivos. PresioneCBL una vez.2. Presione una vez PWR (encendido) paraencender o apagar en secuencia losdispositivos programados de entretenimientodel hogar.Verá que los dispositivos se encienden o apagan deacuerdo con la secuencia programada.www.urcsupport.com/atlasocap51
Borrado del botón de encendido maestro1. En el control remoto, mantenga presionadoSETUP (Configuración) hasta que el botón delúltimo dispositivo seleccionado brilleintermitentemente dos veces.2. Ingrese 9 9 5. El botón del dispositivoseleccionado por última vez brillaintermitentemente dos veces.3. Presione y suelte PWR (encendido).4. Mantenga presionado SETUP (Configuración)hasta que el botón CBL brilleintermitentemente dos veces.REASIGNACIÓN DE LOS BOTONES DEDISPOSITIVOEl control remoto de dispositivo <strong>Atlas</strong> <strong>OCAP</strong> 5 conAprendizaje puede configurarse para controlar unsegundo dispositivo de un tipo ya asignado. Porejemplo, para que la unidad controle un televisor, unConvertidor de cable y dos dispositivos de audio (porejemplo, dos receptores de audio), vuelva a asignar elbotón VCR sin utilizar para poner en funcionamiento elsegundo dispositivo de audio como se muestra acontinuación::NOTA: VCR está preestablecido de fábrica para controlarun VCR RCA. Al realizar los pasos quese presentan posteriormente reemplazará esasconfiguraciones.1. En el control remoto, presione una vez VCR;brillará intermitentemente una vez. Luegomantenga presionado SETUP (Configuración)hasta que el botón VCR brilleintermitentemente dos veces.2. Ingrese 9 9 2. El botón VCR brillaráintermitentemente dos veces.3. Presione AUD una vez, luego presione VCR unavez. El botón VCR brillará intermitentementedos veces.El botón VCR ahora está listo para programar unsegundo dispositivo de audio. Consulte "Programaciónwww.urcsupport.com/atlasocap52
de control de dispositivo" en la página 37. Para volver aasignar otros botones de dispositivo, repita esteprocedimiento y sustituya la secuencia del botónutilizando el siguiente cuadro:NOTA: Únicamente se puede asignar un dispositivo ala vez a un botón de dispositivo sin utilizar.To Re-AssignVCR comosegundobotón AUDVCR comosegundobotón TVVCR comosegundobotón CBLVCR de nuevoa VCRPerform Key SequenceVCRSETUP992AUDVCRVCRSETUP992TVVCRVCRSETUP992CBLVCRVCRSETUP992VCRVCRPara volver a asignar otro botón de dispositivo que nohaya utilizado, sustitúyalo para el botón VCR anterior yluego realice la secuencia. Por ejemplo, para volver aasignar un botón AUD sin utilizar como un botón de unsegundo DVD, realiceAUDSETUP992DVDAUD.Cuando finaliza una nueva asignación, el botónseleccionado de dispositivo (por ejemplo, AUD) brillaráintermitentemente para confirmar su selección. En esemomento, será necesario programar el control deldispositivo (consulte "Programación de control deldispositivo" en la página 37).BORRADO DE LA PROGRAMACIÓNPERSONALIZADAEl <strong>Control</strong> remoto de dispositivo <strong>Atlas</strong> <strong>OCAP</strong> 5 conAprendizaje contiene un programa de Restablecimientode programación personalizada. Puede utilizarlo paraeliminar toda la programación personalizada, exceptosus códigos de configuración y los botones dedispositivo reasignados..IMPORTANTE: La ejecución de este programa borrarátodas las configuraciones personalizadas parael Bloqueo de volumen, Botones aprendidos,Botones de sintonización y Bloqueo dewww.urcsupport.com/atlasocap53
canales. Sin embargo, la programación de sudispositivo continúa.1. En el control remoto, mantenga presionadoSETUP (Configuración) hasta que el botón delúltimo dispositivo seleccionado brilleintermitentemente dos veces.2. Introduzca 9 8 0. El botón del dispositivo queseleccionó por último brillaintermitentemente dos veces, hará una pausay de nuevo brilla intermitentemente dos vecespara confirmar que se borró toda laprogramación personalizada.ACTIVACIÓN DE LA ILUMINACIÓN DE FONDO(OPCIONAL)En algunos modelos de su control remoto de dispositivo<strong>Atlas</strong> <strong>OCAP</strong> 5 con Aprendizaje, puede activar lailuminación de fondo. La iluminación de fondo lepermite que el teclado del control remoto permanezcaencendido durante cinco segundos después de presionarcualquier botón. Para activar la iluminación de fondo enun control remoto con esa característica, realice elsiguiente paso:1. Presione SETUP (Configuración) dos veces enun período de un segundo. La iluminación defondo está encendida.Para desactivar la iluminación de fondo, realice elsiguiente paso:1. Presione SETUP (Configuración) dos vecesen un período de un segundo. La iluminaciónde fondo está apagada.SOLUCIÓN DE PROBLEMASPROBLEMA: El botón del dispositivo no brillaintermitentemente cuando presiona un botónSOLUCIÓN: Reemplace las baterías con dos (2) bateríasAA nuevas (consulte "Instalación de baterías" en lapágina 36).PROBLEMA: El botón del dispositivo brillaintermitentemente cuando presiona un botón, pero eldispositivo del entretenimiento del hogar no responde.SOLUCIÓN: Asegúrese de que esté apuntando el controlremoto a su dispositivo de entretenimiento del hogar yque esté a quince pies del dispositivo que intentacontrolar.www.urcsupport.com/atlasocap54
PROBLEMA: El control remoto no controla losdispositivos de entretenimiento del hogar o loscomandos no funcionan correctamente.SOLUCIÓN: Intente todos los códigos enumerados parala marca del dispositivo que está configurando.Asegúrese de que todos los dispositivos se puedan poneren funcionamiento por medio de un control remotoinfrarrojo.PROBLEMA: El conjunto de TV/VCR no respondeadecuadamente.SOLUCIÓN: Utilice los códigos de VCR para su marca. Esposible que algunas unidades combinadas necesiten uncódigo de televisor y un código de VCR para unfuncionamiento completo (consulte la página 38).PROBLEMA: No hay volumen en un segundo televisor.SOLUCIÓN: Siga las instrucciones que se encuentran en“Cambio del Bloqueo de Volumen” en la página 46.PROBLEMA: Los botones PLAY (Reproducir) y STOP(Detener) no funcionan en un convertidor de cableMotorola DCT-2000.SOLUCIÓN: Vuelva a programar el botón CBL para elcódigo de cable 0476 (consulte "Programación decontrol de dispositivo" en la página 37).PROBLEMA: Ya llevó a cabo el método de búsqueda ytodavía no encuentra un código que funcione.SOLUCIÓN: Lleve a cabo de nuevo el método debúsqueda después de borrar el botón del dispositivo taly como se muestra:a. Mantenga presionado SETUP (Configuración)hasta que el botón del dispositivo brilleintermitentemente dos veces..b. Ingrese 9 9 2.c. Presione y suelte dos veces el botón del dispositivoque va a borrar.PROBLEMA: El control remoto no enciende un conjuntode TV/VCR Sony o Sharp.SOLUCIÓN: Para encender estos productos es necesarioprogramar los códigos de TV en el control remoto. ParaSony, utilice el código de TV 0000 y el código VCR 0032.Para Sharp, utilice el código de TV 0093 y el código deVCR 0048.AVISO DE FCCSe realizaron pruebas en este equipo y éste cumple conlos límites para un dispositivo digital clase B, de acuerdocon la parte 15 de las Normas de FCC. Estos límitesestán diseñados para proporcionar una protecciónrazonable contra la interferencia dañina en unawww.urcsupport.com/atlasocap55
instalación residencial. Este equipo genera, utiliza ypuede emitir energía de radio frecuencia y, si no seinstala y utiliza de acuerdo con las instrucciones, puedeocasionar interferencia dañina para las comunicacionesde radio.Sin embargo, no hay garantía que no ocurriráinterferencia en una instalación predeterminada. Si esteequipo ocasiona interferencia dañina para la recepciónde radio o televisión, que se puede determinar a travésdel encendido y apagado del equipo, se recomienda alusuario intentar corregir la interferencia por medio deuna o más de las siguientes medidas:• Vuelva a orientar y ubicar la antena de recepción.• Aumente la separación entre el equipo y el receptor.• Conecte el equipo en un tomacorriente en uncircuito diferente al cual está conectado el receptor.• Consulte al distribuidor o un técnico conexperiencia de radio/TV para obtener ayuda.Se verificó que este equipo cumpla con los límites paraun dispositivo de computación clase B, de acuerdo conlas Normas de FCC. Para que continúe con elcumplimiento de las normas de FCC, con este equipodebe utilizar cables blindados. Es muy probable que elfuncionamiento con el equipo no aprobado o cables sinblindaje tengan como resultado la interferencia en larecepción de radio y televisor. Se advierte al usuario quelos cambios y modificaciones que realice al equipo sin laaprobación del fabricante podrían anular la autoridaddel usuario para operar este equipo.INFORMACIÓN ADICIONALEste producto no tiene ninguna parte a la que el usuario lepueda dar servicio. La apertura de la caja, excepto la cubiertade la batería, puede ocasionar daño permanente en su <strong>Control</strong>remoto de dispositivo <strong>Atlas</strong> <strong>OCAP</strong> 5 con Aprendizaje.• Para obtener ayuda por medio de Internet, visítenos en:www.urcsupport.com©Copyright 2006 por <strong>Universal</strong> Electronics Inc. No se puedereproducir, transmitir, transcribir, almacenar en ningúnsistema de recuperación o traducir a ningún idioma ningunaparte de esta publicación, de ninguna forma o por ningúnmedio, electrónico, mecánico, magnético, óptico, manual ocualquier otro, sin previa autorización escrita de <strong>Universal</strong>Electronics Inc.M1056L 12/06www.urcsupport.com/atlasocap56
MANUFACTURER’S CODES (CÓDIGOS DEFABRICANTE)Setup Codes for Audio AmplifiersCódigos de configuración para los amplificadores deaudioAdcom 0577, 1100Bose 0674Durabrand 1561Elan 0647GE 0078Harman/Kardon 0892JVC 0331Left Coast 0892Lenoxx 1561Luxman 0165Marantz 0892, 0321McIntosh 0251Nakamichi 0321NEC 0264Optimus 0395, 0823Parasound 0246Philips 0892Pioneer 0823Polk Audio 0892RCA 0823Realistic 0395Sansui 0321Shure 0264Sony 0689, 0815, 1126Soundesign 0078, 0211Victor 0331Wards 0078, 0211Yamaha 0354, 0133Setup Codes for Audio ReceiversCódigos de configuración para los receptores deaudioADC 0531Aiwa 1405, 0189, 0121, 0405,1243, 1388, 1641www.urcsupport.com/atlasocap57
Akai 1512Alco 1390Amphion Media Works 1563, 1615AMW 1563, 1615Anam 1609, 1074Apex Digital 1257, 1430, 1774Arcam 1120Audiotronic 1189Audiovox 1390, 1627B & K 0701, 0820, 0840BK 0702Bose 1229, 1629, 1841, 1933Cambridge Soundworks 1370Capetronic 0531Carver 1189, 0189Classic 1352Coby 1389Curtis Mathes 0080Daewoo 1250Delphi 1414Denon 1360, 0004, 1142Fisher 1801Gateway 1517Go Video 1532Harman/Kardon 0110, 0189, 0891, 1304,1306Hitachi 1801Integra 0135, 1298, 1320JBL 0110, 1306JVC 1374, 1495, 1811, 1871Kenwood 1313, 1570, 1569, 0186KLH 1390, 1412, 1428Koss 1366, 1497Lasonic 1798LG 1293Linn 0189Liquid Video 1497Magnavox 1189, 1269, 0189, 0391,0531, 1514Marantz 1189, 1269, 0189, 1289Mitsubishi 1393www.urcsupport.com/atlasocap58
Norcent 1389Nova 1389Onkyo 0135, 0842, 1298, 1320,1531Optimus 1023, 0080, 0186, 0531,0670, 1074Oritron 1366, 1497Panasonic 1308, 1518, 0309, 0367,1288, 1316, 1548, 1633,1763, 1764Philips 1189, 1269, 0189, 0391,1120, 1266Pioneer 1023, 0014, 0080, 0150,0244, 0531, 0630, 1384Polaroid 1508Polk Audio 0189, 1289, 1414Proscan 1254RCA 1023, 1609, 1254, 0080,0531, 1074, 1390, 1511Rio 1869Samsung 1295, 1500Sansui 0189Sanyo 1251, 1469, 1801Sharp 0186, 1286Sharper Image 1556Sherwood 1077, 1517, 1653Sirius 1627, 1811, 1987Sonic Blue 1532, 1869Sony 1058, 1441, 1258, 1759,1622, 0474, 1349, 1406,1442, 1558, 1658, 1758,1858Soundesign 0670Stereophonics 1023Sunfire 1313Teac 1074, 1390, 1528Technics 1308, 1518, 0309Thorens 1189Toshiba 1788Venturer 1390Wards 0189, 0014, 0080XM 1406, 1414www.urcsupport.com/atlasocap59
Yamaha 0176, 0186, 1176, 1276,1331, 1375Zenith 0857, 1293Setup Codes for Audio AccessoriesCódigos de configuración para los accesorios deaudioAccurian 1106Altec Lansing 0607, 1056, 1485Apple 1115, 1644Cambridge Soundworks 1530Creative 0872D-Link 1522DLO 1155Integra 1789iPort 1917Marantz 1491Motorola 1464NaviPod 1644Netgear 1785Omnifi 1605Onkyo 1789Roku 1828Sonance 1917SSI 1522Yamaha 1809, 1810Setup Codes for Cable Boxes/ConvertersCódigos de configuración para los convertidores/cajas de cableABC 0003, 0008, 0014, 0017Americast 0899Amino 1602, 1822Bell & Howell 0014Bell South 0899Clearmaster 0883ClearMax 0883Coolmax 0883Digeo 1187Digi 0637www.urcsupport.com/atlasocap60
Director 0476Dumont 0637General Instrument 0476, 0810, 0276, 0003GoldStar 0144Hamlin 0009, 0273i3 Micro 1602Jerrold 0476, 0810, 0276, 0003,0012, 0014Memorex 0000Motorola 1376, 0476, 0810, 0276,1187, 1254, 1106, 1540Multitech 0883Myrio 1602, 1822Pace 1376, 1877, 0237, 0008Panasonic 1376, 1877, 0000, 0107Panther 0637Paragon 0000Philips 1305, 0317Pioneer 1877, 0877, 0144, 0533Pulsar 0000Quasar 0000RadioShack 0883RCA 1256Regal 0279, 0273Runco 0000Samsung 1376, 1877, 0144Sasktel 1737Scientific Atlanta 1877, 0877, 0477, 0008,0017Sejin 1602Sony 1006Starcom 0003Supercable 0276Supermax 0883Thomson 1256Tocom 0012Torx 0003Toshiba 0000Tristar 0883V2 0883Viewmaster 0883www.urcsupport.com/atlasocap61
Vision 0883Vortex View 0883Zenith 0000, 0525, 0899Setup Codes for Cable/DVR/PVR CombosCódigos de configuración para reproductores de DVDAmericast 0899Amino 1822Digeo 1187General Instrument 0476, 0810Jerrold 0476, 0810Motorola 1376, 0810, 1187, 1106,1540, 0476Myrio 1822Pace 1376,1877, 0237Panasonic 1376, 1877Pioneer 1877, 0877RCA 1256Sasktel 1737Samsung 1376, 1877Scientific Atlanta 1877, 0877Sony 1006Supercable 0276Thomson 1256Zenith 0899Setup Codes for DVD PlayersCódigos de configuración para reproductores de DVDAccurian 1072, 1416Adcom 1094Advent 1016Aiwa 0641Akai 0695, 0770, 0899, 1089Alco 0790Allegro 0869Amphion Media Works 0872, 1245AMW 0872, 1245Apex Digital 0672, 0717, 0755, 0794,0796, 0797, 0830, 1004,1020, 1056, 1061, 1100Arrgo 1023Aspire Digital 1168, 1407www.urcsupport.com/atlasocap62
Audiologic 0736Audiovox 0790, 1041, 1071, 1072,1121, 1122Axion 1071, 1072B & K 0655, 0662BBK 1224Bel Canto Design 1571Blaupunkt 0717Blue Parade 0571Broksonic 0695, 0868, 1419Buffalo 1882Cary Audio Design 1477CAVS 1057Centrios 1577Cinea 0831Cinego 1399CineVision 0876, 0833, 0869Citizen 1277Coby 0778, 0852, 1086, 1107,1165, 1177, 1351Craig 0831Curtis Mathes 1087CyberHome 0816, 0874, 1023, 1024,1117, 1129, 1502, 1537D-Link 1881Daewoo 0784, 0705, 0833, 0869,1169, 1172, 1234, 1242,1441, 1443Denon 0490, 0634Desay 1407, 1455Diamond Vision 1316, 1609, 1610Disney 0675, 1270Dual 1068, 1085Durabrand 1127DVD2000 0521Emerson 0591, 0675, 0821, 1268Enterprise 0591ESA 0821, 1268, 1443Fisher 0670, 1919Funai 0675, 1268, 1334Gateway 1073, 1077, 1158www.urcsupport.com/atlasocap63
GE 0522, 0815, 0717Go Video 0744, 0715, 0741, 0783,0833, 0869, 1044, 1075,1099, 1144, 1158, 1304,1443, 1730Go Vision 1071, 1072GoldStar 0741GPX 0699, 0769Greenhill 0717Harman/Kardon 0582, 0702Hitachi 0573, 0664, 1247, 1919Hiteker 0672iLo 1348, 1472Initial 0717, 1472Innovative Technology 1542Insignia 1268Integra 0627Jaton 1078JBL 0702Jensen 1016JSI 1423JVC 0558, 0623, 0867, 1164,1275, 1602, 1863jWin 1049, 1051Kawasaki 0790Kenwood 0490, 0534, 0682, 0737KLH 0717, 0790, 1020, 1149,1261Konka 0711, 0719, 0720, 0721Koss 0651, 0896, 1423Kreisen 1421Landel 0826Lasonic 0798, 1173Lenoxx 1127LG 0591, 0741, 0801, 0869,1526LiteOn 1058, 1158, 1416, 1440Loewe 0511Magnavox 0503, 0539, 0646, 0675,0821, 1268, 1506Malata 0782, 1159Marantz 0539www.urcsupport.com/atlasocap64
McIntosh 1273Memorex 0695, 0831, 1270Microsoft 0522, 1708Mintek 0839, 0717, 1472Mitsubishi 1521, 0521Momitsu 1082NAD 0741Nakamichi 1222NEC 0785Nesa 0717, 1603NeuNeo 1454Next Base 0826NexxTech 1402Norcent 1003, 0872, 1107, 1265,1457Onkyo 0503, 0627, 0792Oppo 1224, 1525OptoMedia Electronics 0896Oritron 0651Panasonic 0490, 0632, 0703, 1362,1462, 1490, 1762Philips 0503, 0539, 0646, 0675,0854, 1260, 1267, 1354Pioneer 0525, 0571, 0631, 0632Polaroid 1020, 1061, 1086, 1245,1316, 1478, 1480, 1482Polk Audio 0539Portland 0770Presidian 0675, 1072Prima 1016Primare 1467Princeton 0674Proscan 0522ProVision 0778Qwestar 0651RCA 0522, 0571, 0717, 0790,0822, 1022, 1132, 1193Rio 0869RJTech 1360Rotel 0623, 1178Rowa 0823www.urcsupport.com/atlasocap65
Sampo 0698, 0752, 1501Samsung 0490, 0573, 0820, 0899,1044, 1075Sansui 0695Sanyo 0670, 0695, 0873, 1919Sensory Science 1158Sharp 0630, 0675, 0752, 1256Sharper Image 1117Sherwood 0633, 0770, 1043, 1077,1889Shinsonic 0533, 0839Sigma Designs 0674Sonic Blue 0869, 1099Sony 0533, 1533, 0864, 1033,1431, 1432, 1433, 1548,1892Sound Mobile 1298Sova 1122Sungale 1074, 1532Superscan 0821SVA 0860, 1105Sylvania 0675, 0821, 1268Symphonic 0675, 0821TAG McLaren 0894Teac 0790, 0809Technics 0490, 0703Technosonic 0730Techwood 0692Terapin 1031Theta Digital 0571Toshiba 0503, 0695, 1045, 1154,1854Tredex 0799, 0800, 0803, 0804Urban Concepts 0503US Logic 0839Valor 1298Venturer 0790Vialta 1509Vizio 1064, 1226Vocopro 1027, 1360Xbox 0522, 1708www.urcsupport.com/atlasocap66
Xwave 1001Yamaha 0490, 0539, 0545Zenith 0503, 0591, 0741, 0869Zoece 1265Setup Codes for DVD RecordersCódigos de configuración para grabadoras de DVDAccurian 1416Apex Digital 1056Aspire Digital 1168Coby 1086CyberHome 1129, 1502Funai 0675, 1334Gateway 1073, 1158Go Video 0741, 1158, 1304, 1730iLo 1348JVC 1164, 1275Kreisen 1421LG 0741LiteOn 1158, 1416, 1440Magnavox 0646, 0675, 1506Panasonic 0490Philips 0646Pioneer 0631Polaroid 1086RCA 0522Samsung 0490Sensory Science 1158Sharp 0675Sony 1033, 1431, 1432, 1433Sylvania 0675Zenith 0741Setup Codes for DVD CombosCódigos de configuración para conjuntos de DVDAkai 0695Audiovox 1071, 1121, 1122iLo 1472Initial 1472LG 1526Mintek 1472www.urcsupport.com/atlasocap67
RCA 1193Satellite Receivers and DVR/PVR SystemsReceptores de satélite y sistemas de DVR/PVRSetup Codes for Satellite ReceiversCódigos de configuración para los receptores desatéliteAlphaStar 0772Amino 1615Chaparral 0216Coolsat 1806Crossdigital 1109DirecTV 1377, 0392, 0566, 0639,1639, 1142, 0247, 0749,1749, 0724, 0819, 1856,1076, 1108, 0099, 1109,1392, 1414, 1442, 1443,1444, 1609, 1640Dish Network System 1505, 1005, 0775, 1170,1775Dishpro 1505, 1005, 0775, 1775Echostar 1505, 1005, 0775, 1170,1775Expressvu 0775, 1775GE 0566General Instrument 0869GOI 0775, 1775Goodmans 1246Hisense 1535Hitachi 0819, 1250HTS 0775, 1775Hughes Network Systems 1142, 0749, 1749, 1442,1443, 1444Humax 1790iLo 1535JVC 0775, 1170, 1775LG 1226, 1414Magnavox 0724, 0722Memorex 0724Mitsubishi 0749Motorola 0869NEC 1270Next Level 0869www.urcsupport.com/atlasocap68
Panasonic 0247, 0701Pansat 1807Paysat 0724Philips 1142, 0749, 1749, 0724,1076, 0722, 0099, 1442Proscan 0392, 0566Proton 1535RadioShack 0869RCA 0566, 0855, 0143, 1392Samsung 1377, 1276, 1108, 1109,1442, 1609Sanyo 1219SKY 0856Sony 0639, 1639, 1640Star Choice 0869Tivo 1142, 1442, 1443, 1444Toshiba 0749, 1749, 0790, 1285UltimateTV 1392, 1640Ultrasat 1806Uniden 0724, 0722US Digital 1535USDTV 1535Voom 0869Zenith 1856, 0856Setup Codes for DVR/PVR SystemsCódigos de configuración para los sistemas de DVR/PVRAmino 1615DirecTV 1377, 0392, 0639, 1142, 1076,0099, 1392, 1442, 1443, 1444,1640Dish Network System 1505, 0775Dishpro 1505, 0775Echostar 1505, 0775, 1170Expressvu 0775Hughes Network Systems 1142, 1442, 1443, 1444, 0739JVC 1170Motorola 0869Philips 1142, 1442, 0739Proscan 0392www.urcsupport.com/atlasocap69
RCA 1392Samsung 1442, 0739Sony 0639, 1640Star Choice 0869Setup Codes for TVsCódigos de configuración para TelevisorA-Mark 0003Abex 0032Accurian 1803Action0873lAdmira 0093, 0463Advent 0761, 0783, 0815, 0817, 0842,1933Adventura 0046Aiko 0092Aiwa 0701Akai 0812, 0702, 0030, 0098, 0672,1207, 1903, 1935Alaron 0179, 0183, 0216Albatron 0700, 0843Ambassador 0177America Action 0180Ampro 0751Anam 0180, 0004, 0009, 0068Anam National 0055, 0161AOC 0030, 0003, 0019, 0052, 0137,0185, 1365Apex Digital 0748, 0879, 0765, 0767, 0890,1217, 1943Archer 0003Astar 1548Audiovox 0451, 0180, 0092, 0003, 0623,0710, 0802, 0846, 0875, 1284,1937, 1951, 1952Aventura 0171Axion 1937Belcor 0019Bell & Howell 0154, 0016BenQ 1032, 1315Bradford 0180www.urcsupport.com/atlasocap70
Brockwood 0019Broksonic 0236, 0463, 0003, 1935, 1938Byd:sign 1309, 1311Cadia 1283Candle 0030, 0046, 0056, 0186Carnivale 0030Carver 0054, 0170CCE 0217, 0329Celebrity 0000Celera 0765Champion 1362Changhong 0765Cinego 1986Citizen 0060, 0030, 0092, 0039, 0046,0056, 0186, 0280Clairtone 0185Clarion 0180Commercial Solutions 1447, 0047Concerto 0056Contec 0180, 0157, 0158, 0185Craig 0180, 0161Crosley 0054Crown 0180, 0039Curtis Mathes 0047, 0054, 0154, 0451, 0093,0060, 0702, 0030, 0145, 0166,1347, 1147, 0747, 0466, 0056,0039, 0016CXC 0180CyberHome 0794Cytron 1326Daewoo 0451, 0092, 1661, 0019, 0039,0066, 0067, 0091, 0623, 0661,0672Daytron 0019Dell 1080, 1178, 1264, 1403Denon 0145, 0511Denstar 0628Diamond Vision 1996, 1997Dumont 0017, 0019Durabrand 0463, 0180, 0178, 0171, 1034,0003Dwin 0720, 0774www.urcsupport.com/atlasocap71
Dynatech 0049Electroband 0000, 0185Electrograph 1623, 1755Electrohome 0381, 0389, 0409Emerson 0154, 0236, 0463, 0180, 0178,0171, 1963, 1944, 0623, 0282,0280, 0270, 0185, 0183, 0182,0181, 0179, 0177, 0158, 0039,0038, 0019Emprex 1422, 1546Envision 0030, 0813, 1365Epson 0833, 0840, 1290ESA 0812, 0171, 1944, 1963Fisher 0154, 0159FlexVision 0710Fujitsu 0179, 0186, 0683, 0809, 0853Funai 0180, 0171, 0179, 1271, 1963Futuretech 0180Gateway 1001, 1002, 1003, 1004, 1755,1756GE 1447, 0047, 0051, 0451, 0178,1347, 0747, 0282, 0279, 0251,0174, 0138, 0135, 0055, 0029,0027, 0021Gibralter 0017, 0030, 0019Go Video 0886GoldStar 0178, 0030, 0001, 0002, 0019,0032, 0106, 0409Goodmans 0360Gradiente 0392Grunpy 0180, 0179Haier 1034, 0768Hallmark 0178Hannspree 1348, 1351, 1352Hantarex 1338Harley Davidson 0043, 0179Harman/Kardon 0054, 0078Harvard 0180, 0068Havermy 0093Helios 0865Hello Kitty 0451Hewlett Packard 1088, 1089, 1101, 1494, 1502Hisense 0748www.urcsupport.com/atlasocap72
Hitachi 1145, 0145, 0016, 0032, 0038,0056, 0095, 0097, 0151, 0173,0227, 0279, 0409, 0413, 0797,1960HP 1088, 1089, 1101, 1494, 1502Hyundai 0849, 1219, 1294iLo 1286, 1603, 1990Infinity 0054Initial 1603, 1990Insignia 0171, 1204, 1326, 1517, 1963,2002Inteq 0017Janeil 0046JBL 0054JCB 0000Jensen 0761, 0050, 0815, 0817, 1299,1933JVC 0053, 0036, 0069, 0160, 0169,0182, 0731, 1253Kamp 0216Kawasho 0158, 0216, 0308Kaypani 0052KEC 0180Kenwood 0030, 0019KLH 0765, 0767, 1962Kloss 0024, 0046, 0078KMC 0106Konka 0628, 0632, 0638, 0703, 0707Kost 1262, 1483KTV 0180, 0030, 0039, 0183, 0185,0217, 0280LG 1265, 0178, 0442, 0700, 0829,0856, 1178, 1325, 1423, 1758,1993Loewe 0136Logik 0016Luxman 0056LXI 0047, 0054, 0154, 0156, 0178,0148, 0747Magnavox 1454, 0054, 0030, 0706, 1963,1944, 1525, 1254, 1198, 0802,0386, 0230, 0187, 0186, 0179,0096, 0036, 0028, 0024, 0020Majestic 0015, 0016www.urcsupport.com/atlasocap73
Marantz 0054, 0030, 0444, 0704, 0854,0855, 1154, 1398Matsushita 0250, 0650Maxent 0762, 1211, 1755Megapower 0700Megatron 0178, 0145, 0003MEI 0185Memorex 0154, 0463, 0150, 0178, 0016,0106, 0179MGA 0150, 0178, 0030, 0019, 0155Midland 0047, 0017, 0051, 0032, 0039,0135, 0747Mintek 1603, 1990Minutz 0021Mitsubishi 0093, 1250, 0150, 0178, 0014,0019, 0098, 0155, 0331, 0358,0836, 0868, 1550Monivision 0700, 0843Motorola 0093, 0055, 0835Moxell 0835MTC 0060, 0030, 0019, 0049, 0056,0091, 0185, 0216Multitech 0180, 0049, 0217NAD 0156, 0178, 0866NEC 0030, 0019, 0036, 0056, 0170,0434, 0497, 0882, 1398, 1704Neovia 1338NetTV 0762, 1755Nikko 0178, 0030, 0092, 0317Noblex 0430Norcent 0748, 0824, 1089, 1365, 1589,1590, 1591Norwood Micro 1286, 1296, 1303Noshi 0018NTC 0092Olevia 1144, 1240, 1331, 1610Olympus 1342Onwa 0180Optimus 0154, 0250, 0166, 0650Optoma 0887Optonica 0093, 0165Orion 0236, 0463, 1463, 0179www.urcsupport.com/atlasocap74
Panasonic 0250, 0051, 0055, 0162, 0226,0338, 0375, 0650, 1291, 1410,1941, 1946, 1947Penney 0047, 0156, 0051, 0060, 0178,0030, 1347, 0747, 0309, 0149,0138, 0135, 0110, 0039, 0032,0027, 0021, 0019, 0018, 0003,0002Petters 1523Philco 0054, 0030, 0019, 0020, 0028,0096, 0302Philips 1454, 0054, 0690, 1154, 1483Pilot 0030, 0019, 0039Pioneer 0166, 0038, 0172, 0679, 0866,1260, 1398Polaroid 0765, 0865, 1262, 1276, 1314,1316, 1326, 1327, 1328, 1341,1498, 1523, 1991, 1992Portland 0092, 0019, 0039Prima 0761, 0783, 0815, 0817, 1933Princeton 0700, 0717Prism 0051Proscan 1447, 0047, 0747, 1347Proton 0178, 0003, 0031, 0052, 0466Protron 1320, 1323Proview 0835, 1401, 1498Pulsar 0017, 0019Quasar 0250, 0051, 0055, 0165, 0219,0650RadioShack 0047, 0154, 0180, 0178, 0030,0019, 0032, 0039, 0056, 0165,0409, 0747RCA 1447, 0047, 2002, 1958, 1953,1948, 1547, 1347, 1247, 1147,1047, 0747, 0679, 0278, 0174,0135, 0090, 0038, 0029, 0019,0018Realistic 0154, 0180, 0178, 0030, 0019,0032, 0039, 0056, 0165Rhapsody 0183, 0185, 0216Runco 0017, 0030, 0251, 0497, 0603,1398Sampo 0030, 0032, 0039, 0052, 0100,0110, 0762, 1755www.urcsupport.com/atlasocap75
Samsung 0060, 0812, 0702, 0178, 0030,1903, 1575, 1395, 1312, 1060,0814, 0766, 0427, 0408, 0329,0056, 0032, 0019Samsux 0039Sansui 0463, 1409, 1935Sanyo 0154, 0088, 0107, 0146, 0159,0232, 0484, 0799, 0893, 1142Sceptre 0878, 1217, 1360, 1599Scimitsu 0019Scotch 0178Scott 0236, 0180, 0178, 0019, 0179,0309Sears 0047, 0054, 0154, 0156, 0178,0171, 0015, 0056, 0146, 0148,0149, 0159, 0168, 0179, 0281,0747Sharp 0093, 0039, 0153, 0157, 0165,0220, 0281, 0386, 0398, 0491,0688, 0689, 0818, 0851, 1602Sheng Chia 0093Sherwood 1399Shogun 0019Signature 0016Signet 1262SIM2 Multimedia 1297Simpson 0186, 0187Sony 1100, 0000, 0011, 0080, 0111,0273, 0353, 0810, 0834, 1317Soundesign 0180, 0178, 0179, 0186Sova 1320, 1952Soyo 1520Spectricon 0003, 0137Squareview 0171SSS 0180, 0019Starlite 0180Studio Experience 0843Superscan 0093, 0864Supre-Macy 0046Supreme 0000SVA 0748, 0587, 0768, 0865, 0870,0871, 0872www.urcsupport.com/atlasocap76
Sylvania 0054, 0030, 0171, 0020, 0028,0065, 0096, 0381, 1271, 1944,1963Symphonic 0180, 0171, 1944Syntax 1144, 1240, 1331Tandy 0093Tatung 0003, 0049, 0055, 0396, 1101,1285, 1286, 1287, 1288, 1361,1756Technics 0250, 0051Technol Ace 0179Technovox 0007Techview 0847Techwood 0051, 0003, 0056Teknika 0054, 0180, 0150, 0060, 0092,0016, 0019, 0039, 0056, 0175,0179, 0186, 0312, 0322Telefunken 0702, 0056, 0074Tera 0031Thomson 0209, 0210TMK 0178, 0056, 0177TNCi 0017Toshiba 0154, 1256, 0156, 1265, 0060,1945, 1935, 1704, 1656, 1635,1356, 1343, 1325, 1306, 1156,0845, 0832, 0650, 0149, 0036Tosonic 0185Totevision 0039Trical 0157TVS 0463Ultra 0391, 1323<strong>Universal</strong> 0027Universum 1337US Logic 1286, 1303Vector Research 0030Victor 0053Video Concepts 0098Vidikron 0054, 0242, 1398Vidtech 0178, 0019, 0036Viewsonic 0797, 0857, 0864, 0885, 1330,1342, 1578, 1627, 1755Viking 0046, 0312Viore 1207www.urcsupport.com/atlasocap77
Visart 1336Vizio 0864, 0885, 1499, 1756, 1758Wards 0054, 0178, 0030, 1156, 0866,0202, 0179, 0174, 0165, 0111,0096, 0080, 0056, 0029, 0028,0027, 0021, 0020, 0019, 0016Waycon 0156Westinghouse 0885, 0889, 0890, 1282, 1577White Westinghouse 0463, 0623Wyse 1365Yamaha 0030, 0019, 0769, 0797, 0833,0839Zenith 0017, 0463, 1265, 0178, 0092,0016Zonda 0003Setup Codes for TVs (DLP)Códigos de configuración para Televisor (DLP)Hewlett Packard 1494HP 1494LG 1265Magnavox 1525Mitsubishi 1250Optoma 0887Panasonic 1291RCA 1447Samsung 0812, 1060, 1312SVA 0872Toshiba 1265, 1306Vizio 1499Setup Codes for TVs (HDTV)Códigos de configuración para Televisor (HDTV)Advent 0842Hitachi 1960Marantz 0854Mitsubishi 0150Panasonic 0250, 0650, 1291Pioneer 0679Princeton 0717RCA 1447www.urcsupport.com/atlasocap78
Samsung 0812, 0702Sharp 0688, 0689Toshiba 1256Setup Codes for TVs (LCD)Códigos de configuración para Televisor (LCD)Accurian 1803Action 0873Akai 1935AOC 1365Apex Digital 0890, 1217Astar 1548Audiovox 0180, 0710, 0802, 0846,0875, 1284, 1937, 1951,1952BenQ 1315Byd:sign 1309, 1311Cadia 1283CyberHome 0794Dell 1080, 1178, 1264Emprex 1422, 1546Envision 0813, 1365FlexVision 0710Funai 0171Go Video 0886Hannspree 1348, 1351Hewlett Packard 1088HP 1088Hyundai 0849, 1219, 1294iLo 1286, 1603, 1990Initial 1603, 1990Insignia 1204, 1517, 2002Jensen 1299Kost 1262LG 0856, 1178, 1993Magnavox 1454, 0802, 1198Marantz 0855Maxent 0762, 1211Mintek 1603, 1990Mitsubishi 1250NetTV 0762www.urcsupport.com/atlasocap79
Norcent 1365, 1589, 1591Norwood Micro 1286, 1296Olevia 1144, 1240, 1331, 1610Panasonic 0650, 1941Petters 1523Philips 1454, 1483Polaroid 1262, 1276, 1316, 1341,1498, 1523Protron 1320, 1323Proview 1401RCA 0047, 1958Sampo 0762Samsung 0812, 0766, 0814, 1395,1575Sansui 1409Sanyo 1142Sceptre 0878, 1217, 1360, 1599Sharp 0093, 0818, 1602Sherwood 1399Signet 1262Sony 0810Sova 1320Soyo 1520Superscan 0864SVA 0587, 0870, 0871Sylvania 0171, 1271Symphonic 0171Syntax 1144, 1240, 1331Tatung 1286Techview 0847Toshiba 0845, 1343, 1635, 1656Ultra 1323US Logic 1286Vidikron 1398Viewsonic 0857, 0864, 0885, 1330,1578, 1627Visart 1336Vizio 0864, 0885, 1756Westinghouse 0885, 0889, 0890, 1282,1577Wyse 1365www.urcsupport.com/atlasocap80
Zenith 1265Setup Codes for TV/DVD CombosCódigos de configuración para conjuntos de TV/DVD<strong>Control</strong>led by the TVAccurian 1803Advent 1933Akai 1935Apex Digital 1943Audiovox 1937, 1951, 1952Axion 1937Broksonic 1935Cinego 1986Diamond Vision 1997Emerson 1963ESA 1963Funai 1963Hitachi 1960iLo 1990Initial 1990Insignia 1963, 2002Jensen 1933KLH 1962LG 1993Magnavox 1963Mintek 1990Panasonic 1941Polaroid 1991Prima 1933RCA 1948, 1958, 2002Samsung 1903Sansui 1935Sova 1952Sylvania 1963Toshiba 1635, 1935<strong>Control</strong>led by the DVDAdvent 1016Akai 0695Apex Digital 0830www.urcsupport.com/atlasocap81
Audiovox 1071, 1121, 1122Axion 1071Broksonic 0695Cinego 1399Diamond Vision 1610Emerson 0675, 1268ESA 1268Funai 1268Go Vision 1071Hitachi 1247iLo 1472Initial 1472Insignia 1268Jensen 1016KLH 1261Konka 0719, 0720LG 1526Magnavox 1268Mintek 1472Panasonic 1490Philips 0854, 1260Polaroid 1480Prima 1016RCA 1022, 1193Samsung 0899Sansui 0695Sova 1122Sylvania 0675, 1268Toshiba 0695Setup Codes for TV/VCR CombosCódigos de configuración para conjuntos de TV/VCR<strong>Control</strong>led by the TVAmerica Action 0180Audiovox 0180Emerson 0236www.urcsupport.com/atlasocap82
<strong>Control</strong>led by the VCRAmerica Action 0278Audiovox 0278Broksonic 0002, 0479, 1479Citizen 1278Colt 0072Curtis Mathes 1035Daewoo 0637, 1278Emerson 0002, 0294, 0479, 0593,1278, 1479Funai 0000GE 0240, 0807, 1035, 1060GoldStar 1237Harley Davidson 0000Hitachi 0000LG 1037Lloyd's 0000Magnasonic 0593, 1278Magnavox 0000, 0593, 1781Magnin 0240Memorex 0162, 0454, 1037, 1162,1237, 1262MGA 0240Mitsubishi 0807Optimus 0162, 0454, 0593, 1162,1262Orion 0002, 0479, 1479Panasonic 0162, 1035, 1162, 1262Penney 0240, 1035, 1237Quasar 0162, 1035, 1162RadioShack 0000, 1037RCA 0240, 0807, 1035, 1060Samsung 1014Sansui 0000, 0479, 1479Sanyo 0240Sears 0000, 1237Sony 0000, 1232Sylvania 1781Symphonic 0000, 0593Thomas 0000www.urcsupport.com/atlasocap83
Toshiba 0845, 1145White Westinghouse 0637Zenith 0000, 0479, 0637, 1479Setup Codes for TV/VCR/DVD CombosCódigos de configuración para conjuntos de TV/VCR/DVD<strong>Control</strong>led by the TVAkai 1903Broksonic 1938Diamond Vision 1996Emerson 1944ESA 1944Magnavox 1944Panasonic 1946, 1947Polaroid 1992RCA 1953Sylvania 1944Symphonic 1944Toshiba 1945<strong>Control</strong>led by the DVDAkai 0899Broksonic 0868Diamond Vision 1609Emerson 0821ESA 0821Funai 1334Magnavox 0821Panasonic 1362, 1462Polaroid 1482RCA 1132Sharp 0630Superscan 0821Sylvania 0821Symphonic 0821Toshiba 1045<strong>Control</strong>led by the VCRSharp 0807www.urcsupport.com/atlasocap84
Setup Codes for VCRsCódigos de configuración para VCRABS 1972Admiral 0048, 0209Adventura 0000Aiko 0278Aiwa 0037, 0000, 0124, 0307,0468Akai 0041, 0049, 0053, 0061,0106, 0175Alienware 1972America Action 0278American High 0035Asha 0240Audiovox 0037, 0278Beaumark 0240Bell & Howell 0104Broksonic 0184, 0121, 0209, 0002,0211, 0295, 0361, 0479,1479, 1815Calix 0037Canon 0035, 0102Capehart 0020Carver 0081CCE 0072, 0278Citizen 0037, 0278, 1278Colt 0072Craig 0037, 0047, 0240, 0072,0271Curtis Mathes 0060, 0035, 0162, 0041,0760, 1035Cybernex 0240, 0051CyberPower 1972Daewoo 0045, 0278, 0020, 0561,0637, 1278Daytron 0020Dell 1972Denon 0042DirecTV 0739Durabrand 0039, 0038Dynatech 0000Electrohome 0037www.urcsupport.com/atlasocap85
Electrophonic 0037Emerex 0032Emerson 0037, 0184, 0000, 0121,0043, 0209, 0002, 0278,1479, 1278, 0637, 1593,0593, 0561, 0510, 0479,0361, 0295, 0294, 0212,0211, 0208, 0088, 0068,0061, 0036Fisher 0047, 0104, 0054, 0066Fuji 0035, 0033Funai 0000, 0593, 1593Garrard 0000Gateway 1972GE 0060, 0035, 0240, 0065,0202, 0760, 0761, 0807,1035, 1060Go Video 0232, 0279, 0432, 0526,0643GoldStar 0037, 0038, 0018, 1237Gradiente 0000, 0408Grundig 0195Harley Davidson 0000Harman/Kardon 0081, 0038, 0075Harwood 0072, 0068Headquarter 0046Hewlett Packard 1972HI-Q 0047Hitachi 0000, 0042, 0041, 0065,0082, 0089, 0105, 0166Howard Computers 1972HP 1972Hughes Network Systems 0042, 0739Humax 0739Hush 1972iBUYPOWER 1972Jensen 0041JVC 0067, 0041, 0008, 0206,0207, 0384, 1707KEC 0037, 0278Keen 0693Kenwood 0067, 0041, 0038, 0384KLH 0072www.urcsupport.com/atlasocap86
Kodak 0035, 0037LG 1037Linksys 1972Lloyd's 0000, 0208Logik 0072LXI 0037Magnasonic 0593, 1278Magnavox 0035, 0039, 0081, 0000,0149, 0110, 0563, 0593,1593, 1781Magnin 0240Marantz 0035, 0081Marta 0037Matsushita 0035, 0162, 1162Media Center PC 1972MEI 0035Memorex 0035, 0162, 0037, 0048,0039, 0047, 0240, 0000,0104, 0209, 0046, 0307,0454, 0479, 1037, 1162,1237, 1262MGA 0240, 0043, 0061MGN Technology 0240Microsoft 1972Mind 1972Minolta 0042, 0105Mitsubishi 0067, 0043, 0061, 0075,0173, 0443, 0807Motorola 0035, 0048MTC 0240, 0000Multitech 0000, 0072NAD 0058NEC 0104, 0067, 0041, 0038,0040, 0050, 0082Nikko 0037Nikon 0034Niveus Media 1972Noblex 0240Northgate 1972Olympus 0035, 0226Onkyo 0222www.urcsupport.com/atlasocap87
Optimus 1062, 0162, 0037, 0048,0104, 0058, 0432, 0454,0593, 1048, 1162, 1262Optonica 0062Orion 0184, 0209, 0002, 0295,0479, 1479Panasonic 1062, 0035, 0162, 0077,0102, 0225, 0226, 0227,0378, 0454, 0616, 1035,1162, 1262Penney 0035, 0037, 0240, 0042,0038, 0040, 0054, 1035,1237Pentax 0042, 0065, 0105Philco 0035Philips 0035, 0081, 0062, 0110,0618, 0739, 1081, 1181Pilot 0037Pioneer 0067, 0058Polk Audio 0081Portland 0020Presidian 1593Profitronic 0240Proscan 0060, 0202, 0760, 0761,1060Protec 0072Pulsar 0039, 0051Quarter 0046Quartz 0046Quasar 0035, 0162, 0077, 0454,1035, 1162RadioShack 0000, 1037Radix 0037Randex 0037RCA 0060, 0240, 0042, 0149,0058, 0065, 0077, 0105,0106, 0202, 0760, 0761,0807, 0880, 1035, 1060Realistic 0035, 0037, 0048, 0047,0000, 0104, 0046, 0062,0066ReplayTV 0614, 0616Ricavision 1972Ricoh 0034www.urcsupport.com/atlasocap88
Runco 0039Salora 0075Samsung 0240, 0045, 0051, 0053,0739, 1014Samtron 0643Sanky 0048, 0039Sansui 0000, 0067, 0209, 0041,0082, 0271, 0479, 1479Sanyo 0047, 0240, 0104, 0046,0159Scott 0184, 0045, 0121, 0043,0210, 0211, 0212Sears 0035, 0037, 0047, 0000,0042, 0104, 0046, 0054,0066, 0105, 1237Sharp 0048, 0062, 0807, 0848Shintom 0072Shogun 0240, 0051Singer 0072Sonic Blue 0614, 0616Sony 0035, 0032, 0033, 0000,0011, 0034, 0636, 1032,1232, 1972Stack 9 1972STS 0042Sylvania 0035, 0081, 0000, 0043,0110, 0593, 1593, 1781Symphonic 0000, 0593, 1593Systemax 1972Tagar Systems 1972Tatung 0041Teac 0000, 0041Technics 0035, 0162Teknika 0035, 0037, 0000, 0052Thomas 0000Tivo 0618, 0636, 0739, 1996TMK 0240, 0036, 0208Toshiba 0045, 0043, 0066, 0210,0212, 0366, 0845, 1008,1145, 1972, 1996Totevision 0037, 0240Touch 1972Unitech 0240www.urcsupport.com/atlasocap89
Vector 0045Vector Research 0038, 0040Video Concepts 0045, 0040, 0061Videomagic 0037Videosonic 0240Viewsonic 1972Villain 0000Voodoo 1972Wards 0060, 0035, 0048, 0047,0081, 0240, 0000, 0042,0072, 0149, 0062, 0212,0760White Westinghouse 0209, 0072, 0637XR-1000 0035, 0000, 0072Yamaha 0038Zenith 0039, 0033, 0000, 0209,0034, 0479, 0637, 1139,1479ZT Group 1972www.urcsupport.com/atlasocap90
NOTES
Revision 3.0M1056L