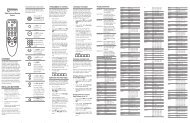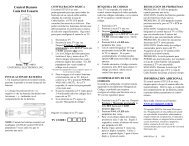
Atlas DVR/PVR 5-Device Universal Remote Control with Learning
Atlas DVR/PVR 5-Device Universal Remote Control with Learning
Atlas DVR/PVR 5-Device Universal Remote Control with Learning

You also want an ePaper? Increase the reach of your titles
YUMPU automatically turns print PDFs into web optimized ePapers that Google loves.
turn off your television, press TV. The TV keyblinks once and your television turns off.To <strong>Control</strong> your television:1. Use the VOL key to raise or lower thevolume of your television. To raise thevolume, press VOL+. To lower thevolume, press VOL-.Note:See “Key Charts” on page 9 to get anoverview of the functions of all thekeys available on your Polaris <strong>Remote</strong><strong>Control</strong>.TURN ON BACKLIGHTINGYour Polaris <strong>Remote</strong> <strong>Control</strong> has a feature thatallows backlighting of all its keys. Whenbacklighting is turned on, the keys to yourremote control are lit when you press them.To enable backlighting, do the following:1. Quickly press SETUP twice. All thekeys to your remote control are lit for afew seconds, allowing you to easily seethem in low-light conditions. Afteryou have activated backlighting, anytime you press a key, the selecteddevice key (either TV or CBL) blinksonce. After the device key blinks, allthe keys on your Polaris <strong>Remote</strong><strong>Control</strong> are lit for a few seconds.To disable backlighting, do the following:1. Quickly press SETUP twice. Keys nolonger are lit when you press them.The selected device key (either TV orCBL) still blinks once when you pressa key.www.urcsupport.com5
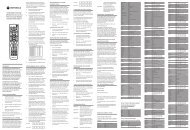
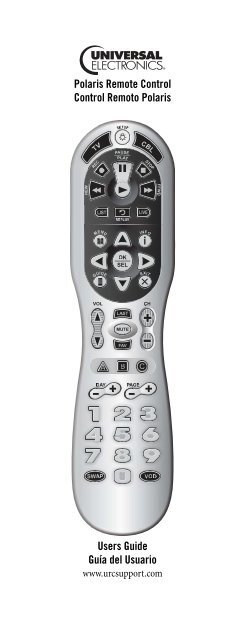
INTRODUCTIONThe Polaris <strong>Remote</strong> <strong>Control</strong> by <strong>Universal</strong> Electronics isour latest generation universal remote control. Itprovides easy and comfortable access to the remotecontrolfunctions you’ll need to use most often.Moreover, it’s packed <strong>with</strong> advanced, friendly featuressuch as:• Preprogrammed control to operate the cableconverter supplied by your cable service provider• Simple, two-button operation• No power key• Essential keys embossed for easy identification andoperation• Backlit keys• Code Search to help program control of older ordiscontinued componentsBefore using the product, you need to install theenclosed batteries and also perform some programmingto operate the specific home entertainment devices youwish to control.Please follow the instructions detailed in this manual toset up the unit and then start enjoying your new remotecontrol and cable service.www.urcsupport.com7
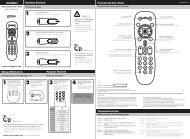
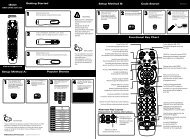
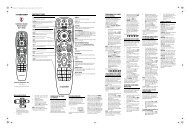
FEATURES AND FUNCTIONSUse the illustration below to locate features on thePolaris <strong>Remote</strong> <strong>Control</strong> and then study the Key Charts(on the next three pages) to learn how they function.To find out what type of devices can be controlled byeach device key after programming, see “<strong>Device</strong> Table”on page 11.www.urcsupport.com8
Key ChartsKeyFunctionUse SETUP for all programmingsequences.Quickly press SETUP twice to enablebacklighting of all the keys on yourPolaris <strong>Remote</strong> <strong>Control</strong>. Afterbacklighting has been enabled, quicklypress SETUP twice to disablebacklighting.To turn on your television or cable box,press TV or CBL once.Each device key has an embedded LED(red light) that blinks upon selectionand indicates the remote control isworking and (after programming) issending signals. When backlighting isenabled, all the keys on your remotecontrol are lit when you press any key.Use GUIDE to display the programguide.Press MENU once to display availableinteractive services.Use INFO to display the current channeland program information.Use DAY+ (or DAY-) to move a dayforward (or back) on your cableconverter’s program guide.Use the Cursor keys to move the cursorin the program guide and menu screensand to navigate <strong>with</strong>in the interactiveservice.Use OK/SELECT to choose options, PPVevents, and to tune programs from theprogram guide.Use PAGE+ (or PAGE-) to page up (orpage down) through menu screens andthe program guide.Use EXIT to exit out of your cableconverters menu and guide.www.urcsupport.com9
KeyFunctionUse A, B, or C to access additional cablefeatures (see your cable converter’smanual).Use VOL+ (or VOL-) to raise (or lower)the TV volume.Use FAV to cycle through your favoritechannels stored in your cable converter.Use CH+ (or CH-) to select the nexthigher (or lower) channel.Press MUTE once to turn the sound offor on.Press LAST once to recall the lastchannel.Press VOD to switch to Video-on-Demand services available throughyour cable set-top box. You can alsoprogram this key to tune in to yourfavorite channel.Use REPLAY to command your cable boxto instantly replay the last 7 seconds of aprogram you are watching.Press LIST once to display a list ofrecorded shows on your <strong>DVR</strong>/<strong>PVR</strong>.Press LIVE to return to watching live TV.Use REC, REW, PLAY, FFWD, STOP, andPAUSE to control a <strong>DVR</strong>/<strong>PVR</strong>. To recordin the VCR mode, press REC twice.Use the keypad numbers (1-9, and 0) todirectly tune channels (e.g., 09).Use SWAP to swap the content beingviewed. Applicable for cable boxesequipped <strong>with</strong> <strong>DVR</strong> service.www.urcsupport.com10
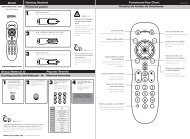
<strong>Device</strong> TableNOTE: Please refer to the table below whenperforming the instructions in“Programming <strong>Device</strong> <strong>Control</strong>” on page 12.After programming, the Polaris <strong>Remote</strong> <strong>Control</strong> cancontrol the following types of devices:<strong>Device</strong> Key<strong>Control</strong>s these types of devicesCable Box (Converter)The CBL key turns your cable box onand off.TelevisionThe TV key turns your television on andoff.INSTALLING BATTERIES❶❷1. On the back of the remote control, push thetab and lift off the battery cover.2. Locate the two (2) enclosed AA batteries.Match the + and - marks <strong>with</strong> those in thebattery case, then insert them. Align thecover’s keys <strong>with</strong> the case’s holes and press thecover back into place. The tab should clickwhen the cover is locked.3. Test the remote control by pressing any modekey (e.g., TV). If the batteries are insertedcorrectly, the LED (red light) blinks once.NOTE:When batteries need replacement, the remotecontrol ceases to operate. Replace thebatteries and the unit is restored to its fullfunctionality, complete <strong>with</strong> your favoritesettings.www.urcsupport.com11
PROGRAMMING DEVICE CONTROLThe Polaris <strong>Remote</strong> <strong>Control</strong> is preprogrammed tooperate the cable box (converter) provided by your cablecompany, and an RCA TV. To control devices other thanthe default brands, perform the following steps;otherwise skip this section.NOTE: If you have another brand of cable converteryou would like to control, you’ll need tounlock the cable ID Lock before changing theconverter code (see “Programming ID Lock”on page 14).1. Turn on a device.NOTE: Please read steps 2 through 4 completelybefore proceeding. Highlight or write downthe codes and device you wish to programbefore moving on to step 2.2. On the remote control, press a device key once(i.e., TV or CBL); it blinks once. Then pressand hold SETUP until the selected mode keyblinks twice.3. Use the “Manufacturer’s Codes (Códigos delFabricante)” starting on page 39) to locate thetype of device and brand name and then enterthe first four-digit code for your device. Ifperformed correctly, the selected mode keyblinks twice.NOTE: If the selected mode key emits a long blink,the entry is invalid. Repeat steps 2 through 3and try entering the same code again.4. Aim the remote control at the device (eitherTV or CBL) and press the key for that deviceonce. The device should turn off. If it doesnot, repeat steps 2 through 3, trying each codefor your brand until you find one that works.If it still does not respond, try searching forthe code (see “Searching for Your Code” onpage 13).5. Repeat steps 1 through 4 for the other deviceyou want the remote control to operate (eitherTV or CBL). For future reference, write downeach working device code in the boxes on thefollowing page.CBL Codewww.urcsupport.com12
<strong>Device</strong> Type:___________________TV Code<strong>Device</strong> Type:___________________SEARCHING FOR YOUR CODEIf your home entertainment device does not respond tothe Polaris <strong>Remote</strong> <strong>Control</strong> after trying all of the codeslisted for your brand, or if your brand is not listed at all,try searching for your code.To search for a code for your TV:1. Turn on your TV.2. On the remote control, press TV once; it blinksonce. Then press and hold SETUP until the TVkey blinks twice.3. Enter 9 9 1. The TV key blinks twice.4. Aim the remote control at the TV and press TVonce.5. Continually press and release CH+ until theTV turns off. Stop when the TV turns off.NOTE: In the search mode, the remote control sendsIR codes from its library to the selecteddevice, starting <strong>with</strong> the most popular codefirst.6. If the TV does not turn back on, slowly pressCH- until the TV turns on.7. Press SETUP once to lock in the code. The TVkey blinks twice.8. To search for the code of your cable box,repeat steps 1 through 5, but substitute theappropriate key (e.g., CBL) for the cable box.www.urcsupport.com13
CHECKING THE CODESIf you have set up the Polaris <strong>Remote</strong> <strong>Control</strong> bysearching for your device code (on the previous page),you may need to find out which four-digit code isoperating your equipment. To find out which code isoperating your TV:1. On the remote control, press TV once; it blinksonce. Then press and hold SETUP until the TVkey blinks twice.2. Enter 9 9 0. The TV key blinks twice.3. To view the code for the first digit, press 1once. Count the number of times the TV keyblinks (e.g., 3 blinks = 3) and write down thenumber in the leftmost TV Code box onpage 13.NOTE: If a code digit is 0, the selected mode key doesnot blink.4. Repeat step 3 three more times for theremaining digits. Use 2 for the second digit, 3for the third digit, and 4 for the fourth digit.Finish writing down the code in the TV Codeboxes on page 13.PROGRAMMING ID LOCKThe Polaris <strong>Remote</strong> <strong>Control</strong> is locked at the factory tooperate your cable system’s cable converter. However, ifyou have another brand or model of cable converter thatyou would like to control, then you’ll need to perform thefollowing steps to unlock the ID Lock, enter a newmanufacturer’s code, and lock the ID Lock again.www.urcsupport.com14
1. Turn on the cable converter.2. On the remote control, press CBL once; itblinks once. Then press and hold SETUP untilthe CBL key blinks twice.3. Enter 9 8 2. The CBL key blinks four times,indicating ID Lock is unlocked.4. Perform the instructions under“Programming <strong>Device</strong> <strong>Control</strong>” on page 12 toprogram device control for the desired cableconverter.When you are done, perform steps 5 and 6 onthis page to again lock the ID Lock.5. On the remote control, press CBL once; itblinks once. Then press and hold SETUP untilthe CBL key blinks twice.6. Enter 9 8 2. The CBL key blinks twice,indicating ID Lock is again locked.LOCKING THE VOLUME TO YOUR CABLE BOXNormally, the Polaris <strong>Remote</strong> <strong>Control</strong> is locked tocontrol the volume of your television only. However, ifyou have an older television that does not have a remotecontrol for the volume, you have to control yourtelevision’s volume through your cable box. To lock thevolume control to your cable box, perform the stepsbelow:www.urcsupport.com15
1. On the remote control, press and hold SETUPuntil the CBL key blinks twice.2. Enter 9 9 3. CBL blinks twice.Your Polaris <strong>Remote</strong> <strong>Control</strong> is now locked tocontrol the volume of your cable box.PROGRAMMING THE VODKEY FOR SPECIFIC CHANNELSThe Polaris <strong>Remote</strong> <strong>Control</strong> includes one programmabletune-in key: the VOD (Video on Demand) key. The VODkey can be programmed to remember five of yourfavorite cable channel settings. If you want to change thecable channels you previously programmed into the VODkey, you’ll need to clear the key first (see “Clearing theVOD Key” on page 17).Programming the VOD Key.1. On the remote control, press CBL once; itblinks once. Then press and hold SETUP untilthe CBL key blinks twice.2. Enter 9 9 5. The CBL key blinks twice.3. Press VOD once.www.urcsupport.com16
4. Press CBL once, followed by the channelnumber to be programmed (e.g., 3 9 forchannel 39).NOTE: If you are programming a channel for a DigitalCable Converter, you need to enter allchannels in a 3-digit channel format. Forexample, to program channel is 39, enter0 3 9.5. Press and hold SETUP until the CBL key blinkstwice.6. To add another channel, repeat steps 1through 5, substituting the new channel to beadded in step 4.NOTE: Programming more than five channels on theVOD key overwrites previous settings.Clearing the VOD Key1. On the remote control, press CBL once; itblinks once. Then press and hold SETUP untilthe CBL key blinks twice.2. Enter 9 9 5. The CBL key blinks twice.3. Press VOD once.4. Press and hold SETUP until the CBL key blinkstwice.The VOD key is now clear and ready for reprogramming(see “Programming the VOD Key.” on page 16).www.urcsupport.com17
TROUBLESHOOTINGPROBLEM: <strong>Device</strong> key does not blink when you press akey.SOLUTION: Replace the batteries <strong>with</strong> two (2) new AAalkaline batteries (see “Installing Batteries” on page 11).PROBLEM: <strong>Device</strong> key blinks when you press a key, buthome entertainment device does not respond.SOLUTION: Make sure you are aiming the remote controlat your home entertainment device and that you are<strong>with</strong>in 15 feet of the device you are trying to control.PROBLEM: The remote control does not control homeentertainment devices or commands are not performingproperly.SOLUTION: Try all listed codes for the device brandbeing set up. Make sure all devices can be operated <strong>with</strong>an infrared remote control.PROBLEM: Tried Search Method and still could not finda working code.SOLUTION: Try the Search Method again after clearingout the device key as follows:a. Press and hold SETUP until device key blinks twice.b. Enter 9 9 2.c. Press and release the device key to be cleared twice.FCC NOTICEThis equipment has been tested and found to comply<strong>with</strong> the limits for a class B digital device, pursuant topart 15 of the FCC Rules. These limits are designed toprovide reasonable protection against harmfulinterference in a residential installation. This equipmentgenerates, uses and can radiate radio frequency energyand if not installed and used in accordance <strong>with</strong> theinstructions, may cause harmful interference to radiocommunications.However, there is no guarantee that interference will notoccur in a particular installation. If this equipment doescause harmful interference to radio or televisionreception, which can be determined by turning theequipment off and on, the user is encouraged to try tocorrect the interference by one or more of the followingmeasures:• Reorient or relocate the receiving antenna.• Increase the separation between the equipment andreceiver.• Connect the equipment into an outlet on a circuitdifferent from that to which the receiver isconnected.www.urcsupport.com18
• Consult the dealer or an experienced radio/TVtechnician for help.This equipment has been verified to comply <strong>with</strong> thelimits for a class B computing device, pursuant to FCCRules. In order to maintain compliance <strong>with</strong> FCCregulations, shielded cables must be used <strong>with</strong> thisequipment. Operation <strong>with</strong> non-approved equipment orunshielded cables is likely to result in interference toradio and TV reception. The user is cautioned thatchanges and modifications made to the equipment<strong>with</strong>out the approval of manufacturer could void theuser’s authority to operate this equipment.ADDITIONAL INFORMATIONThis product does not have any user-serviceable parts.Opening the case, except for the battery cover, maycause permanent damage to your Polaris <strong>Remote</strong><strong>Control</strong>.• For help via the Internet, visit us at:www.urcsupport.com• For help via e-mail, contact us at:cablehelp@ueic.com©Copyright 2005 by <strong>Universal</strong> Electronics Inc. No partof this publication may be reproduced, transmitted,transcribed, stored in any retrieval system, or translatedto any language, in any form or by any means,electronic, mechanical, magnetic, optical, manual, orotherwise, <strong>with</strong>out prior written permission of<strong>Universal</strong> Electronics Inc.M1090 04/06www.urcsupport.com19
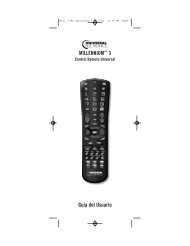
GUÍA RÁPIDABienvenido a la Guía Rápida del <strong>Control</strong>Remoto Polaris. Para comenzar a utilizar sucontrol remoto de forma inmediata, siga lospasos que se describen a continuación:Nota: Esta Guía Rápida supone que su controlremoto Polaris tiene colocadas lasbaterías. Si su control remoto no poseebaterías, deberá remitirse a la sección“Instalación de las Baterías” en lapágina 30.El <strong>Control</strong> Remoto Polaris ha sido diseñadopara su comodidad y conveniencia, y para quepueda utilizarlo de modo sencillo. Utilice losbotones TV y CBL para encender y apagar sutelevisor y su decodificador. Los botonesVolume y Mute se encuentran bloqueados demodo que pueda controlar el volumen de sutelevisor, y para que las demás funcionescontrolen su decodificador.PROGRAMACIÓN DEL CONTROL DE SUTELEVISOR Y DECODIFICADORPodrá controlar su televisor y su decodificadorcon su <strong>Control</strong> Remoto Polaris. Siga los pasosque se describen a continuación paraprogramar el control del aparato.Nota: Remitirse a la sección “Cuadro deAparatos” en la página 29 para verificarqué aparatos puede programar encada botón de modo.1. Encienda el aparato que deseacontrolar.Presione el botón de modo apropiado(TV o CBL). El botón de modoparpadeará una vez. Luego presione y2. mantenga presionado el botón SETUPhasta que el botón de modoseleccionado parpadee dos veces.3. Utilice los “Manufacturer’s Codes(Códigos del Fabricante)” en lapágina 39 para ubicar el tipo dewww.urcsupport.com21
4.aparato y su marca. Introduzca losprimeros cuatro números del códigopara ese aparato y marca. Si el códigoes correcto, el botón de motoparpadeará dos veces. Si el botónemite un único y largo parpadeo, elcódigo introducido es incorrecto.Repita los pasos 2 y 3, utilizando elmismo código.Dirija el control remoto hacia elaparato que desea controlar. Presioneuna sola vez el botón para dichoaparato (TV o CBL). Si el aparato seapaga, el control remoto para eseaparato estará programado. Si no seapaga, repita los pasos 2 a 4 hasta queencuentre el código correcto.5. Repita los pasos 1 a 4 para el próximoaparato que desee controlar (televisoro decodificador).FUNCIONAMIENTO DEL DECODIFICADORSu <strong>Control</strong> Remoto Polaris ya se encuentraprogramado para operar su decodificador.Puede utilizar el control remoto para encendero apagar su decodificador, como así tambiénpara cambiar de canal.1. Para encender su decodificador,presione CBL. El botón CBLparpadeará una vez y el decodificadorse encenderá. Para apagarlo, presioneCBL. El botón CBL parpadeará una vezy el receptor se apagará.www.urcsupport.com22
Para cambiar de canal, siga los siguientespasos:1. Utilice los botones CH+ y CH- paraseleccionar el canal que desea ver, uncanal a la vez.FUNCIONAMIENTO DEL TELEVISORPara encender su televisor, presione TV. Elbotón TV parpadeará una vez y su televisor seencenderá.Para controlar su televisor:1. Utilice el botón VOL para subir o bajarel volumen de la televisión. Para subirel volumen, presione VOL+. Parabajarlo, presione VOL-.Nota:Ver “Cuadro de Botones” en lapágina 27, donde encontrará unareseña de las funciones de todos losbotones del <strong>Control</strong> Remoto Polaris.RETROILUMINACIÓNEl <strong>Control</strong> Remoto Polaris posee unacaracterística que permite la retroiluminaciónde todos sus botones. Si se habilita laretroiluminación, los botones del controlremoto se encenderán cada vez que lospresione.www.urcsupport.com23
Para habilitar la retroiluminación:1. Presione rápidamente SETUP dosveces. Todos los botones del controlremoto se encenderán durante unossegundos, y podrá verlos fácilmenteen ambientes con poca luz. Despuésde haber activado la retroiluminación,cada vez que presione un botón, elbotón de modo seleccionado (TV oCBL) parpadeará una vez, luego todoslos botones del <strong>Control</strong> RemotoPolaris permanecerán encendidosdurante unos segundos.Para deshabilitar la retroiluminación:1. Presione rápidamente SETUP dosveces. Los botones ya no seencenderán cada vez que los presione.El botón de modo seleccionado (TV oCBL) aún parpadeará una vez cuandopresione un botón.¡Felicitaciones! Ahora puede utilizar su <strong>Control</strong>Remoto Polaris para operar las funciones másimportantes de su sistema de entretenimientodoméstico. Para obtener más informaciónacerca de estas útiles características del controlremoto, consulte el resto de esta Guía delUsuario, comenzando por lasección“Características y Funciones” en lapágina 26.www.urcsupport.com24
INTRODUCCIÓNEl <strong>Control</strong> Remoto Polaris de <strong>Universal</strong> Electronics esnuestra última generación de controles remotosuniversales. Provee un acceso sencillo y confortable a lasfunciones del control remoto que utiliza con másfrecuencia.Además, posee funciones avanzadas y fáciles de usar,como por ejemplo:• <strong>Control</strong> preprogramado para operar eldecodificador proporcionado por su proveedor decable.• Funcionamiento simple, con dos botones.• Sin botón de encendido.• Botones en relieve para su fácil identificación yaccionamiento.• Botones retroiluminados.• Búsqueda de Código para un mejor control decomponentes antiguos o discontinuados.Antes de comenzar a utilizar el producto, es necesarioinstalar las baterías y programar el control remoto paraoperar los aparatos de entretenimiento domésticoespecíficos que desea controlar.Siga las instrucciones que se detallan en este manualpara configurar la unidad y comenzar a disfrutar sunuevo control remoto y servicio de cable.www.urcsupport.com25
CARACTERÍSTICAS Y FUNCIONESUtilice la ilustración que aparece más abajo para ubicarlas funciones del <strong>Control</strong> Remoto Polaris y luego vea elCuadro de Botones (en las siguientes 3 páginas) paraconocer su función.Para saber qué tipo de aparatos se pueden controlar concada botón de modo luego de la programación, ver"“Cuadro de Aparatos” en la página 29.www.urcsupport.com26
Cuadro de BotonesBotónFunciónUtilice el botón SETUP para todas lassecuencias de programación.Presione rápidamente SETUP dos vecespara habilitar la retroilumincación detodos los botones del <strong>Control</strong> RemotoPolaris. Después de haber habilitado laretroiluminación, presione rápidamenteSETUP dos veces para deshabilitarla.Para encender su televisor odecodificador, presione TV o CBL unasola vez.Cada botón de modo posee una luz LED(luz roja) en relieve que parpadea alrealizar una selección e indica que elcontrol remoto está funcionando y que(luego de la programación) estáenviando señales. Cuando la función deretroilumincación se encuentrahabilitada, todos los botones de sucontrol remoto se encenderán cada vezque presione un botón.Utilice el botón GUIDE para mostrar laguía de programas.Presione el botón MENU una sola vezpara mostrar los servicios interactivosdisponibles.Utilice el botón INFO para mostrar lainformación del programa y del canalen pantalla.Utilice el botón DAY+ (o DAY-) paraavanzar (o retroceder) un día en la guíade programa de su decodificador.Utilice los Botones de Dirección paramover el cursor en la guía de programay pantallas de menú y para navegar porel servicio interactivo.Utilice los botones OK/SELECT paraseleccionar opciones, eventos de PPV, ypara sintonizar programas de la guía deprogramas.Utilice los botones PAGE+ (o PAGE-)para navegar por las pantallas de menúy la guía de programa.www.urcsupport.com27
BotónFunciónUse EXIT para salir del menú o de la guíade su convertidor de cable.Utilice los botones A, B o C para ingresara las funciones adicionales deldecodificador (ver manual de sudecodificador).Utilice los botones VOL+ (o VOL-) parasubir (o bajar) el volumen del televisor.Utilice el botón FAV para recorrer suscanales favoritos almacenados en sudecodificador.Utilice los botones CH+ (o CH-) paraseleccionar el canal siguiente (o elanterior).Presione el botón MUTE una sola vezpara activar o desactivar el sonido.Presione el botón LAST para regresar alcanal anterior.Presione el botón VOD para ingresar alservicio de Vídeo por Demanda,disponible a través de su decodificador.También podrá programar este botónpara sintonizar su canal favorito.Utilice el botón REPLAY para reproducirlos últimos 7 segundos del programaque está viendo.Presione el botón LIST una sola vez paramostrar la lista de programas grabadosen su <strong>DVR</strong>/<strong>PVR</strong>.Presione el botón LIVE para regresar a laprogramación en vivo.Utilice los botones REC, REW, PLAY,FFWD, STOP y PAUSE para controlar un<strong>DVR</strong>/<strong>PVR</strong>. Para grabar en modo VCR,presione REC dos veces.www.urcsupport.com28
BotónFunciónUtilice el teclado numérico (1-9, y 0)para sintonizar directamente loscanales (por ejemplo, 09).Utilice el botón SWAP para intercambiarlas imágenes del cuadro principal y losrecuadros que está viendo. Disponiblesolo para decodificadores que posean elservicio <strong>DVR</strong>.FuCuadro de AparatosNOTA: Deberá remitirse a la tabla que se describe acontinuación cuando siga las instruccionesdescriptas en la sección “Programación del<strong>Control</strong> del Aparato” en la página 30.Luego de su programación, el <strong>Control</strong> Remoto Polarispodrá controlar los siguientes aparatos:Botón demodo<strong>Control</strong>a los siguientes aparatosDecodificador (conversor)El botón CBL enciende y apaga sudecodificadorTelevisorEl botón TV enciende y apaga sutelevisorwww.urcsupport.com29
INSTALACIÓN DE LAS BATERÍAS❶❷1. En la parte posterior del control remoto,presione la pestaña y levante la tapa de lasbaterías.2. Tome dos (2) baterías AA. Coloque los polospositivo (+) y negativo (-) de las baterías conlas marcas + y - indicadas en elcompartimiento de las baterías. Coloque denuevo la tapa. La pestaña deberá hacer "clic"si está bien colocada.3. Pruebe el control remoto presionandocualquier botón de modo (por ejemplo, TV). Silas baterías están bien colocadas, la luz LED(luz roja) parpadeará una vez.NOTA:Cuando las baterías necesiten ser cambiadas,el control remoto dejará de funcionar. El controlremoto recuperará todas sus configuracionesfavoritas cuando instale las nuevasbaterías.PROGRAMACIÓN DEL CONTROL DEL APARATOEl <strong>Control</strong> Remoto Polaris se encuentra preprogramadopara operar el decodificador (conversor) proporcionadopor su compañía de cable y un TV RCA. Para podercontrolar otros aparatos que no sean las marcaspredeterminadas, siga los siguientes pasos; de locontrario, saltee esta sección.NOTA:Si posee otra marca de decodificador quedesea controlar, deberá desbloquear el ID delcable antes de cambiar el código del decodificador(ver “Programación del Bloqueo del ID”en la página 33).www.urcsupport.com30
1. Encienda un aparato.NOTA: Lea los pasos 2 al 4 antes de empezar.Recomendamos subrayar o anotar los códigosy el aparato que desea programar antes deseguir con el paso 2.2. Presione una sola vez cualquier botón demodo (por ejemplo, TV o CBL) del controlremoto; parpadeará una vez. Luego presione ymantenga presionado el botón SETUP hastaque el botón de modo seleccionado parpadeedos veces.3. Utilice los “Manufacturer’s Codes (Códigosdel Fabricante)” en la página 39 para poderubicar el tipo de aparato y la marca y luegointroduzca los primeros cuatro números delcódigo de su aparato. Si el código es correcto,el botón de modo seleccionado parpadearádos veces.NOTA: Si el botón de modo emite un largo parpadeo,el código es incorrecto. Repita los pasos 2 al 3e introduzca nuevamente el mismo código.4. Dirija el control remoto hacia el aparato (TV oCBL) y presione una sola vez el botón paradicho aparato. El aparato deberá apagarse. Sino se apaga, repita los pasos 2 a 3introduciendo todos los códigos de su marcahasta que encuentre uno que funcione. Si aúnasí no responde, intente buscar el código“Búsqueda del Código” en la página 32.5. Repita los pasos 1 al 4 para programarcualquier otro aparato que desee controlarcon el control remoto (TV o CBL). Parareferencia futura, escriba el código correctopara cada aparato en los casilleros que seencuentran a continuación:Código de CBLTipo de aparato:__________________Código de TVTipo de aparato:__________________www.urcsupport.com31
BÚSQUEDA DEL CÓDIGOSi su aparato no responde al <strong>Control</strong> Remoto Polarisluego de introducir todos los códigos enumerados parasu marca, o si su marca no aparece, intente buscar sucódigo.Para buscar el código de su TV:1. Encienda su TV.2. Presione el botón TV una sola vez, parpadearáuna vez. Luego presione y mantengapresionado el botón SETUP hasta que el botónTV parpadee dos veces.3. Marque los números 9 9 1. El botón TVparpadeará dos veces.4. Dirija el control remoto hacia la TV y presioneel botón TV una sola vez.5. Presione y suelte varias veces el botón CH+hasta que la televisión se apague. Deténgasecuando la televisión se apague.NOTA: En el modo de búsqueda, el control remotoenvía códigos IR desde su biblioteca alaparato seleccionado, comenzando primeropor el código más usado.6. Si el televisor no se vuelve a encender,presione lentamente CH- hasta que latelevisión se encienda nuevamente.7. Presione el botón SETUP una sola vez parafijar el código. El botón TV parpadeará dosveces.8. Para buscar el código de su decodificador,repita los pasos 1 al 5, pero presione el botónde modo apropiado (por ejemplo, CBL), parael decodificador.VERIFICACIÓN DE LOS CÓDIGOSSi ha programado el <strong>Control</strong> Remoto Polaris mediante labúsqueda del código del aparato (procedimientodescrito anteriormente), deberá averiguar el código dewww.urcsupport.com32
cuatro números que opera su equipo. Para buscar elcódigo que opera su TV:1. bPresione el botón TV una sola vez, parpadearáuna vez. Luego presione y mantengapresionado el botón SETUP hasta que el botónTV parpadee dos veces.2. Marque los números 9 9 0. El botón TVparpadeará dos veces.3. Para saber cuál es el primer número, presione1 una vez. Cuente cuántas veces parpadea elbotón TV (por ejemplo, 3 parpadeos = 3) yescriba el número en el primer casilleroubicado a la izquierda en la opción “Código deTV” en la página 31.NOTA: Si el número es 0, el botón de modo seleccionadono parpadeará4. Repita el paso 3 otras tres veces para obtenerlos números restantes. Utilice el botón 2 parael segundo número, el 3 para el tercer númeroy 4 para el cuarto número. Escriba el códigocompleto en los casilleros de la opción“Código de TV” en la página 31.PROGRAMACIÓN DEL BLOQUEO DEL IDEl <strong>Control</strong> Remoto Polaris se encuentra bloqueado defábrica para operar el decodificador de su sistema decable. No obstante, si posee otra marca o modelo dedecodificador que desea controlar, deberá seguir lossiguientes pasos para desbloquear el ID, introducir unnuevo código de fabricante, y bloquear nuevamente elID.1. Encienda el convertidor de cable.2. Presione CBL una sola vez, parpadeará unavez. Luego presione y mantenga presionado elbotón SETUP hasta que el botón CBL parpadeedos veces.www.urcsupport.com33
3. Marque los números 9 8 2. El botón CBLparpadeará cuatro veces, lo que indica que elID se ha desbloqueado.4. Siga las instrucciones descritas en“Programación del <strong>Control</strong> del Aparato” en lapágina 30 para programar el decodificadordeseado.Cuando finalice este paso, deberá llevar acabo los pasos 5 y 6 descritos más abajo parabloquear nuevamente el ID.5. Presione el botón CBL una sola vez,parpadeará una vez. Luego presione ymantenga presionado el botón SETUP hastaque el botón CBL parpadee dos veces.6. Marque los números 9 8 2. El botón CBLparpadeará dos veces, lo que indica que el IDha sido nuevamente bloqueado.BLOQUEO DEL VOLUMEN A MODODECODIFICADORPor lo general, el <strong>Control</strong> Remoto Polaris se encuentrabloqueado para controlar solamente el volumen deltelevisor. No obstante, si posee un televisor más antiguosin control remoto para el volumen, deberá controlar elvolumen a través de su decodificador. Para controlar elvolumen a través de su decodificador, siga los siguientespasos:1. Presione y mantenga presionado el botónSETUP hasta que el botón CBL parpadee dosveces.www.urcsupport.com34
2. Marque los números 9 9 3. El botón CBLparpadeará dos veces.PROGRAMACIÓN DEL BOTÓN VOD PARACANALES ESPECÍFICOSEl <strong>Control</strong> Remoto Polaris incluye un botón desintonización programable: el botón VOD (Vídeo pordemanda). El botón VOD puede ser programado paraque memorice cinco de sus canales favoritos de cable. Sidesea cambiar los canales de cable previamenteprogramados en el botón VOD, primero deberá eliminarla memoria del botón (ver “Eliminación de la Memoriadel Botón VOD” en la página 36).Programación del Botón VOD1. Presione el botón CBL una sola vez,parpadeará una vez. Luego presione ymantenga presionado el botón SETUP hastaque el botón CBL parpadee dos veces.2. Marque los números 9 9 5. El botón CBLparpadeará dos veces.3. Presione el botón VOD una sola vez.4. Presione el botón CBL una sola vez, seguidodel número del canal que desea programar(por ejemplo, 3 9 para el canal 39).NOTE:Si desea programar un canal para un DecodificadorDigital, deberá introducir todos loscanales en un formato de tres números. Porwww.urcsupport.com35
ejemplo, para programar el canal 39, deberámarcar los números 0 3 9.5. Presione y mantenga presionado el botónSETUP hasta que el botón CBL parpadee dosveces.6. Para agregar otro canal, repita los pasos 1 al 5,reemplazando el nuevo número del canal en elpaso 4.NOTE: Si programa más de cinco canales en el botónVOD, se sobrescribirá la configuración anterior.Eliminación de la Memoria del Botón VOD1. Presione el botón CBL una sola vez,parpadeará una vez. Luego presione ymantenga presionado el botón SETUP hastaque el botón CBL parpadee dos veces.2. Marque los números 9 9 5. El botón CBLparpadeará dos veces.3. Presione el botón VOD una sola vez.4. Presione y mantenga presionado el botónSETUP hasta que el botón CBL parpadee dosveces.El botón VOD se encuentra ahora vacío y listo para serreprogramado (ver “Programación del Botón VOD” enla página 35).SOLUCIÓN DE PROBLEMASPROBLEMA: El botón de modo no parpadea cuandopresiona un botón.SOLUCIÓN: Reemplace las baterías con dos (2) bateríasalcalinas AA nuevas (ver “Instalación de las Baterías” enla página 30).PROBLEMA: El botón de modo parpadea cuandopresiona un botón, pero el aparato no responde.www.urcsupport.com36
SOLUCIÓN: Cerciórese de que está apuntando el controlremoto al aparato y que usted se encuentra a no más de5 metros de distancia del aparato que desea controlar.PROBLEMA: El control remoto no controla los aparatos oestos no responden a los mandos adecuadamente.SOLUCIÓN: Pruebe todos los códigos enumerados parala marca del aparato que se desea configurar. Cercióresede que todos los aparatos pueden ser controlados con uncontrol remoto infrarrojo.PROBLEMA: Ha probado el Método de Búsqueda, peroaún así no encuentra el código correcto.SOLUCIÓN: Pruebe nuevamente el Método deBúsqueda, luego de haber borrado la memoria del botónde modo de la siguiente manera:a. Presione y mantenga presionado el botón SETUPhasta que el botón de modo parpadee dos veces.b. Marque los números 9 9 2.c. Presione y suelte dos veces el botón de modo al quedesea eliminarle la memoria.AVISO DE LA FCC (COMISIÓN FEDERAL DE LASCOMUNICACIONES)Este equipo ha sido probado y cumple con los límites deun aparato digital clase B, conforme a la sección 15 delas normas de la FCC. Estos límites están diseñados paraofrecer una protección razonable contra la interferenciaperjudicial en una instalación residencial. Este equipogenera, utiliza y puede irradiar energía deradiofrecuencia y, si no se instala y utiliza de acuerdocon las instrucciones, puede ocasionar interferenciaperjudicial en las comunicaciones de radio.No obstante, no se garantiza que no se produzcainterferencia en una instalación en particular. Si esteequipo provocara interferencia perjudicial para larecepción de radio o televisión, la cual se puedecomprobar encendiendo y apagando el equipo, seaconseja al usuario que intente corregir la interferenciacon una de las siguientes medidas:• Reorientar o reubicar la antena de recepción.• Aumentar la distancia entre el equipo y el receptor.• Conectar el equipo a una toma de corriente en uncircuito distinto al circuito donde está conectado elreceptor.• Para obtener ayuda, consulte al distribuidor o a untécnico especializado en radio y televisión.Se ha verificado que este equipo cumple con los límitesde un dispositivo de computación de clase B, conforme alas normas de la FCC. Para mantener el cumplimientode las normas de la FCC, con este equipo se deberánwww.urcsupport.com37
utilizar cables blindados. El funcionamiento conequipos no aprobados o cables no blindados provocaráinterferencia en la recepción de radio y televisión. Seadvierte al usuario que cualquier cambio o modificaciónal equipo no expresamente aprobado por el fabricantepueden anular la autoridad del usuario para usar elequipo.INFORMACIÓN ADICIONALEste producto no contiene ninguna pieza que el usuariopueda reparar. Abrir la caja, a excepción delcompartimiento de las baterías, puede ocasionar dañospermanentes al <strong>Control</strong> Remoto Polaris.• Para obtener ayuda vía Internet, visítenos en:www.urcsupport.com• Para obtener ayuda vía correo electrónico,contáctenos en: cablehelp@ueic.com©Copyright 2005 por <strong>Universal</strong> Electronics Inc.Ninguna parte de esta publicación puede serreproducida, transmitida, transcrita, almacenada enningún sistema de recuperación, o traducida a cualquieridioma, en ninguna forma o medio, ya sea electrónico,mecánico, magnético, óptico, manual o de otro tipo, sinel consentimiento previo por escrito de <strong>Universal</strong>Electronics Inc.M1090 04/06www.urcsupport.com38
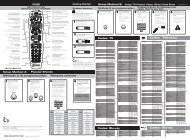
MANUFACTURER’S CODES (CÓDIGOS DELFABRICANTE)Setup Codes for TVsCódigos de Configuración para TelevisoresA-Mark 0003Abex 0032Admiral 0093, 0463Advent 0761, 0783, 0815, 0817, 0842, 1933Adventura 0046Aiko 0092Aiwa 0701Akai 0030, 0060, 0098, 0672, 0702, 0812,1903Alaron 0179, 0183, 0216Albatron 0700, 0843Ambassador 0177America Action 0180Ampro 0751Anam 0004, 0009, 0068, 0180Anam National 0055, 0161AOC 0003, 0019, 0030, 0052, 0137, 0185Apex Digital 0156, 0748, 0765, 0767, 0879, 1943Archer 0003Audiovox 0003, 0092, 0180, 0451, 0623, 0802,0875, 1284, 1937, 1951, 1952Aventura 0171Axion 1937Belcor 0019Bell & Howell 0016, 0154BenQ 1032, 1315Boxlight 0893Bradford 0180Brockwood 0019Broksonic 0003, 0180, 0236, 0463, 1935, 1938Cadia 1283Candle 0030, 0046, 0056, 0186Carnivale 0030Carver 0054, 0170CCE 0217, 0329Celebrity 0000www.urcsupport.com39
Celera 0765Champion 1362Changhong 0765Cinego 1986Citizen 0030, 0039, 0046, 0056, 0060, 0092,0186, 0280Clairtone 0185Clarion 0180Commercial 0047, 1447SolutionsConcerto 0056Contec 0157, 0158, 0180, 0185Craig 0161, 0180Crosley 0054Crown 0039, 0180Curtis Mathes 0016, 0030, 0039, 0047, 0054, 0056,0060, 0093, 0145, 0154, 0166, 0451,0466, 0702, 0747, 1147, 1347CXC 0180Daewoo 0019, 0039, 0066, 0067, 0091, 0092,0451, 0623, 0661, 0672, 1661Daytron 0019Dell 1080, 1178, 1264, 1403, 1454Denon 0145, 0511Denstar 0628Diamond Vision 1996, 1997DMTech 1338Dream Vision 1297Dumont 0017, 0019Durabrand 0003, 0171, 0178, 0180, 0463, 1034Dwin 0093, 0720, 0747, 0774Dynatech 0049Electroband 0000, 0185Electrograph 1755Electrohome 0381, 0389, 0409Emerson 0019, 0038, 0039, 0154, 0158, 0171,0177, 0178, 0179, 0180, 0181, 0182,0183, 0185, 0236, 0270, 0280, 0282,0451, 0463, 0623, 1944, 1963Envision 0030, 0813, 1365Epson 0833, 0840, 1290ESA 0171, 0812www.urcsupport.com40
Fisher 0154, 0159Fujitsu 0179, 0186, 0683, 0809, 0853Funai 0171, 0179, 0180Futuretech 0180Gateway 1755, 1756GE 0021, 0027, 0029, 0047, 0051, 0055,0135, 0138, 0174, 0178, 0251, 0279,0282, 0451, 0747, 1347, 1447Gibralter 0017, 0019, 0030Go Video 0886GoldStar 0001, 0002, 0019, 0030, 0032, 0106,0178, 0409Goodmans 0360Gradiente 0392Grundig 0683Grunpy 0179, 0180Haier 0768, 1034Hallmark 0178Hannspree 1348, 1351, 1352Hantarex 1338Harley Davidson 0043, 0179Harman/Kardon 0054, 0078Harvard 0068, 0180Havermy 0093Helios 0865Hello Kitty 0451Hewlett Packard 1088, 1089, 1101, 1494, 1502Hisense 0748Hitachi 0016, 0032, 0038, 0056, 0095, 0097,0145, 0151, 0173, 0227, 0279, 0409,0413, 1145, 1960HP 1088, 1089, 1101, 1494, 1502Hyundai 0849iLo 1286, 1990Infinity 0054Initial 1990Inteq 0017Janeil 0046JBL 0054JCB 0000Jensen 0050, 0761, 0815, 0817, 1299, 1933www.urcsupport.com41
JVC 0036, 0053, 0069, 0160, 0169, 0182,0731, 1253, 1352Kamp 0216Kawasho 0158, 0216, 0308Kaypani 0052KEC 0180Kenwood 0019, 0030KLH 0765, 0767, 1962Kloss 0024, 0046, 0078KMC 0106Konka 0628, 0632, 0638, 0703, 0707KTV 0030, 0039, 0180, 0183, 0185, 0217,0280LG 0178, 0442, 0700, 0856, 1178, 1265,1325, 1993Loewe 0136Logik 0016Luxman 0056LXI 0047, 0054, 0148, 0154, 0156, 0178,0747Magnavox 0020, 0024, 0028, 0030, 0036, 0054,0096, 0179, 0186, 0187, 0230, 0386,0706, 0802, 1254, 1454, 1944, 1963Majestic 0015, 0016Marantz 0030, 0054, 0444, 0704, 0854, 0855,1154, 1454Matsushita 0250, 0650Maxent 1755Megapower 0700Megatron 0003, 0145, 0178MEI 0185Memorex 0016, 0106, 0150, 0154, 0178, 0179,0463MGA 0019, 0030, 0150, 0155, 0178Midland 0017, 0032, 0039, 0047, 0051, 0135,0747Mintek 1990Minutz 0021Mitsubishi 0014, 0019, 0093, 0098, 0150, 0155,0178, 0331, 0358, 0836, 0868, 1250,1550Monivision 0700, 0843Motorola 0055, 0093www.urcsupport.com42
MTC 0019, 0030, 0049, 0056, 0060, 0091,0185, 0216Multitech 0049, 0180, 0217NAD 0156, 0178, 0866NEC 0019, 0030, 0036, 0056, 0170, 0434,0497, 0882, 1704NetTV 1755Nikko 0030, 0092, 0178, 0317Noblex 0430Norcent 0748, 0824, 1365Norwood Micro 1286, 1296, 1303Noshi 0018NTC 0092Olevia 1144, 1240, 1331Onwa 0180Optimus 0154, 0166, 0250, 0650Optoma 0887, 1348Optonica 0093, 0165Orion 0179, 0236, 0463, 1463Panasonic 0051, 0055, 0162, 0226, 0250, 0338,0375, 0650, 1410, 1941, 1946, 1947Penney 0002, 0003, 0018, 0019, 0021, 0027,0030, 0032, 0039, 0047, 0051, 0060,0110, 0135, 0138, 0149, 0156, 0178,0309, 0747, 1347Philco 0019, 0020, 0028, 0030, 0054, 0096,0302Philips 0054, 0690, 1154, 1454Pilot 0019, 0030, 0039Pioneer 0038, 0166, 0172, 0679, 0866, 1260Polaroid 0765, 0865, 1276, 1314, 1316, 1326,1327, 1328, 1991, 1992Portland 0019, 0039, 0092Prima 0761, 0783, 0815, 0817, 1933Princeton 0700, 0717Prism 0051Proscan 0047, 0466, 0747, 1347, 1447Proton 0003, 0031, 0052, 0178, 0466Protron 1320, 1323Proview 1498Pulsar 0017, 0019Quasar 0051, 0055, 0165, 0219, 0250, 0650www.urcsupport.com43
RadioShack 0019, 0030, 0032, 0039, 0047, 0056,0154, 0165, 0178, 0180, 0409, 0747RCA 0018, 0019, 0029, 0038, 0047, 0090,0135, 0174, 0278, 0679, 0747, 1047,1147, 1247, 1347, 1447, 1547, 1948,1953, 1958Realistic 0019, 0030, 0032, 0039, 0056, 0154,0165, 0178, 0180Rhapsody 0183, 0185, 0216Runco 0017, 0030, 0251, 0497, 0603Sampo 0030, 0032, 0039, 0052, 0100, 0110,1755Samsung 0019, 0030, 0032, 0056, 0060, 0178,0217, 0329, 0408, 0427, 0587, 0702,0766, 0812, 0814, 1060, 1312, 1395,1903Samsux 0039Sansui 0463, 1935Sanyo 0088, 0107, 0146, 0154, 0159, 0232,0484, 0799, 0893, 1142Sceptre 1360Scimitsu 0019Scotch 0178Scott 0019, 0178, 0179, 0180, 0236, 0309Sears 0015, 0047, 0054, 0056, 0146, 0148,0149, 0154, 0156, 0159, 0168, 0171,0178, 0179, 0281, 0747Seleco 1297, 1351Sharp 0039, 0093, 0153, 0157, 0165, 0220,0281, 0386, 0398, 0491, 0688, 0689,0818, 0851Sheng Chia 0093Shogun 0019Signature 0016SIM2 Multimedia1297Simpson 0186, 0187Sole 0813Sony 0000, 0011, 0080, 0111, 0273, 0353,0810, 0834, 1100, 1317Soundesign 0178, 0179, 0180, 0186Sova 1320, 1952Spectricon 0003, 0137Squareview 0171SSS 0019, 0180www.urcsupport.com44
Starlite 0180Studio0843ExperienceSuperscan 0093, 0864Supre-Macy 0046Supreme 0000SVA 0587, 0748, 0768, 0865, 0870, 0871,0872Sylvania 0020, 0028, 0030, 0054, 0065, 0096,0171, 0381, 1944, 1963Symphonic 0171, 0180Syntax 1144, 1240, 1331Tandy 0093Tatung 0003, 0049, 0055, 0396, 1101, 1285,1286, 1287, 1288, 1361, 1756Technics 0051, 0250Technol Ace 0179Technovox 0007Techview 0847Techwood 0003, 0051, 0056Teknika 0016, 0019, 0039, 0054, 0056, 0060,0092, 0150, 0175, 0179, 0180, 0186,0312, 0322Telefunken 0056, 0074, 0702Tera 0031Thomson 0209, 0210TMK 0056, 0177, 0178TNCi 0017Toshiba 0036, 0060, 0149, 0154, 0156, 0650,0832, 0845, 1156, 1256, 1265, 1325,1343, 1356, 1360, 1656, 1704, 1935,1945, 1971Tosonic 0185Totevision 0039Trical 0157TVS 0463Ultra 0391<strong>Universal</strong> 0027Universum 1337US Logic 1286, 1303Vector Research 0030Victor 0053Video Concepts 0098www.urcsupport.com45
Vidikron 0054, 0242Vidtech 0019, 0036, 0178Viewsonic 0857, 0864, 0885, 1330, 1342, 1755Viking 0046, 0312Visart 1336Vizio 0864, 0885, 1756Wards 0016, 0019, 0020, 0021, 0027, 0028,0029, 0030, 0054, 0056, 0080, 0096,0111, 0165, 0174, 0178, 0179, 0202,0866, 1156Waycon 0156Westinghouse 0000, 0451, 0885, 0889, 1282White0463, 0623WestinghouseYamaha 0019, 0030, 0769, 0833, 0839Zenith 0016, 0017, 0092, 0178, 0463, 1145,1265Zonda 0003Setup Codes for Cable Boxes/ConvertersCódigos de Configuración para DecodificadoresABC 0003, 0008, 0014, 0017Americast 0899Amino 1602, 1822Bell & Howell 0014Bell South 0899Clearmaster 0883ClearMax 0883Coolmax 0883Digeo 1187Digi 0637Director 0476Dumont 0637General 0003, 0276, 0476, 0810InstrumentGoldStar 0144Hamlin 0009, 0273i3 Micro 1602Jerrold 0003, 0012, 0014, 0276, 0476, 0810Memorex 0000Motorola 0014, 0276, 0476, 0810, 1106, 1187,1254, 1376, 1540Multitech 0883www.urcsupport.com46
Myrio 1602, 1822Pace 0008, 0237, 1877Panasonic 0000, 0107Panther 0637Paragon 0000Philips 0317, 1305Pioneer 0144, 0533, 0877, 1877Pulsar 0000Quasar 0000RadioShack 0883RCA 1256Regal 0273, 0279Runco 0000Samsung 0144Sasktel 1737Scientific Atlanta 0008, 0017, 0477, 0877, 1877Sejin 1602Sony 1006Starcom 0003Supercable 0276Supermax 0883Thomson 1256Tocom 0012Torx 0003Toshiba 0000Tristar 0883V2 0883Viewmaster 0883Vision 0883Vortex View 0883Zenith 0000, 0525, 0899Setup Codes for Cable/<strong>DVR</strong>/<strong>PVR</strong> CombinationCódigos de Configuración para Combinaciones Cable/<strong>DVR</strong>/<strong>PVR</strong>Americast 0899Amino 1822Digeo 1187General 0476, 0810InstrumentJerrold 0476, 0810www.urcsupport.com47
Motorola 0476, 0810, 1106, 1187, 1376, 1540Myrio 1822Pace 0237, 1877Pioneer 0877, 1877RCA 1256Sasktel 1737Scientific Atlanta 0877, 1877Sony 1006Supercable 0276Thomson 1256Zenith 0899Setup Codes for DBS/<strong>DVR</strong>/<strong>PVR</strong> CombosCódigos de Configuración para Combinaciones DBS/<strong>DVR</strong>/<strong>PVR</strong><strong>Control</strong>led by the Satellite<strong>Control</strong>ados por SatéliteAmino 1615DirecTV 0099, 0392, 0639, 1076,1142, 1377, 1392, 1442,1443, 1444, 1640Dish Network System 0775, 1505Dishpro 0775, 1505Echostar 0775, 1170, 1505Expressvu 0775Hughes Network Systems 1142, 1442, 1443, 1444JVC 1170Motorola 0869Philips 1142, 1442Proscan 0392RCA 1392Samsung 1442Sony 0639, 1640Star Choice 0869Setup Codes for Satellite ReceiversCódigos de Configuración para Receptores SatelitalesAlphaStar 0772Amino 1615Chaparral 0216Coolsat 1806Crossdigital 1109www.urcsupport.com48
DirecTV 0099, 0247, 0392, 0566,0639, 0724, 0749, 0819,1076, 1108, 1109, 1142,1377, 1392, 1414, 1442,1443, 1444, 1609, 1639,1640, 1749, 1856Dish Network System 0775, 1005, 1170, 1505,1775Dishpro 0775, 1005, 1505, 1775Echostar 0775, 1005, 1170, 1505,1775Expressvu 0775, 1775GE 0392, 0566General Instrument 0869GOI 0775, 1775Goodmans 1246Hisense 1535Hitachi 0819, 1250HTS 0775, 1775Hughes 0749, 1442, 1749Hughes Network Systems 0749, 1142, 1442, 1443,1444, 1749Humax 1790iLo 1535Jerrold 0869JVC 0775, 1170, 1775LG 1226, 1414Magnavox 0722, 0724Memorex 0724Mitsubishi 0749Motorola 0856, 0869NEC 1270Next Level 0869Panasonic 0247, 0701Pansat 1807Paysat 0724Philips 0099, 0722, 0724, 0749,0819, 1076, 1142, 1442,1749Pioneer 1442Proscan 0392, 0566Proton 1535RadioShack 0869www.urcsupport.com49
RCA 0143, 0392, 0566, 0855,1392Samsung 1108, 1109, 1142, 1276,1377, 1442, 1609Sanyo 1219Sony 0639, 1639, 1640Star Choice 0869Tivo 1142, 1442, 1443, 1444Toshiba 0749, 0790, 0819, 1285,1749UltimateTV 1392, 1640Ultrasat 1806Uniden 0722, 0724US Digital 1535USDTV 1535Voom 0869Zenith 1856Setup Codes for TV/DVD CombosCódigos de Configuración para Combinaciones TV/DVD<strong>Control</strong>led by the TV<strong>Control</strong>ados por el TelevisorAdvent 1933Apex Digital 1943Audiovox 1937, 1951, 1952Axion 1937Broksonic 1935Cinego 1986Diamond Vision 1997Emerson 1963Hitachi 1960iLo 1990Initial 1990Jensen 1933KLH 1962LG 1993Magnavox 1963Mintek 1990Panasonic 1941Polaroid 1991Prima 1933RCA 1948, 1958www.urcsupport.com50
Samsung 1903Sansui 1935Sova 1952Sylvania 1963Toshiba 1935www.urcsupport.com51