Manuale di Programmazione Programming manual ... - Bpt
Manuale di Programmazione Programming manual ... - Bpt
Manuale di Programmazione Programming manual ... - Bpt

Create successful ePaper yourself
Turn your PDF publications into a flip-book with our unique Google optimized e-Paper software.
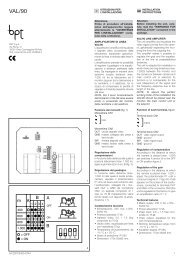
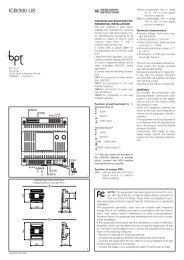
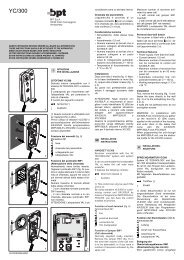
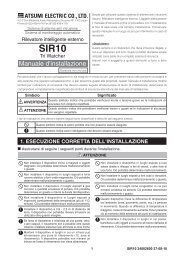
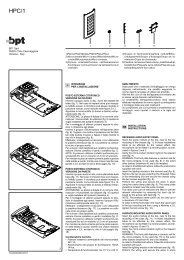
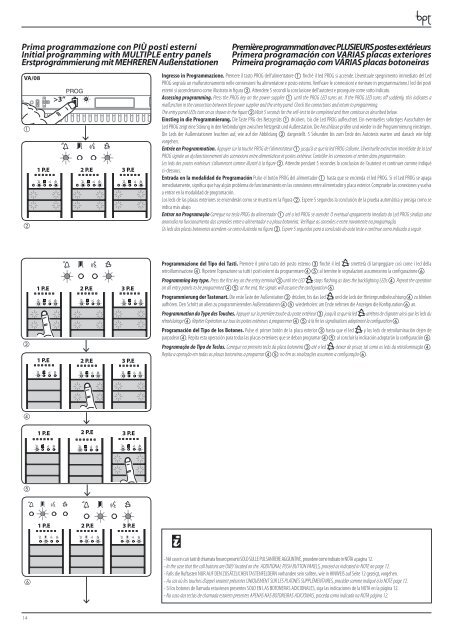
M2Prima programmazione con PIÙ posti esterniInitial programming with MULTIPLE entry panelsErstprogrammierung mit MEHREREN AußenstationenVA/08ab1 P.EPROG>3’’2 P.EM33 P.EPremière programmation avec PLUSIEURS postes extérieursPrimera programación con VARIAS placas exterioresPrimeira programação com VÁRIAS placas botoneirasIngresso in <strong>Programmazione</strong>. Premere il tasto PROG dell’alimentatore a finchè il led PROG si accende. L’eventuale spegnimento imme<strong>di</strong>ato del LedPROG segnala un malfunzionamento nelle connessioni fra alimentatore e posto esterno. Verificare le connessioni e rientrare in programmazione.I led dei postiesterni si accenderanno come illustrato in figura b. Attendere 5 secon<strong>di</strong> la conclusione dell’autotest e proseguire come sotto in<strong>di</strong>cato.Accessing programming. Press the PROG key on the power supplier a until the PROG LED turns on. If the PROG LED turns off suddenly, this in<strong>di</strong>cates amalfunction in the connection between the power supplier and the entry panel. Check the connections and return to programming.The entry panel LEDs turn on as shown in the figure b.Wait 5 seconds for the self-test to be completed and then continue as described below.Einstieg in <strong>di</strong>e Programmierung. Die Taste PRG des Netzgeräts a drücken, bis <strong>di</strong>e Led PROG aufleuchtet. Ein eventuelles sofortiges Ausschalten derLed PROG zeigt eine Störung in den Verbindungen zwischen Netzgerät und Außenstation. Die Anschlüsse prüfen und wieder in <strong>di</strong>e Programmierung einsteigen.Die Leds der Außenstationen leuchten auf, wie auf der Abbildung b dargestellt. 5 Sekunden bis zum Ende des Autotests warten und danach wie folgtvorgehen.Entrée en Programmation. Appuyer sur la touche PROG de l’alimentateur a jusqu’à ce que la led PROG s’allume. L’éventuelle extinction immé<strong>di</strong>ate de la LedPROG signale un dysfonctionnement des connexions entre alimentateur et postes extérieur. Contrôler les connexions et rentrer dans programmation.Les leds des postes extérieurs s’allumeront comme illustré à la figure b. Attendre pendant 5 secondes la conclusion de l’autotest et continuer comme in<strong>di</strong>quéci-dessous.Entrada en la modalidad de Programación Pulse el botón PROG del alimentador a hasta que se encienda el led PROG. Si el Led PROG se apagainme<strong>di</strong>atamente, significa que hay algún problema de funcionamiento en las conexiones entre alimentador y placa exterior. Compruebe las conexiones y vuelvaa entrar en la modalidad de programación.Los leds de las placas exteriores se encenderán como se muestra en la figura b. Espere 5 segundos la conclusión de la prueba automática y prosiga como sein<strong>di</strong>ca más abajo.Entrar na Programação Carregue na tecla PROG do alimentador a até o led PROG se acender. O eventual apagamento ime<strong>di</strong>ato do Led PROG sinaliza umaanomalia no funcionamento das conexões entre o alimentador e a placa botoneira. Verifique as conexões e entre novamente na programação.Os leds das placas botoneiras acendem-se como ilustrado na figura b. Espere 5 segundos para a conclusão do auto teste e continue como in<strong>di</strong>cado a seguir.c1 P.E1 P.E2 P.E2 P.E3 P.E3 P.E<strong>Programmazione</strong> del Tipo dei Tasti. Premere il primo tasto del posto esterno c finchè il led smetterà <strong>di</strong> lampeggiare così come i led dellaretroilluminazione d. Ripetere l’operazione su tutti i posti esterni da programmare d e: al termine le segnalazioni assumeranno la configurazione f.<strong>Programming</strong> key type. Press the first key on the entry terminal c until the LED stops flashing as does the backlighting LEDs d. Repeat the operationon all entry panels to be programmed d e: at the end, the signals will assume the configuration f.Programmierung der Tastenart. Die erste Taste der Außenstation c drücken, bis das Led und <strong>di</strong>e Leds der Hintergrundbeleuchtung d zu blinkenaufhören. Den Schritt an allen zu programmierenden Außenstationen d e wiederholen: am Ende nehmen <strong>di</strong>e Anzeigen <strong>di</strong>e Konfiguration f an.Programmation du Type des Touches. Appuyer sur la première touche du poste extérieur c jusqu’à ce que la led arrêtera de clignoter ainsi que les leds durétroéclairage d. Répéter l’opération sur tous les postes extérieurs à programmer d e: à la fin les signalisations adopteront la configuration f.Programación del Tipo de los Botones. Pulse el primer botón de la placa exterior c hasta que el led y los leds de retroiluminación dejen deparpadear d. Repita esta operación para todas las placas exteriores que se deban programar d e: al concluir la in<strong>di</strong>cación adoptarán la configuración f.Programação do Tipo de Teclas. Carregue na primeira tecla da placa botoneira c até o led deixar de piscar, tal como os leds da retroiluminação d.Repita a operação em todas as placas botoneiras a programar d e: no fim as sinalizações assumem a configuração f.d1 P.E2 P.E3 P.Eef1 P.E 2 P.E 3 P.Ey- Nel caso in cui i tasti <strong>di</strong> chiamata fossero presenti SOLO SULLE PULSANTIERE AGGIUNTIVE, procedere come in<strong>di</strong>cato in NOTA a pagina 12.- In the case that the call buttons are ONLY located on the ADDITIONAL PUSH BUTTON PANELS, proceed as in<strong>di</strong>cated in NOTE on page 12.- Falls <strong>di</strong>e Ruftasten NUR AUF DEN ZUSÄTZLICHEN TASTENFELDERN vorhanden sein sollten, wie in HINWEIS auf Seite 12 gezeigt, vorgehen.- Au cas où les touches d’appel seraient présentes UNIQUEMENT SUR LES PLATINES SUPPLÉMENTAIRES, procéder comme in<strong>di</strong>qué à la NOTE page 12.- Si los botones de llamada estuviesen presentes SOLO EN LAS BOTONERAS ADICIONALES, siga las in<strong>di</strong>caciones de la NOTA en la página 12.- No caso das teclas de chamada estarem presentes APENAS NAS BOTONEIRAS ADICIONAIS, proceda como in<strong>di</strong>cado na NOTA página 12.14