Microlino Quickguide
This is a Quickguide for the Microlino, everything you need to know.
This is a Quickguide for the Microlino, everything you need to know.

You also want an ePaper? Increase the reach of your titles
YUMPU automatically turns print PDFs into web optimized ePapers that Google loves.
MICROLINO<br />
QUICKGUIDE<br />
<strong>Microlino</strong> <strong>Quickguide</strong> 1
EN<br />
CONTENT<br />
01<br />
01 UNLOCKING THE VEHICLE 3<br />
02 DOOR CLOSING 4<br />
03 STARTING THE VEHICLE 5<br />
04 PARKING 6<br />
05 DRIVE MODES 7<br />
06 MULTIMEDIA 8<br />
07 CHARGING 9<br />
08 DRIVING LIGHTS & HORN 11<br />
09 BATTERY OFF SWITCH 12<br />
10 IMPORTANT NOTES & TROUBLESHOOTING 13<br />
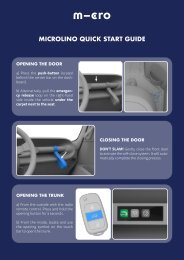
01 UNLOCKING THE VEHICLE<br />
UNLOCKING FROM THE OUTSIDE:<br />
• Electrically, using the radio remote control and then pressing the<br />
push button on the right-hand side of the vehicle (01)<br />
• Manually with the key on the right-hand side of the vehicle.<br />
To do this, press against the front door and turn the key<br />
clockwise.<br />
UNLOCKING FROM THE INSIDE:<br />
• By pressing the push-button behind the centre bar in the dashboard<br />
(02)<br />
• With the emergency release loop on the right-hand inside of<br />
the vehicle under the carpet next to the seat (03)<br />
BOOT RELEASE:<br />
• From the outside with the radio remote control. The opening<br />
button must be pressed for 3 seconds.<br />
• From the inside with the opening symbol on the touch bar<br />
02<br />
03<br />
2 3
EN<br />
02 DOOR CLOSING<br />
PUSH DON’T SLAM!<br />
03 STARTING THE VEHICLE<br />
Your <strong>Microlino</strong> has a soft-close system.<br />
Please note that when closing the front door to only push slightly; the<br />
soft-close system completes the closing automatically. This protects the<br />
interior components from shocks and prolongs their life.<br />
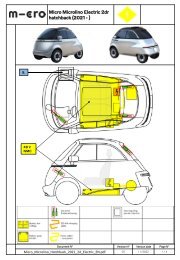
APERTURE ANGLE<br />
1871 mm<br />
To start the vehicle, turn the ignition key to the fixed position<br />
1 or 2. The display then shows «Ready» (01). The vehicle is now<br />
ready for operation. The third ignition key position (not engaging)<br />
has no function.<br />
Before driving, make sure that the handbrake is released<br />
(see chapter 04 PARKING) and then select the desired gear (see<br />
chapter 05 DRIVING MODES & RECUPERATION).<br />
01<br />
Please note that the door opens automatically to the maximum opening<br />
angle due to the gas spring. For this reason, the opening of the door<br />
should always be slowed down by holding on to the loop to avoid damage.<br />
The maximum space needed for the open door is 60cm towards<br />
the front and 190cm upwards.<br />
3031 mm<br />
IMPORTANT!<br />
The vehicle cannot be operated at a cell temperature below -10°<br />
Celsius. When outside temperatures are -10° Celsius or lower, the<br />
vehicle should therefore be stored in a closed or heated place.<br />
4 5
EN<br />
04 PARKING<br />
PULL DON’T ROLL!<br />
The <strong>Microlino</strong> does not have a parking function. Because of this,<br />
it is necessary to pull the handbrake fully until the last click<br />
every time you park.<br />
Stop, select neutral gear & pull the handbrake.<br />
Also make sure that you release the handbrake when driving off.<br />
When the handbrake is applied, the symbol is shown in the<br />
display.<br />
05 DRIVE MODES<br />
To the left of the steering wheel is a dial with which the driving speed<br />
can be set. To select the driving modes the brake pedal must be<br />
pressed.<br />
Central position<br />
Right position<br />
Left position<br />
Button in the middle<br />
IMPORTANT!<br />
N = Neutral (idle)<br />
D = Drive<br />
R = Reverse gear<br />
= Sport mode<br />
The sport mode can be selected with the rocket button in the centre<br />
of the dial. The current driving level is shown in the display.<br />
If the vehicle is fully charged or the battery cell temperature is lower<br />
than -5° Celsius, energy recuperation may be limited to preserve<br />
the battery and electronic components. During deceleration due to<br />
recuperation, which occurs when the accelerator pedal is released,<br />
the brake lights do NOT illuminate.<br />
ENERGY RECUPERATION<br />
The vehicle recuperates energy both when the brake pedal is<br />
pressed and when the accelerator pedal is released.<br />
6 7
EN<br />
06 MULTIMEDIA<br />
07 CHARGING<br />
DISPLAY<br />
The display shows all driving-relevant data as well as warning symbols.<br />
The touch bar can be used to switch between a modern and<br />
retro display.<br />
TOUCHBAR<br />
The touchbar is used to operate all functions and adjust the settings.<br />
Tap on the symbols to activate/deactivate them. With the<br />
ventilation symbol, the fan strength can be adjusted to three different<br />
levels by tapping several times. Swiping to the left reveals<br />
further functions.<br />
SPEAKER<br />
The <strong>Microlino</strong> has a portable Bluetooth speaker. When the<br />
speaker is connected to the USB cable, it switches on automatically<br />
as soon as the vehicle is started. Search for <strong>Microlino</strong><br />
2.0 in the Bluetooth settings of your smartphone and connect it<br />
to the speaker.<br />
RECOMMENDED APPLICATIONS<br />
swipe<br />
The <strong>Microlino</strong> has a type 2 plug and can be charged with the<br />
appropriate cable at a wallbox, public AC charging station or a<br />
household socket. The on-board charger has an output of 2.6 kW<br />
(standard range = 1.35 kW).<br />
Charging at a DC fast charging station is not possible.<br />
WALLBOX / PUBLIC CHARGING STATION:<br />
1. Open the charging flap on the vehicle and pull off the grommet<br />
from the charging connection.<br />
2. Unlock the vehicle<br />
3. Connect the type 2 cable on the wallbox side<br />
4. If necessary, activate the wallbox with the corresponding<br />
card/CHIP or APP.<br />
5. As soon as the wallbox is ready to charge, connect the Type 2<br />
charging cable to the vehicle.<br />
6. Check the charging process visually. The charging bar<br />
shows the charging process in the instrument cluster with a<br />
pulsating movement of the charging bar from left to right.<br />
7. Lock the vehicle.<br />
DOMESTIC POWER SOCKET (ICCB):<br />
1. Open the charging flap on the vehicle and remove the grommet<br />
from the charging connection.<br />
2. Connecting the charger to the household socket<br />
3. Check the current setting (max. 8A is permissible).<br />
4. Check the charger’s readiness for charging (if the LED lights<br />
up red, the unit is in an error state --> see quick fixes).<br />
5. Plug in the connector on the vehicle<br />
6. Check the charging process visually. The charging bar<br />
shows the charging process in the instrument cluster with a<br />
pulsating movement of the charging bar from left to right.<br />
7. Lock the vehicle<br />
ATTENTION!<br />
Spotify<br />
TuneIn Radio App<br />
Never connect the ICCB cable to an extension cable!<br />
Due to the increased resistance, this can lead to a cable fire.<br />
8<br />
9
EN<br />
END THE CHARGING PROCESS:<br />
1. Unlock the vehicle (also unlocks the charging cable).<br />
2. Unlocking of the charging cable can take up to 10 seconds.<br />
3. Unplug the cable from the vehicle<br />
4. Remove the cable from the AC wallbox or household socket.<br />
PUBLIC CHARGING:<br />
The public charging points can be found on the applications of<br />
the charging card providers. Popular providers with access to all<br />
major charging networks include:<br />
Swisscharge<br />
evpass<br />
MOVE<br />
ADDITIONAL INFORMATION:<br />
At a cell temperature of -5°C, charging is not possible.<br />
In this case, we recommend driving the vehicle briefly to<br />
bring the cell temperature (not the same as the outside temperature)<br />
to a level suitable for charging.<br />
When charging at the household socket using an ICCB<br />
charger (In-Cable Control Box or also “household charger”),<br />
select a maximum current of 8 amps.<br />
We strongly recommend that you never leave the vehicle<br />
connected to the wallbox or the ICCB charger for<br />
more than 48 hours and ideally only for the charging time<br />
actually required. In rare cases if not done, it may occur that<br />
the 12V battery discharges and the vehicle can no longer<br />
be started.<br />
08 DRIVING LIGHTS & HORN<br />
The <strong>Microlino</strong> 2.0 is equipped with parking lights, daytime running<br />
lights, low and high beams, brake lights and direction indicators.<br />
The arrangement of the driving light switch is as follows:<br />
Lowest position<br />
Middle position<br />
Top position<br />
Side button<br />
= Daytime running light<br />
= Parking light<br />
= Low beam / high beam<br />
= Horn<br />
ADDITIONAL INFORMATION:<br />
The vehicle does not have a dusk sensor. This means that in the<br />
automatic position, the low beam is NOT activated automatically<br />
when it gets darker and must be switched on manually.<br />
10 11
EN<br />
10 IMPORTANT NOTES &<br />
TROUBLESHOOTING<br />
09 BATTERY OFF SWITCH<br />
If the vehicle is not in use for more than two weeks, the 12 V battery<br />
must be disconnected from the system using the battery-off switch.<br />
This prevents it from discharging during the standstill period.<br />
ADDITIONAL INFORMATION:<br />
If the battery off switch has been activated, the vehicle can<br />
no longer be unlocked via the radio remote control. When<br />
using the vehicle again, it must therefore be unlocked manually<br />
via the lock on the front door (apply light pressure to the front door<br />
when unlocking) and then the battery must be reactivated via the<br />
switch in the boot. The boot cannot be opened if the 12 V battery is<br />
switched off. The battery switch must be switched on from the front.<br />
IMPORTANT NOTES!<br />
VEHICLE IDENTIFICATION<br />
The vehicle identification number (VIN) is stamped into the chassis.<br />
Visible under the carpet in the passenger compartment (passenger<br />
side).<br />
TOWING HOOK<br />
The towing hook is located under the boot carpet. It is mounted on<br />
the front of the vehicle. For this, the cover in the front bumper must<br />
be removed.<br />
WHEELS AND TYRES<br />
• Recommended tyre pressure<br />
• Tightening torque wheels<br />
IMPORTANT!<br />
1.8 bar (front and rear)<br />
40 Nm<br />
The tightening torque of the wheels must be 40Nm and<br />
should not exceed this value. Otherwise, the rims may be<br />
damaged.<br />
SIDE WINDOW<br />
At temperatures below 0° Celsius, the side window guide may<br />
freeze. Please do not apply increased force, as otherwise damage<br />
to the closing device cannot be ruled out.<br />
TROUBLESHOOTING<br />
VEHICLE DOES NOT DRIVE<br />
Quick fix 1 Make sure that the door is completely closed (softclose).<br />
Quick fix 2 Remove the ignition key, wait approx. one minute<br />
and turn the ignition key back to the driving position.<br />
Quick fix 3 Turn the 12V switch to OFF, wait approx. five minutes<br />
(or until the illuminated ring around the USB ports in the<br />
front door goes out) and then turn the 12V switch back to ON.<br />
12 13
EN<br />
VEHICLE DOES NOT CHARGE<br />
Quick fix 1 Check whether there is a fault on the ICCB charger<br />
(LED lamp lights up red).<br />
If so, unplug the charger at both ends and plug it in again on<br />
the socket side. If no extension cables or adapters are used<br />
in the event of a fault and the current is set to 8 amps or less,<br />
please call in a specialist to check the house installation.<br />
Quick fix 2 Set the charging power on the ICCB charger to<br />
the lowest amperage.<br />
Quick fix 3 Try a different socket.<br />
Quick fix 4 Remove the key, wait 5 minutes until the illuminated<br />
ring around the USB ports goes out and then try again.<br />
Quick fix 5 Disconnect the charging plug. Turn the 12V switch<br />
to OFF, wait approx. five minutes (or until the illuminated ring<br />
around the USB ports in the front door goes out) and then<br />
turn the 12V switch back to ON.<br />
DOOR DOES NOT CLOSE<br />
Quick fix Make sure that the opening button on the righthand<br />
side of the vehicle is not stuck. To do this, pull the opening<br />
button slightly in the opposite direction with rocking<br />
movements.<br />
DOOR CANNOT BE OPENED MANUALLY<br />
WITH THE KEY<br />
Quick fix Press frontally against the front door and turn<br />
the key clockwise at the same time to manually unlock the<br />
lock. See also 02 DOOR CLOSING.<br />
For more information about the vehicle, refer to your<br />
manual. The language can be changed on the website.<br />
Watch the instruction video.<br />
<strong>Microlino</strong>-Assistance (by Allianz): +41 800 22 33 44<br />
14<br />
<strong>Microlino</strong> AG<br />
Bahnhofstrasse 10, 8700 Küsnacht<br />
Switzerland<br />
info @microlino-car.com<br />
www.microlino-car.com<br />
microlino-car<br />
microlino-car