Manual de Instrucciones - Lorex
Manual de Instrucciones - Lorex
Manual de Instrucciones - Lorex

You also want an ePaper? Increase the reach of your titles
YUMPU automatically turns print PDFs into web optimized ePapers that Google loves.
Conectividad remota<br />
66<br />
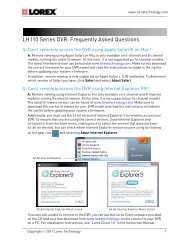
Paso 5 <strong>de</strong> 5: Ingrese la dirección DDNS en el Internet Explorer<br />
Para acce<strong>de</strong>r a la DVR <strong>de</strong> forma remota, escriba la dirección DDNS que creó anteriormente<br />
en Internet Explorer. La URL <strong>de</strong> DDNS <strong>de</strong>be incluir http://, el nombre <strong>de</strong> la URL <strong>de</strong> DDNS,<br />
seguido <strong>de</strong> dos puntos, entonces el número <strong>de</strong> puerto <strong>de</strong>l servidor Web <strong>de</strong> su DVR.<br />
Por ejemplo:<br />
Ejemplo <strong>de</strong> una dirección DDNS<br />
dos puntos<br />
Nombre DDNS Número puerto Web Server<br />
http://tomsmith.lorexddns.net:80<br />
Nombre DDNS creado por usted<br />
Dos puntos<br />
Número puerto Web<br />
Server<br />
Una vez que haya introducido su dirección DDNS en Internet Explorer, ingrese su nombre<br />
<strong>de</strong> usuario y contraseña DVR en la pantalla <strong>de</strong> inicio <strong>de</strong> sesión..<br />
NOTA: Para acce<strong>de</strong>r <strong>de</strong> forma remota, el nombre <strong>de</strong> usuario pre<strong>de</strong>terminado es admin.<br />
La contraseña se <strong>de</strong>ja en blanco.<br />
NOTA: Pue<strong>de</strong> tomar hasta 20 minutos para que se registre la dirección DDNS con su IP<br />
por primera vez .