NSX-AJ80 - How To & Troubleshooting
NSX-AJ80 - How To & Troubleshooting
NSX-AJ80 - How To & Troubleshooting

Create successful ePaper yourself
Turn your PDF publications into a flip-book with our unique Google optimized e-Paper software.
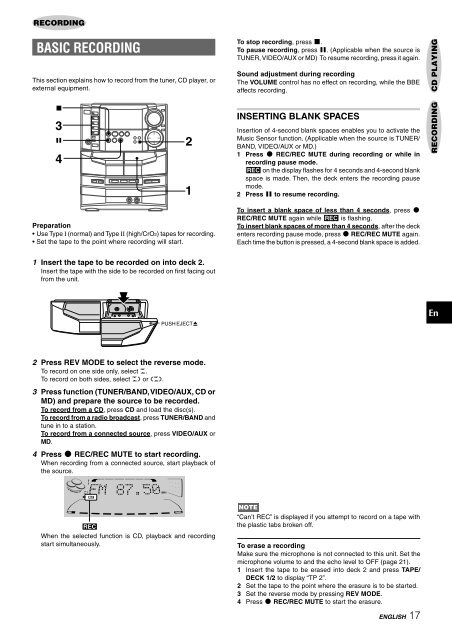
RECORDING<br />
BASIC RECORDING<br />
This section explains how to record from the tuner, CD player, or<br />
external equipment.<br />
Preparation<br />
• Use Type I (normal) and Type II (high/CrO2) tapes for recording.<br />
• Set the tape to the point where recording will start.<br />
1 Insert the tape to be recorded on into deck 2.<br />
Insert the tape with the side to be recorded on first facing out<br />
from the unit.<br />
2 Press REV MODE to select the reverse mode.<br />
<strong>To</strong> record on one side only, select p.<br />
<strong>To</strong> record on both sides, select [ or ].<br />
3 Press function (TUNER/BAND, VIDEO/AUX, CD or<br />
MD) and prepare the source to be recorded.<br />
<strong>To</strong> record from a CD, press CD and load the disc(s).<br />
<strong>To</strong> record from a radio broadcast, press TUNER/BAND and<br />
tune in to a station.<br />
<strong>To</strong> record from a connected source, press VIDEO/AUX or<br />
MD.<br />
4 Press w REC/REC MUTE to start recording.<br />
When recording from a connected source, start playback of<br />
the source.<br />
4<br />
When the selected function is CD, playback and recording<br />
start simultaneously.<br />
<strong>To</strong> stop recording, press s.<br />
<strong>To</strong> pause recording, press a. (Applicable when the source is<br />
TUNER, VIDEO/AUX or MD) <strong>To</strong> resume recording, press it again.<br />
Sound adjustment during recording<br />
The VOLUME control has no effect on recording, while the BBE<br />
affects recording.<br />
INSERTING BLANK SPACES<br />
Insertion of 4-second blank spaces enables you to activate the<br />
Music Sensor function. (Applicable when the source is TUNER/<br />
BAND, VIDEO/AUX or MD.)<br />
1 Press w REC/REC MUTE during recording or while in<br />
recording pause mode.<br />
4 on the display flashes for 4 seconds and 4-second blank<br />
space is made. Then, the deck enters the recording pause<br />
mode.<br />
2 Press a to resume recording.<br />
<strong>To</strong> insert a blank space of less than 4 seconds, press w<br />
REC/REC MUTE again while 4 is flashing.<br />
<strong>To</strong> insert blank spaces of more than 4 seconds, after the deck<br />
enters recording pause mode, press w REC/REC MUTE again.<br />
Each time the button is pressed, a 4-second blank space is added.<br />
“Can’t REC” is displayed if you attempt to record on a tape with<br />
the plastic tabs broken off.<br />
<strong>To</strong> erase a recording<br />
Make sure the microphone is not connected to this unit. Set the<br />
microphone volume to and the echo level to OFF (page 21).<br />
1 Insert the tape to be erased into deck 2 and press TAPE/<br />
DECK 1/2 to display “TP 2”.<br />
2 Set the tape to the point where the erasure is to be started.<br />
3 Set the reverse mode by pressing REV MODE.<br />
4 Press w REC/REC MUTE to start the erasure.<br />
ENGLISH 17<br />
RECORDING CD PLAYING<br />
En