NSX-AJ80 - How To & Troubleshooting
NSX-AJ80 - How To & Troubleshooting
NSX-AJ80 - How To & Troubleshooting

You also want an ePaper? Increase the reach of your titles
YUMPU automatically turns print PDFs into web optimized ePapers that Google loves.
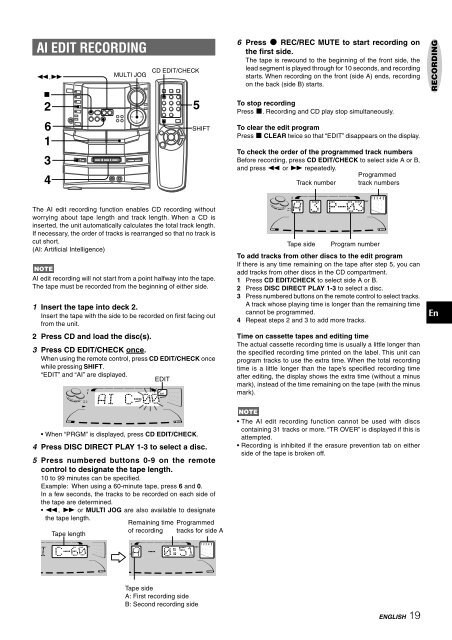
AI EDIT RECORDING<br />
The AI edit recording function enables CD recording without<br />
worrying about tape length and track length. When a CD is<br />
inserted, the unit automatically calculates the total track length.<br />
If necessary, the order of tracks is rearranged so that no track is<br />
cut short.<br />
(AI: Artificial Intelligence)<br />
AI edit recording will not start from a point halfway into the tape.<br />
The tape must be recorded from the beginning of either side.<br />
1 Insert the tape into deck 2.<br />
Insert the tape with the side to be recorded on first facing out<br />
from the unit.<br />
2 Press CD and load the disc(s).<br />
3 Press CD EDIT/CHECK once.<br />
When using the remote control, press CD EDIT/CHECK once<br />
while pressing SHIFT.<br />
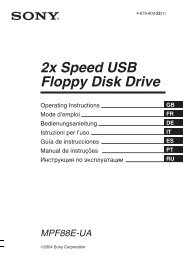
“EDIT” and “AI” are displayed.<br />
EDIT<br />
• When “PRGM” is displayed, press CD EDIT/CHECK.<br />
4 Press DISC DIRECT PLAY 1-3 to select a disc.<br />
5 Press numbered buttons 0-9 on the remote<br />
control to designate the tape length.<br />
10 to 99 minutes can be specified.<br />
Example: When using a 60-minute tape, press 6 and 0.<br />
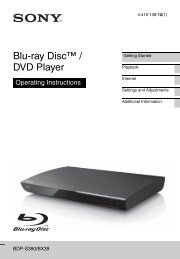
In a few seconds, the tracks to be recorded on each side of<br />
the tape are determined.<br />
• f, g or MULTI JOG are also available to designate<br />
the tape length.<br />
Tape length<br />
Remaining time<br />
of recording<br />
Tape side<br />
A: First recording side<br />
B: Second recording side<br />
Programmed<br />
tracks for side A<br />
6 Press w REC/REC MUTE to start recording on<br />
the first side.<br />
The tape is rewound to the beginning of the front side, the<br />
lead segment is played through for 10 seconds, and recording<br />
starts. When recording on the front (side A) ends, recording<br />
on the back (side B) starts.<br />
<strong>To</strong> stop recording<br />
Press s. Recording and CD play stop simultaneously.<br />
<strong>To</strong> clear the edit program<br />
Press s CLEAR twice so that “EDIT” disappears on the display.<br />
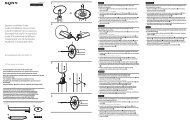
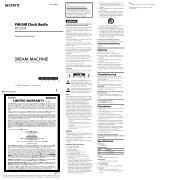
<strong>To</strong> check the order of the programmed track numbers<br />
Before recording, press CD EDIT/CHECK to select side A or B,<br />
and press f or g repeatedly.<br />
Track number<br />
Tape side<br />
Programmed<br />
track numbers<br />
Program number<br />
<strong>To</strong> add tracks from other discs to the edit program<br />
If there is any time remaining on the tape after step 5, you can<br />
add tracks from other discs in the CD compartment.<br />
1 Press CD EDIT/CHECK to select side A or B.<br />
2 Press DISC DIRECT PLAY 1-3 to select a disc.<br />
3 Press numbered buttons on the remote control to select tracks.<br />
A track whose playing time is longer than the remaining time<br />
cannot be programmed.<br />
4 Repeat steps 2 and 3 to add more tracks.<br />
Time on cassette tapes and editing time<br />
The actual cassette recording time is usually a little longer than<br />
the specified recording time printed on the label. This unit can<br />
program tracks to use the extra time. When the total recording<br />
time is a little longer than the tape’s specified recording time<br />
after editing, the display shows the extra time (without a minus<br />
mark), instead of the time remaining on the tape (with the minus<br />
mark).<br />
• The AI edit recording function cannot be used with discs<br />
containing 31 tracks or more. “TR OVER” is displayed if this is<br />
attempted.<br />
• Recording is inhibited if the erasure prevention tab on either<br />
side of the tape is broken off.<br />
ENGLISH 19<br />
RECORDING<br />
En