
You also want an ePaper? Increase the reach of your titles
YUMPU automatically turns print PDFs into web optimized ePapers that Google loves.
4<br />
• Do not thread pipe too far. Valve distortion and/or malfunction<br />
may result from excess pipe in the valve body.<br />
• Apply counter pressure using a parallel jaw wrench only<br />
to the flats on the flange when screwing the pipe into the<br />
flanges.<br />
• Do not overtighten the pipe. Follow the maximum torque<br />
values listed below.<br />
• After installation is complete, perform a leak test.<br />
Recommended Torque for Piping<br />
1/2" 3/4" 1" 1-1/4" 1-1/2" 2" NPT pipe<br />
375 560 750 875 940 1190 [Ib-in]<br />
Start-Up<br />
• The inlet and outlet shut off valves should both be<br />
closed.<br />
• Slowly and carefully open the inlet shut off valve just<br />
enough to allow inlet pressure to build up slowly in the<br />
regulator until it is fully pressurized.<br />
• Slowly open the outlet shut off valve(s) to allow a small<br />
flow.<br />
CAUTION: During start-up a pressure gauge must<br />
be used on the regulator outlet pressure and carefully<br />
watched. While inlet pressure builds up, outlet<br />
pressure must not exceed set point by more than 30%. If<br />
outlet pressure exceeds set point by more than 30% close<br />
the inlet shut off valve. The regulator is not closing properly.<br />
Check and make necessary corrections before<br />
proceeding with start-up.<br />
CAUTION: Make sure the flow of gas does not<br />
create a hazard. With gas flowing, check for correct<br />
inlet and outlet pressures. Complete start-up by making<br />
sure that there are no leaks.<br />
Set-Point Adjustment<br />
• Remove the black protective cap.<br />
• To increase the outlet pressure set point turn the adjustment<br />
spindle clockwise with a screw driver.<br />
• To decrease the outlet pressure set point turn the adjustment<br />
spindle counterclockwise with a screw driver.<br />
• Always use an accurate pressure gauge connected<br />
downstream from the regulator to measure the actual<br />
outlet pressure.<br />
• Screw on protective cap.<br />
• After adjusting the set point for normal operation check<br />
to see that the gas pressure regulator operates as<br />
intended.<br />
Outlet Pressure Spring Replacement<br />
• Remove the black protective cap.<br />
• Release spring by turning the adjustment spindle<br />
counterclockwise with a screw driver. Turn the spindle to<br />
the stop.<br />
• Remove the aluminum cap.<br />
• Remove spring.<br />
OPERATION<br />
Vent Line<br />
• On indoor installations requiring venting outdoors, run<br />
the piping as short and as direct as possible.<br />
• With natural gas or other hazardous gases, vent to an<br />
approved location.<br />
• Screen and protect the opening outdoors to guard<br />
against any blocking of the vent line.<br />
CAUTION: When venting is required, each regulator<br />
must be individually vented.<br />
• Insert new spring.<br />
• Assemble complete adjustment device and adjust<br />
desired outlet pressure. Follow the set point adjustment<br />
instructions.<br />
• Screw on the black protective cap.1<br />
• Apply new label provided with new outlet pressure range<br />
onto the name plate.<br />
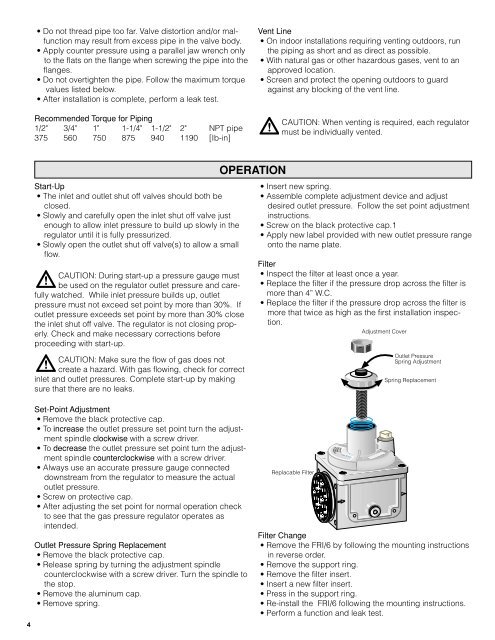
Filter<br />
• Inspect the filter at least once a year.<br />
• Replace the filter if the pressure drop across the filter is<br />
more than 4” W.C.<br />
• Replace the filter if the pressure drop across the filter is<br />
more that twice as high as the first installation inspection.<br />
Replacable Filter<br />
Adjustment Cover<br />
Outlet Pressure<br />
Spring Adjustment<br />
Spring Replacement<br />
Filter Change<br />
• Remove the <strong>FRI</strong>/6 by following the mounting instructions<br />
in reverse order.<br />
• Remove the support ring.<br />
• Remove the filter insert.<br />
• Insert a new filter insert.<br />
• Press in the support ring.<br />
• Re-install the <strong>FRI</strong>/6 following the mounting instructions.<br />
• Perform a function and leak test.