Invacare® BirdieTM Invacare® BirdieTM Plus
Invacare® BirdieTM Invacare® BirdieTM Plus
Invacare® BirdieTM Invacare® BirdieTM Plus

You also want an ePaper? Increase the reach of your titles
YUMPU automatically turns print PDFs into web optimized ePapers that Google loves.
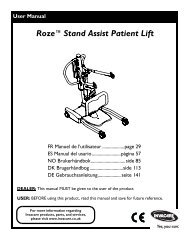
Fitting the sling<br />
Slings designed for 2- or 4-point spreader bars can be used with this mobile hoist, please refer to<br />
<strong>Invacare®</strong>’s sling brochure for details.<br />
Note: The size of the sling and the width of the spreader bar should correspond.<br />
1. Choose the most appropriate sling for the patient. The carer must be trained in the use of hoists<br />
before performing any transfers.<br />
2. Carefully inspect the hoist and the sling. If defective parts are found, the damaged parts must be<br />
replaced.<br />
3. Only use slings suited for the hoist and the patient.<br />
4. Place the patient in the sling as described in the sling manual. Pay special attention to the fact that<br />
the sling is correctly applied.<br />
5. Lower the jib and mount the straps of the sling. If the patient is in a sitting position, the jib must be<br />
lowered to chest height and the hoist must be moved as close as possible to the patient.<br />
6. Make sure that there are no obstructions when raising the jib. Ensure that brakes are not engaged<br />
before<br />
lifting or lowering.<br />
Caution! Do not lift or lower a patient with the brakes applied. Always let the hoist find the<br />
correct centre of gravity. Make sure that the lifting area is between the legs of the hoist.<br />
Never operate the hoist when the patient is outside the base and leg area. Always be careful<br />
when lifting or lowering a patient. Never exceed the maximum recommended lifting capacity.<br />
Charging the battery<br />
The hoists are equipped with an internal charger. It is recommended to charge the batteries regularly to<br />
ensure optimal use of the hoist and prolong the life of the batteries. Furthermore, it is recommended to<br />
charge the batteries before first use.<br />
The control unit is equipped with a sound signal, which will beep when operating with low battery capacity.<br />
It is recommended to charge the batteries as soon as the sound signal is heard. In addition, Birdie TM <strong>Plus</strong><br />
is equipped with a display, indicating the approximately remaining battery capacity.<br />
How to charge the batteries:<br />
1. Connect the mains cable to the control unit and plug it in. It takes about 4 hours to charge<br />
the batteries. Charging must take place in a room with good air ventilation. The charger stops<br />
automatically when the batteries are fully charged.<br />
2. Remember to disconnect the charger cable before using the hoist again.<br />
The emergency stop must not be activated - otherwise it will be impossible to charge<br />
the batteries. While charging takes place the hoist cannot be used. Do not use or move the<br />
hoist without unplugging from the socket outlet. Do not attempt to use the hoist if the battery<br />
housing is damaged. Replace a damaged battery housing before further use.<br />
12