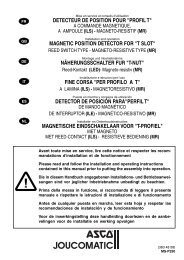
DETECTEUR DE POSITION "COMPACT ... - ASCO Numatics
DETECTEUR DE POSITION "COMPACT ... - ASCO Numatics
DETECTEUR DE POSITION "COMPACT ... - ASCO Numatics

You also want an ePaper? Increase the reach of your titles
YUMPU automatically turns print PDFs into web optimized ePapers that Google loves.
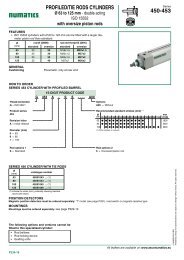
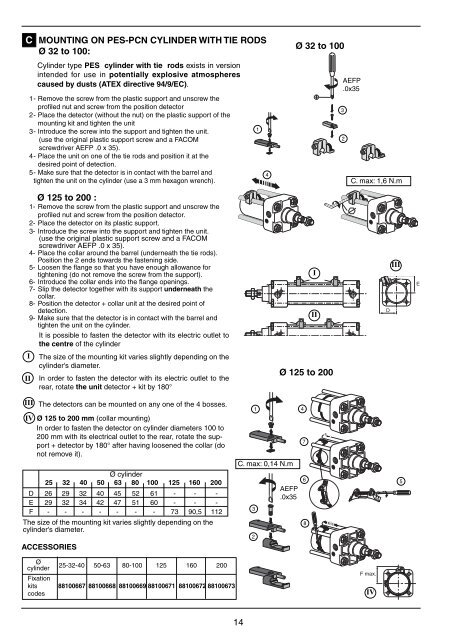
C<br />
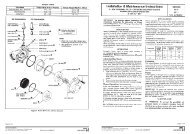
1 - Remove the screw from the the plastic support and unscrew the<br />
profi led nut and screw from the position detector<br />
2 - Place the detector (without the nut) on the plastic support of the<br />
mounting kit and tighten the unit<br />
3 - Introduce the screw into the support and tighten the unit.<br />
(use the original plastic support screw and a FACOM<br />
screwdriver AEFP .0 x 35).<br />
4 - Place the unit on one of the tie rods and position it at the<br />
desired point of detection.<br />
5 - Make sure that the detector is in contact with the barrel and<br />
tighten the unit on the cylinder (use a 3 mm hexagon wrench).<br />
Ø 125 to 200 :<br />
1- Remove the screw from the plastic support and unscrew the<br />
profi led nut and screw from the position detector.<br />
2- Place the detector on its plastic support.<br />
3- Introduce the screw into the support and tighten the unit.<br />
(use the original plastic support screw and a FACOM<br />
screwdriver AEFP .0 x 35).<br />
4- Place the collar around the barrel (underneath the tie rods).<br />
Position the 2 ends towards the fastening side.<br />
5- Loosen the fl ange so that you have enough allowance for<br />
tightening (do not remove the screw from the support).<br />
6- Introduce the collar ends into the fl ange openings.<br />
7- Slip the detector together with its support underneath the<br />
collar.<br />
8- Position the detector + collar unit at the desired point of<br />
detection.<br />
9- Make sure that the detector is in contact with the barrel and<br />
tighten the unit on the cylinder.<br />
I<br />
II<br />
III<br />
IV<br />
MOUNTING ON PES-PCN CYLIN<strong>DE</strong>R WITH TIE RODS<br />
Ø 32 to 100:<br />
Cylinder type PES cylinder with tie rods exists in version<br />
intended for use in potentially explosive atmospheres<br />
caused by dusts (ATEX directive 94/9/EC).<br />
It is possible to fasten the detector with its electric outlet to<br />
the centre of the cylinder<br />
The size of the mounting kit varies slightly depending on the<br />
cylinder's diameter.<br />
In order to fasten the detector with its electric outlet to the<br />
rear, rotate the unit detector + kit by 180°<br />
The detectors can be mounted on any one of the 4 bosses.<br />
Ø 125 to 200 mm (collar mounting)<br />
In order to fasten the detector on cylinder diameters 100 to<br />
200 mm with its electrical outlet to the rear, rotate the support<br />
+ detector by 180° after having loosened the collar (do<br />
not remove it).<br />
Ø cylinder<br />
25 32 40 50 63 80 100 125 160 200<br />
D 26 29 32 40 45 52 61 - - -<br />
E 29 32 34 42 47 51 60 - - -<br />
F - - - - - - - 73 90,5 112<br />
The size of the mounting kit varies slightly depending on the<br />
cylinder's diameter.<br />
ACCESSORIES<br />
Ø<br />
cylinder<br />
25-32-40 50-63 80-100 125 160 200<br />
Fixation<br />
kits 88100667 88100668 88100669 88100671 88100672 88100673<br />
codes<br />
14<br />
3<br />
2<br />
1<br />
1<br />
4<br />
C. max: 0,14 N.m<br />
AEFP<br />
.0x35<br />
Ø 32 to 100<br />
Ø 125 to 200<br />
4<br />
7<br />
6<br />
8<br />
I<br />
II<br />
AEFP<br />
.0x35<br />
3<br />
2<br />
C. max: 1,6 N.m<br />
F max.<br />
IV<br />
D<br />
III<br />
5<br />
E