
You also want an ePaper? Increase the reach of your titles
YUMPU automatically turns print PDFs into web optimized ePapers that Google loves.
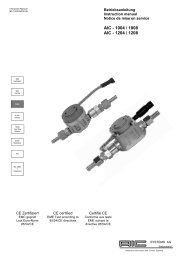
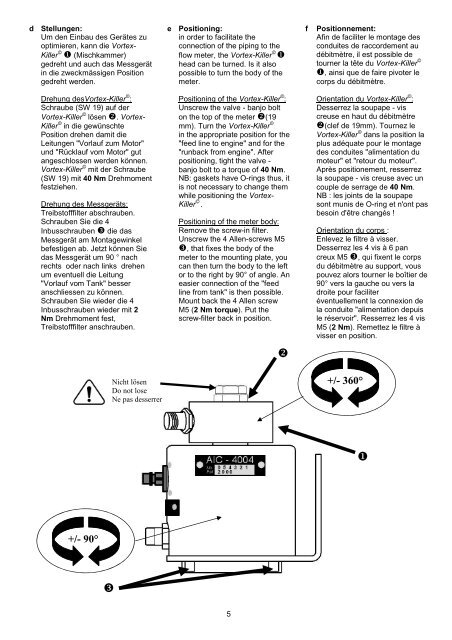
Stellungen:<br />
Um den Einbau des Gerätes zu<br />
optimieren, kann die Vortex-<br />
Killer © Positioning:<br />
in order to facilitate the<br />
connection of the piping to the<br />
(Mischkammer)<br />
flow meter, the Vortex-Killer<br />
gedreht und auch das Messgerät<br />
in die zweckmässigen Position<br />
gedreht werden.<br />
© d e f<br />
<br />
head can be turned. Is it also<br />
possible to turn the body of the<br />
meter.<br />
Drehung desVortex-Killer © :<br />
Schraube (SW 19) auf der<br />
Vortex-Killer © lösen . Vortex-<br />
Killer © in die gewünschte<br />
Position drehen damit die<br />
Leitungen "Vorlauf zum Motor"<br />
und "Rücklauf vom Motor" gut<br />
angeschlossen werden können.<br />
Vortex-Killer © mit der Schraube<br />
(SW 19) mit 40 Nm Drehmoment<br />
festziehen.<br />
Drehung des Messgeräts:<br />
Treibstofffilter abschrauben.<br />
Schrauben Sie die 4<br />
Inbusschrauben die das<br />
Messgerät am Montagewinkel<br />
befestigen ab. Jetzt können Sie<br />
das Messgerät um 90 ° nach<br />
rechts oder nach links drehen<br />
um eventuell die Leitung<br />
"Vorlauf vom Tank" besser<br />
anschliessen zu können.<br />
Schrauben Sie wieder die 4<br />
Inbusschrauben wieder mit 2<br />
Nm Drehmoment fest,<br />
Treibstofffilter anschrauben.<br />
+/- 90°<br />
<br />
Nicht lösen<br />
Do not lose<br />
Ne pas desserrer<br />
Positioning of the Vortex-Killer © :<br />
Unscrew the valve - banjo bolt<br />
on the top of the meter (19<br />
mm). Turn the Vortex-Killer ©<br />
in the appropriate position for the<br />
"feed line to engine" and for the<br />
"runback from engine". After<br />
positioning, tight the valve -<br />
banjo bolt to a torque of 40 Nm.<br />
NB: gaskets have O-rings thus, it<br />
is not necessary to change them<br />
while positioning the Vortex-<br />
Killer © .<br />
Positioning of the meter body:<br />
Remove the screw-in filter.<br />
Unscrew the 4 Allen-screws M5<br />
, that fixes the body of the<br />
meter to the mounting plate, you<br />
can then turn the body to the left<br />
or to the right by 90° of angle. An<br />
easier connection of the "feed<br />
line from tank" is then possible.<br />
Mount back the 4 Allen screw<br />
M5 (2 Nm torque). Put the<br />
screw-filter back in position.<br />
5<br />
<br />
Positionnement:<br />
Afin de faciliter le montage des<br />
conduites de raccordement au<br />
débitmètre, il est possible de<br />
tourner la tête du Vortex-Killer ©<br />
, ainsi que de faire pivoter le<br />
corps du débitmètre.<br />
Orientation du Vortex-Killer © :<br />
Desserrez la soupape - vis<br />
creuse en haut du débitmètre<br />
(clef de 19mm). Tournez le<br />
Vortex-Killer © dans la position la<br />
plus adéquate pour le montage<br />
des conduites "alimentation du<br />
moteur" et "retour du moteur".<br />
Après positionement, resserrez<br />
la soupape - vis creuse avec un<br />
couple de serrage de 40 Nm.<br />
NB : les joints de la soupape<br />
sont munis de O-ring et n'ont pas<br />
besoin d'être changés !<br />
Orientation du corps :<br />
Enlevez le filtre à visser.<br />
Desserrez les 4 vis à 6 pan<br />
creux M5 , qui fixent le corps<br />
du débitmètre au support, vous<br />
pouvez alors tourner le boîtier de<br />
90° vers la gauche ou vers la<br />
droite pour faciliter<br />
éventuellement la connexion de<br />
la conduite "alimentation depuis<br />
le réservoir". Resserrez les 4 vis<br />
M5 (2 Nm). Remettez le filtre à<br />
visser en position.<br />
+/- 360°