Crib (7391) - Assembly and Operation Manual Le Lit ... - DaVinci Baby
Crib (7391) - Assembly and Operation Manual Le Lit ... - DaVinci Baby
Crib (7391) - Assembly and Operation Manual Le Lit ... - DaVinci Baby

Create successful ePaper yourself
Turn your PDF publications into a flip-book with our unique Google optimized e-Paper software.
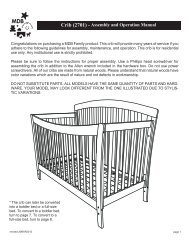
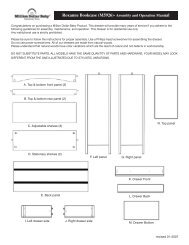
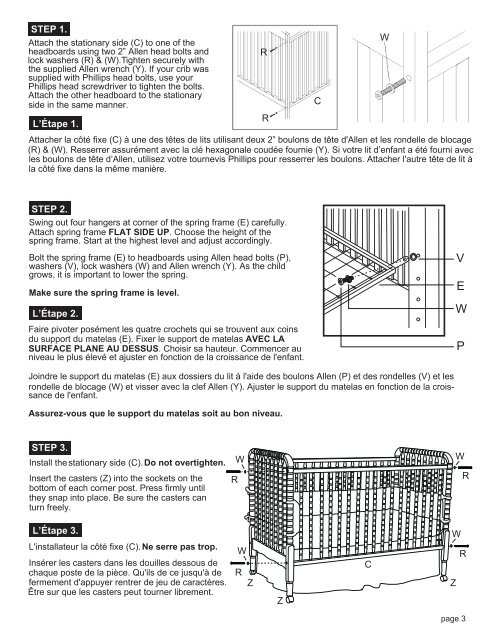
STEP 1.<br />
Attach the stationary side (C) to one of the<br />
headboards using two 2” Allen head bolts <strong>and</strong><br />
lock washers (R) & (W). Tighten securely with<br />
the supplied Allen wrench (Y). If your crib was<br />
supplied with Phillips head bolts, use your<br />
Phillips head screwdriver to tighten the bolts.<br />
Attach the other headboard to the stationary<br />
side in the same manner.<br />
L’Étape 1.<br />
Attacher la côté fixe (C) à une des têtes de lits utilisant deux 2” boulons de tête d'Allen et les rondelle de blocage<br />
(R) & (W). Resserrer assurément avec la clé hexagonale coudée fournie (Y). Si votre lit d’enfant a été fourni avec<br />
les boulons de tête d’Allen, utilisez votre tournevis Phillips pour resserrer les boulons. Attacher l'autre tête de lit à<br />
la côté fixe dans la même manière.<br />
R<br />
R<br />
C<br />
W<br />
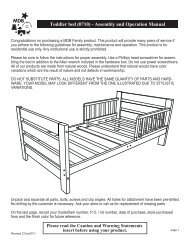
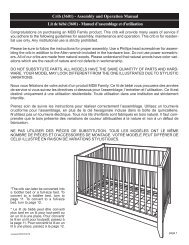
STEP 2.<br />
Swing out four hangers at corner of the spring frame (E) carefully.<br />
Attach spring frame FLAT SIDE UP. Choose the height of the<br />
spring frame. Start at the highest level <strong>and</strong> adjust accordingly.<br />
Bolt the spring frame (E) to headboards using Allen head bolts (P),<br />
washers (V), lock washers (W) <strong>and</strong> Allen wrench (Y). As the child<br />
grows, it is important to lower the spring.<br />
Make sure the spring frame is level.<br />
L’Étape 2.<br />
Faire pivoter posément les quatre crochets qui se trouvent aux coins<br />
du support du matelas (E). Fixer le support de matelas AVEC LA<br />
SURFACE PLANE AU DESSUS. Choisir sa hauteur. Commencer au<br />
niveau le plus élevé et ajuster en fonction de la croissance de l'enfant.<br />
V<br />
E<br />
W<br />
P<br />
Joindre le support du matelas (E) aux dossiers du lit à l'aide des boulons Allen (P) et des rondelles (V) et les<br />
rondelle de blocage (W) et visser avec la clef Allen (Y). Ajuster le support du matelas en fonction de la croissance<br />
de l'enfant.<br />
Assurez-vous que le support du matelas soit au bon niveau.<br />
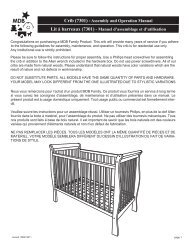
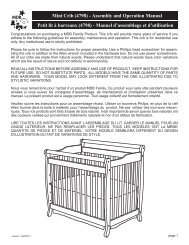
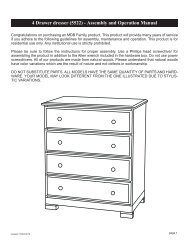
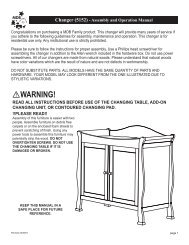
STEP 3.<br />
Install the stationary side (C). . Do not overtighten.<br />
Insert the casters (Z) into the sockets on the<br />
bottom of each corner post. Press firmly until<br />
they snap into place. Be sure the casters can<br />
turn freely.<br />
W<br />
R<br />
W<br />
R<br />
L’Étape 3.<br />
L'installateur la côté fixe (C). Ne serre pas trop.<br />
Insérer les casters dans les douilles dessous de<br />
chaque poste de la pièce. Qu'ils de ce jusqu'à de<br />
fermement d'appuyer rentrer de jeu de caractères.<br />
Être sur que les casters peut tourner librement.<br />
W<br />
R<br />
Z<br />
Z<br />
C<br />
W<br />
R<br />
Z<br />
page 3