Mini Crib (4798) - Assembly and Operation Manual ... - DaVinci Baby
Mini Crib (4798) - Assembly and Operation Manual ... - DaVinci Baby
Mini Crib (4798) - Assembly and Operation Manual ... - DaVinci Baby
- No tags were found...

You also want an ePaper? Increase the reach of your titles
YUMPU automatically turns print PDFs into web optimized ePapers that Google loves.
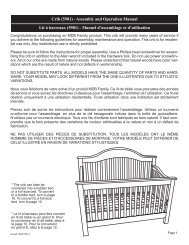
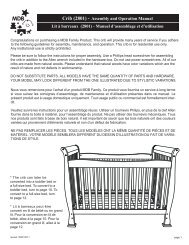
STEP 3.Attach the two side panel assemblies to theHeadboard assembly using 4 Phillips headbolts (L), barrel nuts (K) <strong>and</strong> big lock washers(R).Tighten the bolts securely.ETAPE 3.Joindre les deux panneaux latéraux assemblésà l’assemblage du gr<strong>and</strong> dossier en utilisant4 boulons Phillips (L) et 4 écrous à portéecylindrique (K) et des gr<strong>and</strong>e rondelle deblocage (R).Serrer fermement les boulons.RRRRSTEP 4.Attach the 4 mounting brackets (N) to themattress support board (P) using 4 Phillipshead bolts (I) <strong>and</strong> small lock washers (T).NNTNTETAPE 4.Fixer les supports de fixation au supportdu matelas (P) en utilisant 4 vis Phillips (I)et des petits rondelle de blocage (T).TTNSTEP 5.Attach the mattress support to the cribusing 4 Allen head bolts (J) <strong>and</strong> big lockwashers (R). Use the provided Allenwrench (S) to securely tighten the bolts.Choose a high position for your infant<strong>and</strong> lower the mattress support as yourchild grows.JRETAPE 5.NFixer le support de matelas au lit enutilisant 4 boulons Allen (J) et les gr<strong>and</strong>erondelles de blocages (R). Utiliser laclef Allen (S) fournie pour fixer lesboulons solidement. Choisir la positionélevée pour votre enfant et réduire enfonction de la croissance de l’enfant.page 4
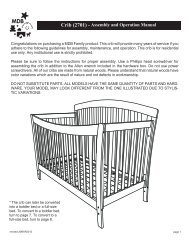
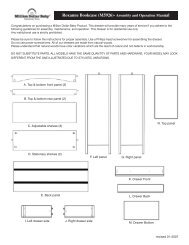
STEP 6.Attach the footboard (B) <strong>and</strong> front cross bar (D)to the crib side panel assemblies using 6 Phillipshead bolts (M), barrel nuts (K) <strong>and</strong> big lockwashers (R).Re-check all screws <strong>and</strong> bolts to be certain theyare all securely tightened. Do not overtighten.RRRRETAPE 6.Fixer le pied-planche (B) et la traverse avant (D)aux assemblages des panneaux latéraux. Utiliser6 boulons Phillips (M) et 6 écrous à portéecylindriques et des gr<strong>and</strong>e rondelle de blocage (R).Refaire une vérification pour vous assurer de labonne fixation des vis et des boulons. Ne pas tropserrer.RRVue de faceKEEP THIS MANUAL IN ASAFE PLACE FOR FUTUREREFERENCE.GARDER CE MANUEL DANSUN LIEU SUR POUR UNUSAGE ULTERIEUR.READ ALL INSTRUCTIONS BEFORE ASSEMBLING CRIB.KEEP THE MANUALFOR FUTURE USE.LIRE TOUTES LES INSTRUCTIONS AVANT L’ASSEMBLAGE DU LIT.GARDER LE MANUEL POUR UN USAGE ULTERIEUR.WARNING: INFANTS CAN SUFFOCATE● In gaps between a mattress too small or too thick <strong>and</strong> product sides● On soft bedding NEVER add a mattress, pillow, comforter, or paddingAVERTISSEMENT : RISQUE DE SUFFOCATION● Dans les trous entre un matelas trop petit ou trop épais et les cotés du lit.● Sur une literie douce. NE JAMAIS ajouter de matelas, d’oreiller, de couvre-pied piqué ou de garniturepage 5
WARNING:Failure to follow these warnings <strong>and</strong>the assembly instructions could resultin serious injury or death.READ ALL INSTRUCTIONS BEFORE ASSEMBLINGCRIB. KEEP THE MANUAL FOR FUTURE USE.WARNING:• The product, including side rails, must be fully erected prior to use.• Infants can suffocate on soft bedding. Never add a pillow, comforter or padding.• To reduce the risk of SIDS, pediatricians recommend healthy infants be placedon their backs to sleep, unless otherwise advised by your physician.• Strings can cause strangulation! Do not place items with a string around achild’s neck, such as hood strings or pacifier cords. Do not suspend strings overa crib or attach strings to toys.• To help prevent strangulation tighten all fasteners. A child can trap parts of thebody or clothing on loose fasteners.• DO NOT place a crib near a window where cords from blinds or drapes maystrangle a child.• When a child is able to pull to a st<strong>and</strong>ing position, set the mattress to the lowestposition <strong>and</strong> remove bumper pads, large toys <strong>and</strong> other objects that could serveas steps for climbing out.• For cribs with drop sides, after raising side, make sure latches are secure.• For cribs with drop sides, DO NOT leave child in crib with side lowered. Be sureside is in raised <strong>and</strong> locked position whenever child is in crib.• When a child is able to climb out, reaches the height of 35 inches (90cm), thechild should be placed in a youth or regular bed, <strong>and</strong> the crib shall no longer beused.• Check this product for damaged hardware, loose joints, missing parts or sharpedges before <strong>and</strong> after assembly <strong>and</strong> frequently during use. DO NOT use cribif any parts are missing, damaged or broken. Contact MDB Family forreplacement parts <strong>and</strong> instructional literature if needed. DO NOT substitute parts.• NEVER use a water mattress with this product.• For cribs equipped with teething rails, replace teething rail if damaged, crackedor loose.• If refinishing, use a non-toxic finish specified for children’s products.• Never use plastic shipping bags or other plastic films as mattress covers notsold <strong>and</strong> intended for that purpose. They can cause suffocation.• Infants can suffocate in gaps between crib sides when used with a mattressthat is too small.• Check fasteners periodically for tightness. Do not overtighten. This may causedistortion or breakage.• Use a crib as a crib, not as a play pen. Remember that a crib is not a substitutefor a parent’s supervision.• When re-assembling the crib for your second child, please keep in mind that thescrew holes will need to be filled in order for the screws to grip the wood, Talk toyour local hardware store or lumber yard about how to do this properly.• Child can become entrapped <strong>and</strong> die when improvised netting or covers areplaced on top of a play yard. Never add such items to confine child in play yard.• Replace teething rails if damaged, cracked or loose.• Always provide the supervision necessary for the continued safety of your child.When used for playing, never leave child unattended.Please DO NOT remove any wood screws in thenormal disassembly of the crib.ONE YEAR LIMITED WARRANTY:We will replace any missing parts at thetime of purchase or any defective itemwithin a one year period from the date oforiginal purchase. Please keep your receiptso that we may process your warrantyrequest. This warranty only covers newunits with original packaging <strong>and</strong> ownership,<strong>and</strong> is not transferable. It does notcover any used, secondh<strong>and</strong> or demomodels.This warranty does not cover any damagedor defective parts that result from installation<strong>and</strong> assembly, normal wear <strong>and</strong> tear,abuse, negligence, improper use or alterationto the finish, design, <strong>and</strong> hardware ofthe crib. The specific legal rights of thiswarranty may vary from state to state.Some states do not allow any exclusion orlimitation of incidental damages. SomeStates do not allow limitation on how longan implied warranty lasts.Storage:• Pine woods exchange moisture with the air adjustingto major changes in room temperature <strong>and</strong> humidity.Therefore, it is best to place your furniture away fromheating or air-conditioning vents.• Sunlight is not friendly to solid wood furniture <strong>and</strong>prolonged direct exposure to harsh sunlight c<strong>and</strong>iscolor the finish. Be careful not to place yourfurniture in direct sunlight for extended periods oftime. As with all your fine furniture, blot up spillsimmediately.Care <strong>and</strong> Cleaning:• Do not scratch or chip the finish. Do not use abrasivechemicals for cleaning. Clean with mild soap on a softrag. Rinse <strong>and</strong> dry thoroughly. If you ever refinish thisfurniture, be sure to use only a non-toxic finishspecified for children’s products. If you choose torefinish this furniture, the warranty will be voided.Registering your product is even easier thanbefore. You can register your product on ourwebsite at : www.themdbfamily.comIF YOU WOULD LIKE TO ORDERREPLACEMENT OR MISSING PARTSPLEASE VISIT US AT:WWW.THEMDBFAMILY.COMOR YOU CAN CONTACT US BY MAIL:MDB FAMILY855 WASHINGTON BLVD.MONTEBELLO, CA 90640revised 11FEB11