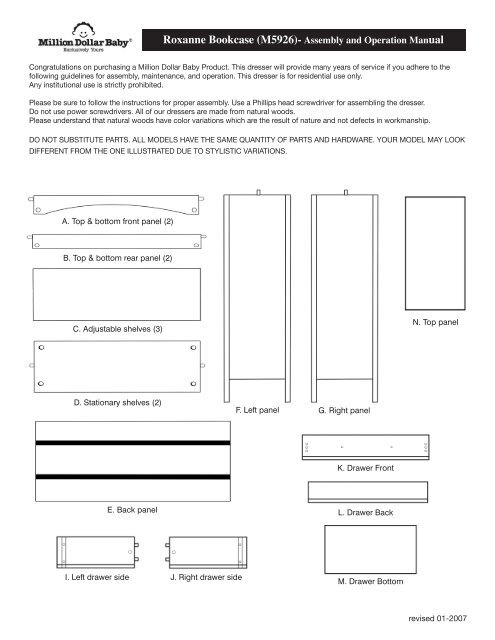
Roxanne Bookcase (M5926)- Assembly and ... - DaVinci Baby
Roxanne Bookcase (M5926)- Assembly and ... - DaVinci Baby
Roxanne Bookcase (M5926)- Assembly and ... - DaVinci Baby

Create successful ePaper yourself
Turn your PDF publications into a flip-book with our unique Google optimized e-Paper software.
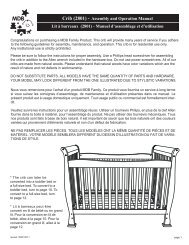
HARDWAREO. Metal shelfpeg (12)P. Cam lock bolt (22) Q. Cam lock (22)Tools Needed(not included)S. 3/8” Phillipshead screw (46)T 1 1/4” Phillipshead screw (4)V. Left panel glideW. Right panel glidePhillipsscrewdriverX. Right drawer glideU. 1 1/4” Phillipshead screw (2)R. Drawer knob (2)Y. Left drawer glideSTEP 1.Screw eight cam lock bolts (P) into the threaded insertson each side panel (F) <strong>and</strong> (G). The side panels arelabeled left <strong>and</strong> right for easy identification. Use threePhillips head screws (S) to attach the left (V) <strong>and</strong> right(W) panel glide. The glide wheel should face the front ofthe bookcase with the angled part to the top.PSSPSPP
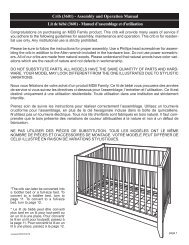
BBSTEP 2.Insert cam locks <strong>and</strong> attach the top <strong>and</strong>bottom front panels (A), top <strong>and</strong> bottom rearpanels (B) <strong>and</strong> the two stationary shelves(D) to the left side panel (F). Rotate the camlocks to secure the parts. Be sure that thecam locks on the front panels face to theinside of the bookcase.ADAQPGSTEP 3.Insert cam locks in the top <strong>and</strong> bottom front<strong>and</strong> rear panels <strong>and</strong> stationary shelves. Alignthe right side panel (G) over the assembly sothat all of the dowels <strong>and</strong> cam lock bolts fitinto position. Push the panel firmly in place<strong>and</strong> rotate the cam locks to secure the panel.
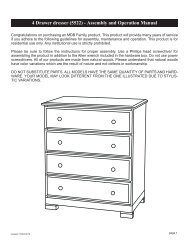
STEP 4.NScrew four cam lock bolts into the threaded inserts inthe top panel (N). Insert four cam locks into the holesat the top of the case. Align the top panel over thedowels <strong>and</strong> push it into position. tighten the cam locksto secure the top.PPPPSTEP 5.Attach the back panel (E) to the case with thirty fourPhillips head screws (S).STEP 6.Insert the metal shelf pins into the holes at thedesired height in the side panels <strong>and</strong> place theadjustable shelves (C) on top of them.O
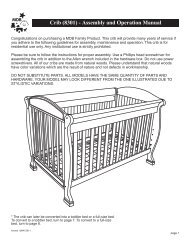
STEP 7.Screw two cam lock bolts (P) intothe threaded inserts in the drawerfront (K). Insert cam locks (Q) intothe drawer sides (I) <strong>and</strong> (J) thenrotate the locks to secure the sides.QQPPSTEP 8.Slide the drawer bottom (M) into the grooves in the sides<strong>and</strong> front of the drawer.M
STEP 9.Position the back panel on the drawer assembly <strong>and</strong> secure it with four Phillips head screws (T).LTSTEP 10.Attach the left (Y) <strong>and</strong> right (X) drawer glides with threePhillips head screws (S) each. Be sure the glide wheel istowards the back of the drawer.STEP 11.Use the two Phillips head screws (U) to attachthe drawer knobs (R). Then slide the drawer intothe case.XYSUR