Crib (5101) - Assembly and Operation Manual Lit à ... - DaVinci Baby
Crib (5101) - Assembly and Operation Manual Lit à ... - DaVinci Baby
Crib (5101) - Assembly and Operation Manual Lit à ... - DaVinci Baby

You also want an ePaper? Increase the reach of your titles
YUMPU automatically turns print PDFs into web optimized ePapers that Google loves.
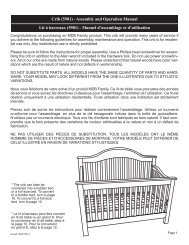
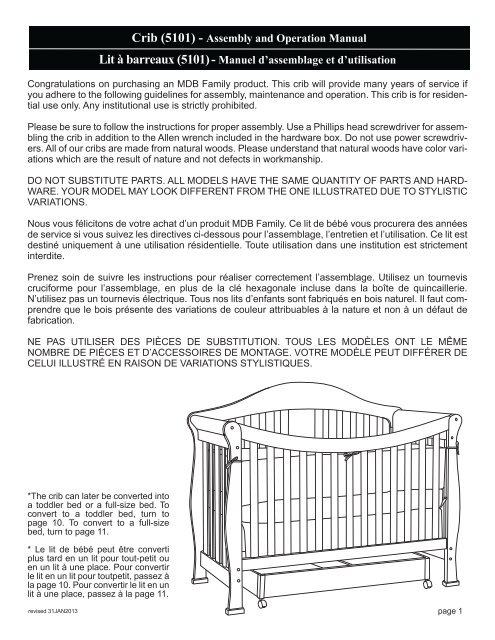
<strong>Crib</strong> (<strong>5101</strong>) - <strong>Assembly</strong> <strong>and</strong> <strong>Operation</strong> <strong>Manual</strong><strong>Lit</strong> à barreaux (<strong>5101</strong>) - Manuel d’assemblage et d’utilisationCongratulations on purchasing an MDB Family product. This crib will provide many years of service ifyou adhere to the following guidelines for assembly, maintenance <strong>and</strong> operation. This crib is for residentialuse only. Any institutional use is strictly prohibited.Please be sure to follow the instructions for proper assembly. Use a Phillips head screwdriver for assemblingthe crib in addition to the Allen wrench included in the hardware box. Do not use power screwdrivers.All of our cribs are made from natural woods. Please underst<strong>and</strong> that natural woods have color variationswhich are the result of nature <strong>and</strong> not defects in workmanship.DO NOT SUBSTITUTE PARTS. ALL MODELS HAVE THE SAME QUANTITY OF PARTS AND HARD-WARE. YOUR MODEL MAY LOOK DIFFERENT FROM THE ONE ILLUSTRATED DUE TO STYLISTICVARIATIONS.Nous vous félicitons de votre achat d’un produit MDB Family. Ce lit de bébé vous procurera des annéesde service si vous suivez les directives ci-dessous pour l’assemblage, l’entretien et l’utilisation. Ce lit estdestiné uniquement à une utilisation résidentielle. Toute utilisation dans une institution est strictementinterdite.Prenez soin de suivre les instructions pour réaliser correctement l’assemblage. Utilisez un tourneviscruciforme pour l’assemblage, en plus de la clé hexagonale incluse dans la boîte de quincaillerie.N’utilisez pas un tournevis électrique. Tous nos lits d’enfants sont fabriqués en bois naturel. Il faut comprendreque le bois présente des variations de couleur attribuables à la nature et non à un défaut defabrication.NE PAS UTILISER DES PIÈCES DE SUBSTITUTION. TOUS LES MODÈLES ONT LE MÊMENOMBRE DE PIÈCES ET D’ACCESSOIRES DE MONTAGE. VOTRE MODÈLE PEUT DIFFÉRER DECELUI ILLUSTRÉ EN RAISON DE VARIATIONS STYLISTIQUES.*The crib can later be converted intoa toddler bed or a full-size bed. Toconvert to a toddler bed, turn topage 10. To convert to a full-sizebed, turn to page 11.* Le lit de bébé peut être convertiplus tard en un lit pour tout-petit ouen un lit à une place. Pour convertirle lit en un lit pour toutpetit, passez àla page 10. Pour convertir le lit en unlit à une place, passez à la page 11.revised 31JAN2013page 1
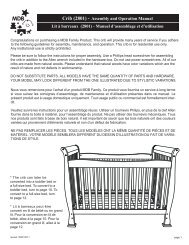
PARTS • PIÈCESA. HeadboardA. Tête de litB. Front RailB. Traverse avantC. Spring FrameC. Support de matelasD. Side (2)D. Côtélatéraux (2)Tools Needed(not included)Outils nécessaire(pas inclus)E. Foot (4)E. Pied debase (4)G. Guard RailG. BalustradeF. Side Rail (2)F. Barre stabilisatrice (2)H. Left Leg (2)H. Pied degauche (2)J. Right Leg (2)J. Pied dedroite (2)PhillipsscrewdriverTournevisPhillipsHARDWARE • ACCESSOIRES DE MONTAGEK. 1 3/4” Flat head wood screw (8)K. 1 3/4" Vis pour bois a tête plate (8)M. Allen wrenchM. Clef AllenN. Washer (4)N. Rondelle (4)O. 1” Allen head bolt (4)O. Boulon Allen de 1" (4)P.1 1/2” Allenhead bolt (4)P. Boulon Allende 1 1/2" (4)Q. Barrel nut (16)Q. Écroucylindrique (16)R. 2” Allen head bolt (4)R. Boulon Allen de 2" (4)U. Lockwasher (28)U. Rondelle deblocage (28)V. 3/4" Bolt withmetal cap (4)V. 3/4" Boulon aveccalotte métallique (4)S. 4” Allen head bolt (8)S. Boulon Allen de 4" (8)T. 2 1/4” Allen head bolt (8)T. Boulon Allen de 2 1/4" (8)page 2
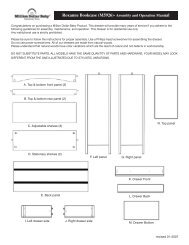
STEP 1.Remove 4 barrel nuts (Q) from 4 Allen head bolts(S) <strong>and</strong> insert the 4 barrel nuts (Q) into the top <strong>and</strong>bottom holes on the left <strong>and</strong> right sides of theheadboard.SUAUSAttach the feet (E) to the bottom of the legs withwood screws (K).Étape 1.SUEKQEUKSRetirer les 4 écrous à portée cylindrique (Q)des 4 boulons Allen (S) et insérer ces écrous (Q)dans les trous se trouvant au-dessus et endessous des cotés gauche et droit du gr<strong>and</strong> dossier.Attacher les pieds de base (E) au bas des piedsen utilisant les vis a bois de 1 3/4" (K).STEP 2.Attach the left (H) <strong>and</strong> right (J) legs to the head -board (A) using the 4 Allen head bolts (S) <strong>and</strong> lockwashers (U). Tighten them into the already-insertedbarrel nuts (Q) with the Allen wrench (M).Étape 2SUUSAttacher la pied gauche (H) et la pied droite (J)à la tête de lit (A) en utilisant 4 boulons Allen (S) etdes rondelles de blocage (U). Les resserrer dansles écrous à portée cylindrique insérés auparavant(Q) à l'aide de la clef Allen (M).SUEKBQSUEKSTEP 3.Remove 4 barrel nuts (Q) from 4 Allen head bolts(S) <strong>and</strong> insert the 4 barrel nuts (Q) into the top <strong>and</strong>bottom holes on the left <strong>and</strong> right sides of the frontrail (B).STEP 4.Attach the left (H) <strong>and</strong> right (J) legs to the front rail(B) using the 4 Allen head bolts (S) <strong>and</strong> lockwashers (U). Tighten them into the already-insertedbarrel nuts (Q) with the Allen wrench (M).Étape 4.Attacher les pieds de gauche (H) et de droite (J)à traverse avant (B) avec 4 boulons Allen (S) etdes rondelles de blocage (U). Les resserrer dansles écrous à portée cylindrique insérés auparavant(Q) à l'aide de la clef Allen (M).Attach the feet (E) to the bottom of the legs withwood screws (K).Étape 3.Retirer les 4 écrous à portée cylindrique (Q) des 4boulons Allen (S) et insérer ces écrous (Q) dansles trous se trouvant au-dessus et en dessousdes cotés gauche et droit des barres stabilisatrices(B).Attacher les pieds de base (E) au bas des piedsen utilisant les vis a bois de 1 3/4" (K).page 3
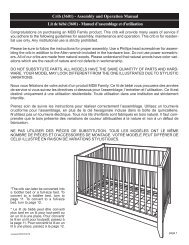
Outer sideBoltBoulonVH / J STEP 5.Inner sideVMetal capCalotte métalliqueInsert bolt with metal cap (V) into the lowest holesin the four legs (H & J).Étape 5.Insérer les boulon avec calottes métallique (V)dans les trous les plus bas au cours des quatrepieds (H & J).ABTTUUDQUUTTSTEP 6.Insert barrel nuts (Q) into the holes in the face ofthe side panels (D). Attach the Front rail (B) <strong>and</strong>headboard (A) to the side panels (D) using theAllen head bolts (T) <strong>and</strong> lock washers (U). Tightensecurely with the Allen Wrench (M).Étape 6.Insérer les écrous cylindriques (Q) à travers lestrous situés en face des panneaux de côté (D)Attacher traverse avant (B) à la tête de lit (A) auxcôtés latéraux (D) avec les boulons Allen (T) et desrondelles de blocage (U). Serrer solidement avecla clef Allen (M)FUPSTEP 7.Align the side rails (F) with the grooves in the cribsides (D). Attach with the Allen head bolts (P) <strong>and</strong><strong>and</strong> lock washers (U) through the pre-drilled holes.UDÉtape 7.Aligner les barres stabilisatrices (F) avec lesrainures de chaque côté du lit (D). Insérer lesboulons Allen (P) et des rondelles de blocage (U)à travers les trous déjà percés.Ppage 4
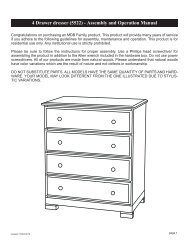
STEP 8.Swing out four hangers at corner of the spring frame (C) carefully. Attach spring frame FLAT SIDE UP. Choosethe height of the spring frame. Start at the highest level <strong>and</strong> adjust accordingly.Bolt the spring frame (C) to headboards using Allen head bolts (O), washers (N), lock washers (U) <strong>and</strong> Allenwrench (M). As the child grows, it is important to lower the spring.Make sure the spring frame is level.Étape 8.Faire pivoter posément les quatre crochets qui se trouventaux coins du support du matelas (C). Fixer lesupport de matelas AVEC LA SURFACE PLANE AUDESSUS. Choisir sa hauteur. Commencer au niveau leplus élevé et ajuster en fonction de la croissance del'enfant.Joindre le support du matelas (C) aux dossiers du lit àl'aide des boulons Allen (O) et des rondelles (N) et lesrondelles de blocage (U) et visser avec la clef Allen (M).Ajuster le support du matelas en fonction de la croissancede l'enfant.Assurez-vous que le support du matelas soit au bonniveau.NCUODo not overtighten.Ne pas trop serrer.Make sure the mattress support frame is installed FLAT SIDE UP. Make sure the mattress support frameis level when installing.*As your child grows, it is important to lower the mattress support.Assurez- vous que le support du matelas est au bon niveau et installé avec LA SURFACE PLANE AUDESSUS.*Abaisser le support du matelas en fonction de la croissance de l’enfant.KEEP THIS MANUAL IN A SAFE PLACEFOR FUTURE REFERENCE.Recheck all screws <strong>and</strong> bolts to be sure theyare fastened securely. Do not overtighten.Before using your crib, please read allcautionary statements on the insert sheet.GARDER CE MANUEL EN LIEU SÛRPOUR UN USAGE ULTÉRIEUR.Procéder à une nouvelle vérification des viset des boulons pour vous assurer qu’ils sontbien fixés. Ne pas trop serrer.Avant d'utiliser le lit de bébé, lire tous lesavertissements inscrits sur le feuillet.page 5
CAUTION: ANY MATTRESS USED IN THIS CRIB MUST BE AT LEAST 27 1/4 INCHES (69CM)BY 51 5/8 INCHES (131CM) WITH A THICKNESS NOT EXCEEDING 6 INCHES (15CM).Please refer to the label (sample below) on the inside faceof the headboard. Record the model/ item number <strong>and</strong> serialnumber of your crib, the name of the store where you madethe purchase, the date of purchase <strong>and</strong> the wood finish inthe box to the lower right.WE WILL ASK YOU FOR YOUR SERIAL NUMBER FOR ALLWARRANTY AND REPLACEMENT PART REQUESTS. PLEASEREFER TO THE LAST PAGE OF THIS INSTRUCTION SHEET FORWARRANTY INFORMATION. KEEP THIS MANUAL FOR FUTUREREFERENCE.CAUTION: ANY MATTRESS USED IN THIS CRIBMUST BE AT LEAST 27 1/4 INCHES (69CM) BY51 5/8 INCHES (131CM) WITH A THICKNESSNOT EXCEEDING 6 INCHES (15CM).THIS PRODUCT CONFORMS TO THEAPPLICABLE REGULATIONS OF THECONSUMER PRODUCTS SAFETY COMMISSION.www.themdbfamily.comSAMPLE LABELPlease read the Caution <strong>and</strong> WarningStatements insert before using your crib.ATTENTION : TOUT MATELAS UTILISÉ DANS CE LIT DOIT MESURER AU MOINS 69 CM(27 1/4 POUCES) PAR 131 CM (51 5/8 POUCES) ET AVOIR UNE ÉPAISSEUR NEDÉPASSANT PAS 15 CM (6 POUCES).Veuillez consulter l’étiquette (spécimen ci-dessous) sur laface intérieure de la tête de lit. Inscrivez le numéro de modèleou d’article et le numéro de série du lit, le nom du magasin oùvous l’avez acheté, la date de l’achat et le fini du bois dans lacase de droite.NOUS VOUS DEMANDERONS LE NUMÉRO DE SÉRIE LORS DETOUTE DEMANDE DE GARANTIE ET DE PIÈCE DE RECHANGE.CONSULTEZ LA DERNIÈRE PAGE DE CE MANUELD’INSTRUCTION POUR DES RENSEIGNEMENTS SUR LA GAR-ANTIE. CONSERVEZ CE MANUEL POUR UN USAGE ULTÉRIEUR.ATTENTION : TOUT MATELAS UTILISÉ DANS CELIT DOIT MESURER AU MOINS 69 CM (27 1/4POUCES) PAR 131 CM (51 5/8 POUCES) ET AVOIRUNE ÉPAISSEUR NE DÉPASSANT PAS 15 CM (6POUCES).Numéro de modèle :Numéro de série :Numéro dumodèle/produitNumérode sérieDate defabricationCE PRODUIT EST CONFORME AUXRÈGLEMENTS EN VIGUEUR DE LACONSUMER PRODUCTS SAFETYCOMMISSION.www.themdbfamily.comMagasin :Date d’achat :Finition :SPÉCIMEN D’ÉTIQUETTEVeuillez lire le feuillet de mises en garde etd’avertissements avant l’utilisation de ce lit.
WARNING:Failure to follow these warnings <strong>and</strong>the assembly instructions could resultin serious injury or death.READ ALL INSTRUCTIONS BEFORE ASSEMBLINGCRIB. KEEP THE MANUAL FOR FUTURE USE.WARNING:Parents should ensure a safe environment for thechild by checking regularly, before placing thechild in the product, that every component isproperly <strong>and</strong> securely in place.• Do not use this crib if you cannot exactly follow the accompanying instructions.• Infants can suffocate on soft bedding. Never add a pillow or comforter. Neverplace additional padding under an infant.• To reduce the risk of SIDS, pediatricians recommend healthy infants be placedon their backs to sleep, unless otherwise advised by your physician.• Strings can cause strangulation! Do not place items with a string around achild’s neck, such as hood strings or pacifier cords. Do not place cords, straps,or similar items that could become wound around the child’s neck in or near thiscrib. Do not suspend strings over a crib or attach strings to toys.• To help prevent strangulation tighten all fasteners. A child can trap parts of thebody or clothing on loose fasteners.• DO NOT place a crib near a window where cords from blinds or drapes maystrangle a child. Do not place this crib near a window or a patio door where achild could reach the cord of a blind or curtain <strong>and</strong> be strangled.• When a child is able to pull to a st<strong>and</strong>ing position, set the mattress to the lowestposition <strong>and</strong> remove bumper pads, large toys <strong>and</strong> other objects that could serveas steps for climbing out.• Do not use this crib if the child is able to climb out unaided or is taller than35 in. (89cm).• Check this product for damaged hardware, loose joints, loose bolts or otherfasteners, missing parts or sharp edges before <strong>and</strong> after assembly <strong>and</strong> frequentlyduring use. Securely tighten loose bolts <strong>and</strong> other fasteners. DO NOT use crib ifany parts are missing, damaged or broken. DO NOT substitute parts. ContactMDB FAMILY for replacement parts <strong>and</strong> instructional literature if needed.• DO NOT use a water mattress with this crib.• For cribs equipped with teething rails, replace teething rail if damaged, crackedor loose.• If refinishing, use a non-toxic finish specified for children’s products.• Never use plastic shipping bags or other plastic films as mattress coversbecause they can cause suffocation.• Infants can suffocate in gaps between crib sides when used with a mattressthat is too small.• Follow warnings on all products in a crib.• Ensure that the sides are properly latched or locked inplace when the crib is occupied.• The mattress used with this crib should not be more than15cm thick <strong>and</strong> should be of such length with width that thegap between the mattress <strong>and</strong> the sides of the crib is nomore than 3cm when the mattress is pushed into thecorner of the crib.WARNING:Please do NOT remove any wood screwsin the normal disassembly of the crib.
LIRE TOUTES LES INSTRUCTIONS AVANTD’ASSEMBLER LE LIT. CONSERVER CEMANUEL POUR UN USAGE ULTÉRIEUR.AVERTISSEMENT :Avant de placer l’enfant dans ce lit, les parentsdoivent s’assurer que son environnement estsécuritaire en vérifiant régulièrement que toutesles composantes sont correctement fixées.• Ne pas utiliser ce lit de bébé si vous n’êtes pas en mesure de suivre lesinstructions qui l’accompagnent.• Les nourrissons peuvent s’étouffer avec des accessoires de literiesouples. Ne jamais ajouter un oreiller ou un édredon. Ne jamais placerun coussin supplémentaire sous un nourrisson.• Pour réduire les risques de SMSN, les pédiatres recomm<strong>and</strong>ent deplacer les nourrissons en bonne santé sur le dos pour dormir, saufindication contraire de votre médecin.• Les cordons peuvent causer un étranglement! Ne pas placer un objetmuni d’une ficelle autour du cou de l’enfant, tels que les cordons d’uncapuchon ou d’une sucette. Ne fixer au lit aucun cordon, ni ruban ouobjet semblable pouvant s’enrouler autour du cou de l’enfant, ni àproximité du lit. Ne pas suspendre de ficelles au-dessus du lit, ni enattacher aux jouets.• Pour éviter tout risque d’étranglement, vérifier le serrage des pièces.Un enfant peut coincer une partie de son corps ou ses vêtements entredes pièces mal serrées.• NE PAS placer un lit de bébé près d’une fenêtre où les cordons desstores ou des rideaux pourraient étrangler l’enfant. Ne pas placer ce litde bébé près d’une fenêtre ou d’une porte-fenêtre où l’enfant pourraitatteindre le cordon des stores ou des rideaux et s’étrangler.• Lorsque l’enfant est capable de se tenir debout, régler le matelas à laposition inférieure et enlever les coussins de contour, les gr<strong>and</strong>s jouetset tout autre objet dont l’enfant pourrait se servir pour sortir du lit.• Ne pas utiliser ce lit si l’enfant est capable d’en sortir sans aide oumesure plus de 89 cm (35 po).• Vérifier que le produit ne comporte pas de pièce endommagée ni joint,boulon ou élément desserré, pièce manquante ou arête tranchante avantet après l’assemblage et fréquemment pendant l’utilisation. Serrerfermement les boulons lâches et autres pièces de fixation. NE PASutiliser le lit si des pièces sont manquantes, endommagées ou brisées.NE PAS UTILISER DES PIÈCES DE SUBSTITUTION. Communiqueravec MDB FAMILY pour obtenir des pièces de rechange et des instructions.AVERTISSEMENT :Le non respect des avertissements et directivesd’assemblage peut entraîner de graves blessures ou lamort.• NE PAS utiliser un matelas d’eau dans ce lit de bébé.• Pour les lits de bébé munis de barreaux de dentition,remplacer tout barreau de dentition endommagé, fendu oulâche.• Si la finition de ce meuble doit être refaite, utiliser un fini nontoxique conçu pour les meubles pour enfants.• Ne jamais utiliser des plastiques d’emballage ni toute autrepellicule de plastique pour recouvrir le matelas car ils présententun risque de suffocation.• Les nourrissons peuvent s’étouffer en glissant dans l’espaceentre le matelas et les côtés du lit si le matelas est trop petit.• Suivre les avertissements de tous les produits placés dans unlit de bébé.• S’assurer que les côtés sont correctement verrouillés lorsquele lit est occupé.• Le matelas utilisé dans ce lit ne doit pas avoir plus 15 cmd’épaisseur et sa longueur et sa largeur ne doivent pas laisserun espace de plus de 3 cm entre celui-ci et les côtés lorsqu’il estpoussé dans un coin du lit.AVERTISSEMENT :N’enlever AUCUNE vis à bois lors dudémontage normal du lit de bébé.
ONE YEAR LIMITED WARRANTY:We will replace any missing parts at the timeof purchase or any defective item within aone year period from the date of originalpurchase. Please keep your receipt so thatwe may process your warranty request. Thiswarranty only covers new units with originalpackaging <strong>and</strong> ownership, <strong>and</strong> is not transferable.It does not cover any used, secondh<strong>and</strong>or demo models.This warranty does not cover any damagedor defective parts that result from installation<strong>and</strong> assembly, normal wear <strong>and</strong> tear, abuse,negligence, improper use or alteration to thefinish, design, <strong>and</strong> hardware of the crib. Thespecific legal rights of this warranty may varyfrom state to state. Some states do not allowany exclusion or limitation of incidental damages.Some states do not allow limitation onhow long an implied warranty lasts.Storage:• Pine woods exchange moisture with the airadjusting to major changes in room temperature<strong>and</strong> humidity. Therefore, it is best to place yourfurniture away from heating or air-conditioningvents.• Sunlight is not friendly to solid wood furniture <strong>and</strong>prolonged direct exposure to harsh sunlight c<strong>and</strong>iscolor the finish. Be careful not to place yourfurniture in direct sunlight for extended periods oftime. As with all your fine furniture, blot up spillsimmediately.Care <strong>and</strong> Cleaning:• Do not scratch or chip the finish. Do not useabrasive chemicals for cleaning. Clean with mildsoap on a soft rag. Rinse <strong>and</strong> dry thoroughly. Ifyou ever refinish this furniture, be sure to use onlya non-toxic finish specified for children’s products.If you choose to refinish this furniture, the warrantywill be voided.Registering your product is even easier thanbefore. You can register your product on ourwebsite at : www.themdbfamily.comIF YOU WOULD LIKE TO ORDERREPLACEMENT OR MISSING PARTSPLEASE VISIT US AT:WWW.THEMDBFAMILY.COMOR YOU CAN CONTACT US BY MAIL:MDB FAMILY855 WASHINGTON BLVD.MONTEBELLO, CA 90640GARANTIE LIMITÉE D’UN AN :Nous remplacerons toute pièce manquant au momentde l’achat ou tout article défectueux au cours de lapériode de garantie d’un an à compter de la dateinitiale de l’achat. Veuillez conserver votre reçu decaisse pour le traitement de votre dem<strong>and</strong>e de garantie.Cette garantie ne couvre que les produits neufsavec leur emballage original. Elle ne couvre que leurpropriétaire initial et n’est pas transférable. Elle necouvre pas les produits usagés, d’occasion ou dedémonstration.Cette garantie ne couvre pas les pièces endommagéesou défectueuses en raison de leur installation etleur assemblage, l’usure normale, les abus, les négligences,les utilisations incorrectes ni l’altération du fini,du style et des accessoires de quincaillerie du lit. Lesdroits particuliers rattachés à cette garantie peuventvarier d’une juridiction à une autre.Certaines juridictions interdisent l’exclusion ou lalimitation des dommages indirects et ne permettentpas de limiter la durée d’une garantie implicite.Rangement :• Le bois de pin échange de l’humidité avec l’air ens’adaptant aux principaux changements de températureet d’humidité ambiante. Il est donc préférable d’éloignerce meuble des bouches de chaleur et de climatisation.• Les rayons du soleil ne font pas bon ménage avec lesmeubles en bois massif et une exposition prolongée à lalumière directe du soleil risque de décolorer le fini.Prenez garde de ne pas laisser votre meuble directementau soleil pendant un temps prolongé. Comme pour tousles meubles précieux, épongez immédiatement touteéclaboussure.Entretien et nettoyage :• Évitez d’égratigner ou d’écailler le fini. N’utilisez pasdes nettoyants abrasifs. Nettoyez le meuble avec dusavon doux sur un chiffon non rugueux. Rincez etséchez-le complètement. Si vous devez refaire la finitionde ce meuble, assurez-vous d’utiliser un fini non toxiqueconçu pour les meubles pour enfants. Si vous entreprenezde refinir ce meuble, sa garantie sera annulée.L’enregistrement de votre produit est plus facile quejamais. Veuillez l’enregistrer sur notre site Web à :www.themdbfamily.comPOUR COMMANDER DES PIÈCES DE RE-CHANGE OU MANQUANTES, VISITEZ-NOUS À :WWW.THEMDBFAMILY.COMOU CONTACTEZ-NOUS PAR LA POSTE :MDB FAMILY855 WASHINGTON BLVD.MONTEBELLO, CA 90640revised03JUL2012
<strong>Crib</strong> (<strong>5101</strong>) - Daybed conversion assembly<strong>Lit</strong> à barreaux (<strong>5101</strong>) - Assemblage pour la conversion en lit de jourR. 2” Allen head bolt (4)R. Boulon Allen de 2" (4)STEP 1.U. Lock washer (4)U. Rondelle deblocage (4)G. Guard RailG. Barre protectriceAll of the parts <strong>and</strong> hardware you will need weresupplied with the crib at the time of purchase.Étape 1SBSToutes les pièces et le matériel dont vous aurez besoinsont fournis avec le lit au moment de l’achat.SSTEP 2.SUnscrew the 4 Allen head bolts (S) <strong>and</strong> remove the front rail (B).Étape 2Dévisser les 4 boulons Allen (S) et retirer les traverse avant (B). STEP 3.Move the spring frameto the lowest level.UURRRUÉtape 3Placer le support dematelas au niveau leplus bas.STEP 4.RAttach the guard rail to headboards using twoAllen head bolts (R) <strong>and</strong> two lock washers (U) atGeach end.GThe guard rail can be installed with the high endfacing either to the left or the right. Check tomake sure that all of the bolts are fastenedÉtape 4securely. Do not overtighten.Attacher la barre protectrice aux dossiers du lit à l'aide avec 2 boulons Allen (R) et avec 2 rondelles de blocage (U).Le côté le plus haut de la barre protectrice peut être placé a droite ou a gauche. Assurez-vous que tous lesboulons soient bien serrés. Ne pas trop serrer.The intended user's minimum age must be at least 15 months old <strong>and</strong> maximumweight must not exceed 50 lbs (22.7 kg).L’enfant doit avoir au moins 15 mois et peser au maximum 22,7 kg (50 lb).page 10
The mattress intended for use on the bed shall be a full-size mattress havingminimum dimensions of 51 5/8" (1310 mm) in length, 27 1/4"(690 mm) in width<strong>and</strong> 4" (100 mm) in thickness <strong>and</strong> not exceeding 6" (152 mm).Le matelas à utiliser dans ce lit doit mesurer au moins 1310 mm (51 5/8 po) delongueur, 690 mm (27 1/4 po) de largueur et avoir une épaisseur de 100 mm(4 po) ou d’au maximum 152 mm (6 po).WARNING :Failure to follow these warnings <strong>and</strong> the assembly instructions could result inserious injury or death from entrapment or strangulation.DO NOT place bed near windows where cords from blinds or drapes may strangle a child. DO NOT placeitems with a string, cord, or ribbon, around a child’s neck, such as hood strings or pacifier cords. DO NOTsuspend strings over a toddler bed for any reason. If guard rails are used as the mattress containmentmeans, guard rails provided must be used to avoid the formation of a gap between the mattress <strong>and</strong> the bedthat could cause an entrapment.AVERTISSEMENT :Négliger de suivre ces avertissements et ces instructions d’assemblage peutentraîner de graves blessures ou la mort par piégeage ou étranglement.NE PAS placer le lit près d’une fenêtre où les cordons des stores ou des rideaux pourraient étranglerl’enfant. NE PAS placer un objet muni d’une ficelle, d’un cordon ou d’un ruban autour du cou de l’enfant,tels que les cordons d’un capuchon ou d’une sucette. NE PAS suspendre des ficelles au-dessus d’un litd’enfant pour quelque raison que ce soit. Si les balustrades servent à retenir le matelas, elles doiventempêcher qu’un espace apparaisse entre le matelas et le lit, et dans lequel l’enfant pourrait se coincer.Conversion Rails (4799 Sold Separately) - <strong>Assembly</strong> InstructionsTraverses de conversion (4799 - vendu séparément) - instructions d’assemblageSTEP 1.A. 3” Phillips head bolt (8)A. Boulons Phillips de 3" (8)B. Barrel nut (8)B. Écrou cylindrique (8)For all 4 in 1 cribs, please contact a retailer to order your full size adult wooden bed rails for your full size bedconversion.Étape 1Pour tous les lits 4 en 1, bien vouloir contacter votre détaillant pour l’achat de traverses pour gr<strong>and</strong> lit en bois pour laconversion aux dimensions régulières.page 11
STEP 1.GAHSlide the left (G) <strong>and</strong> right (H) rear corners onto thedrawer back (A). Secure with Phillips head screws (L).FLGESTEP 4.CBJBPosition the drawer front (B) over the sides <strong>and</strong> bottom<strong>and</strong> fasten with Phillips head screws (L).Étape 4Positionner le devant du tiroir (B) au dessus des côtéset du bas et attacher avec vis de tête Phillips de 7/8" (L).STEP 5.Attach the center support (D) between the drawer front<strong>and</strong> back using the Phillips head screws (K).Étape 5Attacher le support central (D) entre le devant et le dosdu tiroir avec des vis de tête Phillips de 1" (K)STEP 6.Screw the casters (P) into the threaded inserts in thebottom of each corner. Tighten them securely with thecaster wrench (N).Étape 6Visser les roulettes (P) aux creux filetés au bas dechaque coin. Serrer les solidement avec la Clé a fourche.AEHFSlide the left (E) <strong>and</strong> right (F) front corners onto thedrawer front (B). Secure with Phillips head screws (L).Étape 1Faire glisser le coin a l’arrière gauche (G) et le coin àl’arrière droit (H) dans le dos du tiroir (A). Sécuriser avecdes vis de tête Phillips de 7/8" (L).Glisser le coin a l’avant gauche (E) et le coin à l’avantdroit (F) dans le devant du tiroir (B). Sécuriser avec desvis de tête Phillips de 7/8" (L).STEP 2.Slide the drawer sides (C) into the grooves in the rearcorner pieces <strong>and</strong> fasten them with Phillips headscrews (L).Étape 2Faire glisser les côtés du tiroir (C) dans les rainuresdes arrières coins et attacher avec vis de tête Phillipsde 7/8" (L).STEP 3.Slide the drawer bottom (J) into the grooves in thesides <strong>and</strong> back.Étape 3Faire glisser le bas du tiroir (J) dans les rainures descôtés et du dos.KDKpage 13