Crib (4791) - Assembly and Operation Manual - DaVinci Baby
Crib (4791) - Assembly and Operation Manual - DaVinci Baby
Crib (4791) - Assembly and Operation Manual - DaVinci Baby

You also want an ePaper? Increase the reach of your titles
YUMPU automatically turns print PDFs into web optimized ePapers that Google loves.
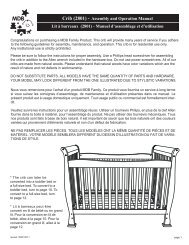
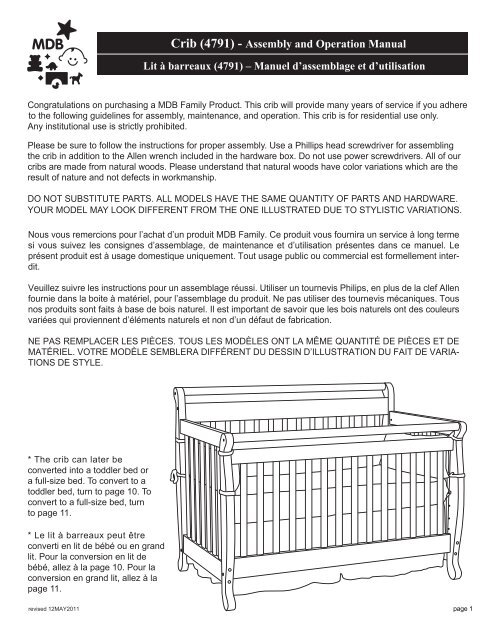
CRIB PARTS Pièces du lit à BarreauxA. HeadboardB. Footboard C. Left side D. Right sideA. Tète de lit B. Pied du litpanelpanelC. Panneau D. PanneaugauchedroitE. Leftfront legE. Pied avantgaucheF. Rightfront legF.Pied avantdroiteG. Leftrear legG. Pied arrièregaucheH. Rightrear legH. Pied arrièredroiteI. Spring FrameI. Support du matelasR. Guard railJ. Cross bar (2)R. Balustrade J. Barre transversale (2)HARDWARE MatérielL. 1” Allen head bolt (4)L. Boulon Allen de 1" (4)P. 2” Allen head bolt (4)P. Boulon Allen de 2" (4)N. Barrel nut (24)N. Ecrou cylindriques (24)Tools Needed(not included)les outilsnecessaires(pas inclu)O. 3” Allen head bolt (12)Q. Allen wrenchO. Boulon Allen de 3" (12) Q. Clef AllenPhillipsscrewdriverTournevis PhillipsS. 3 1/2” Allen head bolt (12) T. Lock washer (32)S. Boulon Allen de 3 1/2" (12)T. Rondelle deblocage (32)U. Washer (4)U. Rondelle (4)R. Metal dowel (4)R. goujon enmetal (4)page 2
ONHOTNTRNNNAJNRTOGTOSTEP 1.Insert a metal dowel (R) into each end of thecross bar (J). Insert barrel nuts (N) in the holesin the headboard (A) <strong>and</strong> one cross bar (J).Use 6 Allen head bolts (O) <strong>and</strong> lock washers (T)to attach the rear legs (G) <strong>and</strong> (H). Be sure theholes with the barrel nuts face to the outside ofthe crib. Use the provided Allen wrench (Q) totighten the bolts securely. .Do not overtighten the bolts.L’Étape 1. 1.Insérer un goujon en métal (R) à chaqueextrémité de la barre transversale (J). Insérer lesécrous cylindriques (N) dans les trous de la têtede lit et d'une barre transversale (J). Utiliser sixboulons Allen (O) et les rondelle de blocage (T)pour attacher les pieds arrières (G) et (H).Assurez-vous que les trous avec les écrouscylindriques soient font face à l'extérieur du lit àbarreaux. Utiliser la clef Allen (Q) pour resserrerlesboulons assurément.Ne pas trop serrer les boulons.STEP 2.ETCNDFTInsert barrel nuts (N) in the holes on each sidepanel (C) <strong>and</strong> (D) <strong>and</strong> use 6 Allen head bolts(S) <strong>and</strong> lock washers (T) to attach the front legs(E) <strong>and</strong> (F). Use the provided Allen wrench (Q)to tighten the bolts securely.Do not overtighten the bolts.SSÉtape 2.TNTInsérer les écrous cylindriques (N) dans lestrous de chaque panneau latéral (C) et (D) etutiliser 6 boulons Allen et les rondelle de blocage(T) pour joindre le pied avant gauche et le piedavant droit (E) et (F). Utiliser la clef Allen (Q)pour serrer solidement les boulons.Ne pas trop serrer les boulons.page 3
STEP 3.NATNInsert barrel nuts (N) into the holes in the sidepanel assemblies <strong>and</strong> attach them to theheadboard assembly with 6 Allen head bolts(S) <strong>and</strong> lock washers (T). Be sure that the holesface to the inside of the crib. Use the providedAllen wrench (Q) to tighten the bolts securely.CSDDo not overtighten the bolts.Étape 3.NTNInsérer les écrous cylindriques (N) dans lestrous des panneaux latéraux assemblés et lesjoindre à la tête de lit assemblée à l'aide de 6boulons Allen et de rondelles de blocage (T).S'assurer que les trous font face à l'intérieur dulit. Utiliser la clef Allen (Q) pour serrersolidement les boulons.Ne pas trop serrer les boulons.STEP 4.Swing out four hangers at corner of the springframe (I) carefully. Attach spring frame FLATSIDE UP. Choose the height of the spring frame.Start at the highest level <strong>and</strong> adjust accordingly.UBolt the spring frame (I) to headboards usingAllen head bolts (L), washers (U), lock washers(T) <strong>and</strong> Allen wrench (Q). As the child grows, it isimportant to lower the spring.IMake sure the spring frame is level.Do not overtighten.Ne pas trop serrer.TLÉtape 4.Faire pivoter posément les quatre crochets quise trouvent aux coins du support du matelas(I). Fixer le support de matelas AVEC LASURFACE PLANE AU DESSUS. Choisir sahauteur. Commencer au niveau le plus élevé etajuster en fonction de la croissance de l'enfant.Joindre le support du matelas (I) aux dossiersdu lit à l'aide des boulons Allen (L) et desrondelles (U) et les rondelle de blocage (T) etvisser avec la clef Allen (Q). Ajuster le supportdu matelas en fonction de la croissance del'enfant.Assurez-vous que le support du matelassoit au bon niveau.page 4
STEP 5.Insert a metal dowel (R) into each end of thecross bar (J). Attach the front cross bar (J)between the side panels. Insert barrel nuts(N) into the holes in the cross bar <strong>and</strong> attach itwith Allen head bolts (O) <strong>and</strong> lock washers (T).TNORJOTRDo not tighten the bolts fully at this time.Étape 5.Insérer un goujon en métal (R) à l'extrémitéde la barre transversale (J). Joindre la barretransversale (J) avant entre les panneauxlatéraux. Insérer les écrous cylindriques (N)dans la barre transversale et serrer avec lesboulons Allen (O) et les rondelles de blocage(T).Ne pas serrer les boulons solidement pour lemoment.OTTBNRecheck all screws <strong>and</strong> bolts to be sure they are fastened securely.Do not overtighten. Before using your crib, please read allcautionary statements on the insert sheet.Before placing your mattress in the crib, you can make your ownmattress protector by cutting the cardboard packing insert to 27”x 51”.Place it on the spring frame under the mattress to extend the life of themattress.Procéder à une nouvelle vérification des vis et des boulons pour vousassurer qu’ils sont bien fixés. Ne pas trop serrer. Bien vouloir lire tousles avertissements inscrits sur le fiche insérée avant l'utilisation du lit àbarreaux.Avant de placer votre matelas dans le lit, vous pouvez fabriquer votrepropre protège-matelas en coupant le support en carton inséré sur27’’ x 51’’. Placer le sur la support du matelas et sous le matelas pouraugmenter la durée de ce dernier.STEP 6.Insert barrel nuts (N) into the holes in thefootboard (B) <strong>and</strong> attach it between theside panels using 4 Allen head bolts (O)<strong>and</strong> lock washers (T). Tighten the boltssecurely with the Allen wrench.Now go back <strong>and</strong> tighten all of the boltson the crossbar <strong>and</strong> spring frame.Do not overtighten the bolts.Étape 6.Insérer les écrous cylindriques (N) dans lestrous du pied du lit (B) et le joindre entre lespanneaux latéraux en utilisant 4 boulons Allen(O) et les rondelles de blocage (T). Serrer lesboulons solidement avec la clef Allen.Maintenant retourner et resserrer tous lesboulons sur le support du matelas et la barretransversale.Ne pas trop serrer les boulons.KEEP THIS MANUAL INA SAFE PLACE FORFUTURE REFERENCE.GARDER CE MANUEL DANS UN LIEUSÛR POUR UN USAGE ULTÉRIEUR.page 5
CAUTION: ANY MATTRESS USED IN THIS CRIB MUST BE AT LEAST 27 1/4 INCHES (69CM)BY 51 5/8 INCHES (131CM) WITH A THICKNESS NOT EXCEEDING 6 INCHES (15CM).Please refer to the label (sample below) on the inside faceof the headboard. Record the model/ item number <strong>and</strong> serialnumber of your crib, the name of the store where you madethe purchase, the date of purchase <strong>and</strong> the wood finish inthe box to the lower right.WE WILL ASK YOU FOR YOUR SERIAL NUMBER FOR ALLWARRANTY AND REPLACEMENT PART REQUESTS. PLEASEREFER TO THE LAST PAGE OF THIS INSTRUCTION SHEET FORWARRANTY INFORMATION. KEEP THIS MANUAL FOR FUTUREREFERENCE.CAUTION: ANY MATTRESS USED IN THIS CRIBMUST BE AT LEAST 27 1/4 INCHES (69CM) BY51 5/8 INCHES (131CM) WITH A THICKNESSNOT EXCEEDING 6 INCHES (15CM).THIS PRODUCT CONFORMS TO THEAPPLICABLE REGULATIONS OF THECONSUMER PRODUCTS SAFETY COMMISSION.www.themdbfamily.comSAMPLE LABELPlease read the Caution <strong>and</strong> WarningStatements insert before using your crib.ATTENTION : LE LIT DOIT ÊTRE UTILISÉ AVEC UN MATELAS DEVANT MESURER AU MOINS 27 1/4POUCES (69CM) PAR 51 5/8 POUCES (131CM) ET AYANT UNE ÉPAISSEUR NE DÉPASSANT PAS 6POUCES (15CM).Bien vouloir se référer au label (exemple ci- dessous)sur la face interne du lit. Enregistrer le numéro dumodèle/produit et le numéro de série de votre lit, le nomdu magasin où l’achat a été effectué, le jour de l’achatdroite.VOTRE NUMÉRO DE SÉRIE VOUS SERA DEMANDÉ POUR TOUTEDEMANDE DE GARANTIE OU DE REMPLACEMENT DE PIÈCES.BIEN VOULOIR SE RÉFÉRER À LA DERNIÈRE PAGE DE CE MANUELD’INSTRUCTION POUR LES INFORMATIONS RELATIVES À LA GARAN-TIE. GARDER CE MANUEL A L’INTÉRIEUR DU SAC PLASTIQUE ATTA-CHE AU SUPPORT DU MATELAS POUR UNE UTILISATION FUTURE.ATTENTION : LE LIT DOIT ÊTRE UTILISÉ AVEC UNMATELAS DEVANT MESURER AU MOINS 27 1/4POUCES (69CM) PAR 51 5/8 POUCES (131CM) ETAYANT UNE ÉPAISSEUR NE DÉPASSANT PAS 6POUCES (15CM).Numéro dumodèle/produitNumérode sérieDate defabricationCE PRODUIT EST CONFORMEAUX LOIS APPLICABLES PAR LACONSUMER PRODUCTS SAFETYCOMMISSIONwww.themdbfamily.comNuméro du modèle :Numéro de série :Magasind’achat :Date d’achat :Finition :EXEMPLE DE LABELLIRE LES CONSEILS ET LES AVERTISSE-MENTS INCLUS AVANT L’UTILISATION DULIT.
WARNING:Failure to follow these warnings <strong>and</strong>the assembly instructions could resultin serious injury or death.READ ALL INSTRUCTIONS BEFORE ASSEMBLINGCRIB. KEEP THE MANUAL FOR FUTURE USE.WARNING:Parents should ensure a safe environment for thechild by checking regularly, before placing thechild in the product, that every component isproperly <strong>and</strong> securely in place.• Do not use this crib if you cannot exactly follow the accompanying instructions.• Infants can suffocate on soft bedding. Never add a pillow or comforter. Neverplace additional padding under an infant.• To reduce the risk of SIDS, pediatricians recommend healthy infants be placedon their backs to sleep, unless otherwise advised by your physician.• Strings can cause strangulation! Do not place items with a string around achild’s neck, such as hood strings or pacifier cords. Do not place cords, straps,or similar items that could become wound around the child’s neck in or near thiscrib. Do not suspend strings over a crib or attach strings to toys.• To help prevent strangulation tighten all fasteners. A child can trap parts of thebody or clothing on loose fasteners.• DO NOT place a crib near a window where cords from blinds or drapes maystrangle a child. Do not place this crib near a window or a patio door where achild could reach the cord of a blind or curtain <strong>and</strong> be strangled.• When a child is able to pull to a st<strong>and</strong>ing position, set the mattress to the lowestposition <strong>and</strong> remove bumper pads, large toys <strong>and</strong> other objects that could serveas steps for climbing out.• Do not use this crib if the child is able to climb out unaided or is taller than35 in. (89cm).• Check this product for damaged hardware, loose joints, loose bolts or otherfasteners, missing parts or sharp edges before <strong>and</strong> after assembly <strong>and</strong> frequentlyduring use. Securely tighten loose bolts <strong>and</strong> other fasteners. DO NOT use crib ifany parts are missing, damaged or broken. DO NOT substitute parts. ContactMDB FAMILY for replacement parts <strong>and</strong> instructional literature if needed.• DO NOT use a water mattress with this crib.• For cribs equipped with teething rails, replace teething rail if damaged, crackedor loose.• If refinishing, use a non-toxic finish specified for children’s products.• Never use plastic shipping bags or other plastic films as mattress coversbecause they can cause suffocation.• Infants can suffocate in gaps between crib sides when used with a mattressthat is too small.• Follow warnings on all products in a crib.• Ensure that the sides are properly latched or locked inplace when the crib is occupied.• The mattress used with this crib should not be more than15cm thick <strong>and</strong> should be of such length with width that thegap between the mattress <strong>and</strong> the sides of the crib is nomore than 3cm when the mattress is pushed into thecorner of the crib.WARNING:Please do NOT remove any wood screwsin the normal disassembly of the crib.ONE YEAR LIMITED WARRANTY:We will replace any missing parts at the timeof purchase or any defective item within aone year period from the date of originalpurchase. Please keep your receipt so thatwe may process your warranty request. Thiswarranty only covers new units with originalpackaging <strong>and</strong> ownership, <strong>and</strong> is not transferable.It does not cover any used, secondh<strong>and</strong>or demo models.This warranty does not cover any damagedor defective parts that result from installation<strong>and</strong> assembly, normal wear <strong>and</strong> tear, abuse,negligence, improper use or alteration to thefinish, design, <strong>and</strong> hardware of the crib. Thespecific legal rights of this warranty may varyfrom state to state. Some states do not allowany exclusion or limitation of incidental damages.Some states do not allow limitation onhow long an implied warranty lasts.
LIRE TOUTES LES INSTRUCTIONS AVANTL’ASSEMBLAGE DU LIT. GARDER LE MANUELPOUR UNE UTILISATION FUTURE.AVERTISSEMENT :le non-respect des avertissements et des instructionsd’assemblage peut conduire à une blessure grave ouà la mort.AVERTISSEMENT :Avant de placer l’enfant dans le produit, les parentsdoivent s’assurer que l’environnement danslequel il se trouvera est sécurisé en procédant àune vérification régulière de la bonne installationde chaque composant.• Ne pas utiliser le lit si vous n’êtes pas capable de suivre les instructionsqui l’accompagnent à la lettre.• Les nouveau-nés peuvent suffoquer sur une literie douce. Ne jamaisajouter d’oreiller, de couvre-pied piqué ou de garniture sous un enfant.• Pour réduire les risques de SMSN, les pédiatres recomm<strong>and</strong>ent deplacer les nouveau-nés en bonne santé sur le dos pendant le sommeil àmoins d’être conseillé autrement par votre médecin.• Les ficelles peuvent causer une strangulation ! Ne pas placer un objetcontenant des ficelles à l’exemple des ficelles de capuchon ou des cordesde sucettes, autour du cou d’un enfant. Ne pas suspendre des ficellesau-dessus du lit ou attacher des ficelles aux jouets.• Afin de prévenir toute strangulation, bien serrer toutes les piècesd’attaches. Les vêtements ou l’enfant pourraient être pris au piège par despièces d’attaches desserrées.• NE PAS placer le lit près d’une fenêtre ou d’une porte-fenêtre dontl’enfant pourrait se saisir des cordes de stores ou de rideau et s’étrangler.• Ne pas mettre dans le lit ou à proximité de celui-ci des cordes, courroiesou objets semblables qui risqueraient de s’enrouler autour du cou del’enfant.• Lorsqu’un enfant est capable de se tenir debout, mettre le matelas à saposition la plus basse et retirer la bordure de protection, les gr<strong>and</strong>s jouetsou tout autre objet dont l’enfant pourrait se servir pour sortir du lit.• Lorsqu’un enfant est capable de sortir du lit ou mesure plus de 89 cm,l’utilisation du lit n’est plus nécessaire.• Procéder à une vérification du produit pour la recherche de matérielendommagé, jointures desserrées, des pièces manquantes ou des bordscoupants avant et après l’assemblage et fréquemment pendant l’utilisation.Ne pas utiliser le lit si des pièces sont manquantes, endommagées oucassées. Ne pas substituer une pièce à une autre. Contacter MDBFAMILY pour le remplacement des pièces et du manuel en cas de besoin.• NE PAS utiliser des matelas à eau avec ce lit.• Pour les lits équipés de traverses à denture, remplacer les traverses àdentures au cas où elles sont endommagées, cassées ou desserrées.• En cas de remise en état, utiliser un produit non toxique et recomm<strong>and</strong>épour les enfants.• Ne jamais utiliser de gr<strong>and</strong>s sacs en plastique ou tout autrefilm plastique comme couverture de matelas, car ils peuvententrainer une suffocation.• Les enfants peuvent suffoquer dans les espaces entre lescôtés du lit à barreaux lorsque vous utilisez un très petitmatelas.• Respecter tous les avertissements présents sur tous lesproduits d’un berceau.• S’assurer que les côtés du lit, dans le cas où l’enfant y estlaissé sans surveillance, sont bien enclenchés ou verrouillés àla position appropriée.• Le matelas utilisé avec ce lit ne doit pas avoir plus de 15 cmd’épaisseur et doit avoir une longueur et une largeur telles quel’espace entre le matelas et les côtés du lit ne dépassent pas 3cm lorsque le matelas est poussé dans un coin quelconque dulit.AVERTISSEMENT:Ne retirer aucune vis à bois pendant ledésassemblage normal du lit à barreaux.GARANTIE D’UN AN :Nous remplacerons toute pièce manquante aumoment de l’achat ou tout matériel défectueuxpendant la première année suivant la dated’achat. Veuillez garder votre reçu pour quenous soyons capables de répondre à vosdem<strong>and</strong>es. Cette garantie couvre uniquementles nouveaux produits dans leurs emballagesd’origines et le propriétaire initial et n’est pastransférable. Elle ne couvre pas les modèlesutilisés, de seconde main ou de démonstrations.Cette garantie ne couvre pas les piècesendommagées ou défectueuses résultantesde l’installation ou de l’assemblage, d’uneusure normale, d’un abus, d'une négligence,d'une utilisation impropre ou d'une altérationde la finition, du design, et du matériel du lit àbarreaux. Les droits spécifiques de cettegarantie reconnus par la loi pourront varierd’un état à l’autre. Certains états ne donnentaucune exclusion ou limitation aux dommagesindirects. D’autres ne mettent aucune limitationsur la durée établie d’une garantie.
Storage:• Pine woods exchange moisture with the airadjusting to major changes in room temperature<strong>and</strong> humidity. Therefore, it is best to place yourfurniture away from heating or air-conditioningvents.• Sunlight is not friendly to solid wood furniture<strong>and</strong> prolonged direct exposure to harsh sunlightcan discolor the finish. Be careful not to placeyour furniture in direct sunlight for extendedperiods of time. As with all your fine furniture, blotup spills immediately.Rangement:• Les pins prennent de la moisissure en fonction del’ajustement de l’air par rapport aux gr<strong>and</strong>s changementsenregistrés dans la température et l’humidité de la pièce.Par conséquent, il est préférable de placer votre matérielloin de la chaleur et des installations de conditionnementsde l'air.• La lumière du soleil n’est pas appropriée pour les équipementsen bois massif et une exposition prolongée à desrayons intenses peut décolorer la finition. N’exposez pasvotre produit à un ensoleillement direct pendant unelongue durée. De même que sur tout bon matériel, lestaches se rép<strong>and</strong>ent immédiatement.Care <strong>and</strong> Cleaning:• Do not scratch or chip the finish. Do not useabrasive chemicals for cleaning. Clean withmild soap on a soft rag. Rinse <strong>and</strong> drythoroughly. If you ever refinish this furniture,be sure to use only a non-toxic finish specifiedfor children’s products. If you choose to refinishthis furniture, the warranty will be voided.Soin et Nettoyage :• Ne pas gratter ou écailler la finition. Ne pas utiliser deproduit abrasif pour le nettoyage. Utiliser un savon doux etun tissu léger pour le nettoyage, rincer et sécherminutieusement et complètement. Si vous procédez à unenouvelle finition du produit, assurez-vous d’utiliser unproduit non toxique recomm<strong>and</strong>é pour les enfants. Unenouvelle finition du produit annule la garantie.Registering your product is even easier thanbefore. You can register your product on ourwebsite at : www.themdbfamily.comIF YOU WOULD LIKE TO ORDERREPLACEMENT OR MISSING PARTSPLEASE VISIT US AT:WWW.THEMDBFAMILY.COMOR YOU CAN CONTACT US BY MAIL:MDB FAMILY855 WASHINGTON BLVD.MONTEBELLO, CA 90640L’enregistrement de votre produit est plus facilequ’avant. Vous pouvez enregistrer votre produit surnotre site Internet : www.themdbfamily.comSI VOUS SOUHAITER COMMANDER DESPIÈCES MANQUANTES OU DES RECHANGES,BIEN VOULOIR VISITER NOTRE SITE :WWW.THEMDBFAMILY.COMOU ENCORE NOUS CONTACTER PARCOURRIER A L’ADRESSE :MDB FAMILY855 WASHINGTON BLVD.MONTEBELLO, CA 90640revised09MAY2011
<strong>Crib</strong> (<strong>4791</strong>) - Daybed conversion assemblyLit à barreaux (M<strong>4791</strong>) - Instructions d’assemblage pour la conversion en lit de jour* All of the parts <strong>and</strong> hardware you will need are supplied with the crib at the time of purchase.* Toutes les pièces et le matériel dont vous avez besoin est fourni avec le lit au moment de l’achat.STEP 1.STEP 2.Unscrew the six Phillips head bolts (O) <strong>and</strong>remove the cross bar (J) <strong>and</strong> footboard (B).Move the spring frame to the lowest level.Étape 1. Étape 2.Dévisser les six boulons Philips (O) et enleverla barre transversale (J) et le pied du lit (B).Placer le support du matelas au niveau leplus bas.STEP 3.Attach the guard rail to the side panel postsusing four Allen head bolts (P) <strong>and</strong> lock washer(T). The guard rail (R) can be installed with thehigh end facing either to the left or the right.Check to make sure that all of the bolts arefastened securely. .Do not overtighten.TPPTÉtape 3.Fixez la balustrade aux montants du panneaulatéral en utilisant quatre boulons Allen (P) etdes rondelles de blocages. La balustrade peutêtre installée avec la partie supérieure situéesoit à gauche ou à droite.RRAssurez-vous que tous les boulons soientsolidement fixésNe pas trop serrer.page 10
<strong>Crib</strong> (<strong>4791</strong>) – Full size conversion assemblyLit à barreaux (<strong>4791</strong>) – La Conversion de pleine taille* For all 4 in 1 cribs, please contact a retailer to order your full size adult wooden bed rails for your full size bedconversion.* Pour tous les lits 4 en 1, bien vouloir contacter votre détaillant pour l’achat de traverses pour gr<strong>and</strong> lit enbois pour la conversion aux dimensions régulières.STEP 1.Unscrew the eight Phillips head bolts (O) <strong>and</strong> remove the side panel assemblies.Étape 1.Dévisser les huit boulons Philips (O) et enlever l'assemblage des panneaux latéraux.STEP 2.Attach the conversion rails as shown using eight Phillips head bolts <strong>and</strong> barrel nuts.Étape 2.Attacher les barres stabilisatrices avec 8 boulons Philips et les écrous cylindriques. Voir le schéma ci-dessus.page 12