Crib (5101) - Assembly and Operation Manual Lit à ... - DaVinci Baby
Crib (5101) - Assembly and Operation Manual Lit à ... - DaVinci Baby
Crib (5101) - Assembly and Operation Manual Lit à ... - DaVinci Baby

Create successful ePaper yourself
Turn your PDF publications into a flip-book with our unique Google optimized e-Paper software.
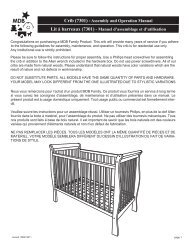
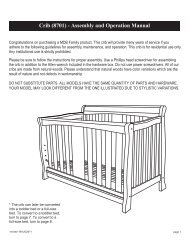
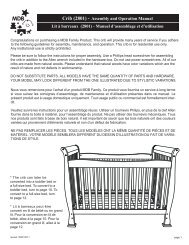
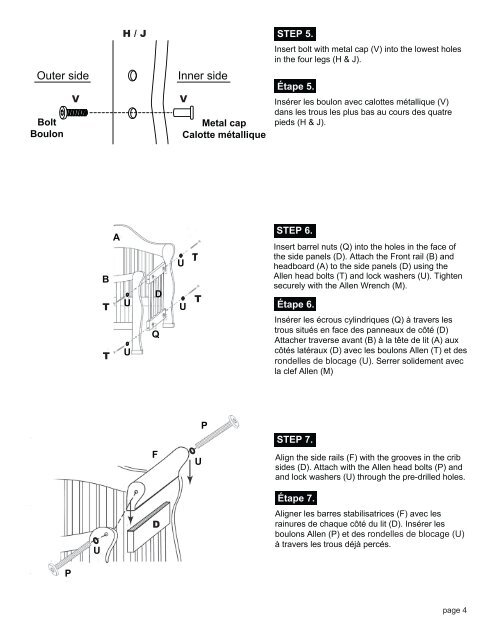
Outer sideBoltBoulonVH / J STEP 5.Inner sideVMetal capCalotte métalliqueInsert bolt with metal cap (V) into the lowest holesin the four legs (H & J).Étape 5.Insérer les boulon avec calottes métallique (V)dans les trous les plus bas au cours des quatrepieds (H & J).ABTTUUDQUUTTSTEP 6.Insert barrel nuts (Q) into the holes in the face ofthe side panels (D). Attach the Front rail (B) <strong>and</strong>headboard (A) to the side panels (D) using theAllen head bolts (T) <strong>and</strong> lock washers (U). Tightensecurely with the Allen Wrench (M).Étape 6.Insérer les écrous cylindriques (Q) à travers lestrous situés en face des panneaux de côté (D)Attacher traverse avant (B) à la tête de lit (A) auxcôtés latéraux (D) avec les boulons Allen (T) et desrondelles de blocage (U). Serrer solidement avecla clef Allen (M)FUPSTEP 7.Align the side rails (F) with the grooves in the cribsides (D). Attach with the Allen head bolts (P) <strong>and</strong><strong>and</strong> lock washers (U) through the pre-drilled holes.UDÉtape 7.Aligner les barres stabilisatrices (F) avec lesrainures de chaque côté du lit (D). Insérer lesboulons Allen (P) et des rondelles de blocage (U)à travers les trous déjà percés.Ppage 4