WallPerfect W 665 I-Spray - Wagner
WallPerfect W 665 I-Spray - Wagner
WallPerfect W 665 I-Spray - Wagner

Create successful ePaper yourself
Turn your PDF publications into a flip-book with our unique Google optimized e-Paper software.
Originalbetriebsanleitung<br />
2 Jahre<br />
Garantie<br />
2 years<br />
WARRANTY<br />
2 ans de<br />
GARANTIE<br />
<strong>WallPerfect</strong><br />
W <strong>665</strong><br />
I-<strong>Spray</strong><br />
2 ans de<br />
GARANTIE<br />
2 anni di<br />
garanzia<br />
D/GB/F/NL/I
<strong>WallPerfect</strong> W <strong>665</strong> I-<strong>Spray</strong><br />
1 Übersicht / Overview / aperçu général / Overzicht/<br />
visione generale<br />
11<br />
9<br />
8 7 6<br />
10 5 4 3<br />
1/2<br />
17<br />
18<br />
12/13<br />
14<br />
15<br />
20<br />
19<br />
16<br />
2<br />
➟<br />
➟<br />
➟<br />
➟<br />
➟<br />
➟
<strong>WallPerfect</strong> W <strong>665</strong> I-<strong>Spray</strong><br />
3<br />
4<br />
a<br />
A<br />
b<br />
➟<br />
B<br />
5<br />
Click
<strong>WallPerfect</strong> W <strong>665</strong> I-<strong>Spray</strong><br />
6<br />
1<br />
7<br />
A<br />
B<br />
8<br />
9<br />
20-30 cm<br />
a<br />
+<br />
b<br />
10<br />
11<br />
1
<strong>WallPerfect</strong> W <strong>665</strong> I-<strong>Spray</strong><br />
12<br />
1<br />
13<br />
1<br />
2 3 4 5<br />
2<br />
3<br />
14<br />
15<br />
5<br />
4
<strong>WallPerfect</strong> W <strong>665</strong> I-<strong>Spray</strong><br />
16<br />
4<br />
3<br />
2<br />
17<br />
1<br />
18<br />
1 1
<strong>WallPerfect</strong> W <strong>665</strong> I-<strong>Spray</strong><br />
19<br />
Ersatzteile / Spare Parts / pièces de rechange /<br />
onderdelen/ RicamBi<br />
1<br />
14<br />
7<br />
6 5 4 3<br />
2<br />
12<br />
13<br />
8<br />
9<br />
10<br />
15<br />
16<br />
11<br />
17 18
<strong>WallPerfect</strong> W <strong>665</strong> I-<strong>Spray</strong><br />
D<br />
GB<br />
F<br />
NL<br />
I<br />
. . . . . . . . . . . . . . . . . . . . . . . . . . . . . . . . . . . . . . . . . 1 - 16<br />
. . . . . . . . . . . . . . . . . . . . . . . . . . . . . . . . . . . . . . . . 17 - 31<br />
. . . . . . . . . . . . . . . . . . . . . . . . . . . . . . . . . . . . . . . . 32 - 47<br />
. . . . . . . . . . . . . . . . . . . . . . . . . . . . . . . . . . . . . . . . 48 - 63<br />
. . . . . . . . . . . . . . . . . . . . . . . . . . . . . . . . . . . . . . . . 64 - 79<br />
<br />
. . . . . . . . . . . 82<br />
+ +
<strong>WallPerfect</strong> W <strong>665</strong> I-<strong>Spray</strong><br />
D<br />
Herzlichen Glückwunsch zum Erwerb Ihrer WAGNER Spritzpistole.<br />
Sie haben ein Markengerät erworben, das für eine reibungslose Funktion einer sorgfältigen<br />
Reinigung und Pflege bedarf. Bitte lesen Sie vor Inbetriebnahme des Gerätes die<br />
Bedienungsanleitung genau durch und beachten Sie die Sicherheitshinweise.<br />
Bewahren Sie die Bedienungsanleitung sorgfältig auf.<br />
Inhalt<br />
1. Erklärung der verwendeten Symbole .............................................2<br />
2. Allgemeine Sicherheitshinweise ..................................................2<br />
3. Sicherheitshinweise für Spritzpistolen . . . . . . . . . . . . . . . . . . . . . . . . . . . . . . . . . . . . . . . . . . . .5<br />
4. Anwendungsbereich .............................................................7<br />
5. Verarbeitbare Beschichtungsstoffe . . . . . . . . . . . . . . . . . . . . . . . . . . . . . . . . . . . . . . . . . . . . . . .7<br />
6. Nichtverarbeitbare Beschichtungsstoffe ..........................................7<br />
7. Folgende Materialien lassen sich nur mit optionalem Zubehör verarbeiten. ........7<br />
9. Vorbereitung des Beschichtungsstoffes ...........................................8<br />
10. Inbetriebnahme . . . . . . . . . . . . . . . . . . . . . . . . . . . . . . . . . . . . . . . . . . . . . . . . . . . . . . . . . . . . . . .8<br />
11. Einstellung des gewünschten Spritzbildes (Abb. 6) ...............................9<br />
12. Einstellung der Materialmenge (Abb. 8) . . . . . . . . . . . . . . . . . . . . . . . . . . . . . . . . . . . . . . . . .9<br />
13. Spritztechnik . . . . . . . . . . . . . . . . . . . . . . . . . . . . . . . . . . . . . . . . . . . . . . . . . . . . . . . . . . . . . . . . . . .9<br />
14. Arbeitsunterbrechung ........................................................ 10<br />
15. Außerbetriebnahme und Reinigung ........................................... 10<br />
16. Wartung ..................................................................... 11<br />
17. Ersatzteile .................................................................... 12<br />
18. Zubehör . . . . . . . . . . . . . . . . . . . . . . . . . . . . . . . . . . . . . . . . . . . . . . . . . . . . . . . . . . . . . . . . . . . . . 12<br />
19. Umweltschutz ................................................................ 13<br />
20. Wichtiger Hinweis zur Produkthaftung! ........................................ 13<br />
21. Behebung von Störungen . . . . . . . . . . . . . . . . . . . . . . . . . . . . . . . . . . . . . . . . . . . . . . . . . . . . 14<br />
1
D<br />
1. Erklärung der verwendeten Symbole<br />
<strong>WallPerfect</strong> W <strong>665</strong> I-<strong>Spray</strong><br />
Dieses Symbol weist auf eine potenzielle Gefahr für Sie bzw. das<br />
Gerät hin. Unter diesem Symbol finden Sie wichtige Informationen,<br />
wie Sie Verletzungen und Schäden am Gerät vermeiden.<br />
Gefahr eines elektrischen Schlages<br />
i<br />
Kennzeichnet Anwendungstipps und andere besonders nützliche<br />
Hinweise.<br />
Mit diesem Symbol gekennzeichnete Geräte und Zubehöre<br />
sind für die Verarbeitung von dickflüssigen Materialien wie z.B.<br />
Innenwandfarben (Dispersionen und Latexfarben) geeignet.<br />
Trägt ein Material dieses Logo ist es für die Verwendung mit dem<br />
entsprechenden Gerät besonders gut geeignet.<br />
2. Allgemeine Sicherheitshinweise<br />
Achtung!<br />
Sämtliche Anweisungen sind zu lesen. Fehler bei der Einhaltung der<br />
nachstehend aufgeführten Anweisungen können elektrischen Schlag,<br />
Brand und/oder schwere Verletzungen verursachen. Der nachfolgend<br />
verwendete Begriff “Elektrowerkzeug” bezieht sich auf netzbetriebene<br />
Elektrowerkzeuge (mit Netzkabel) und auf akkubetriebene Elektrowerkzeuge<br />
(ohne Netzkabel).<br />
1. Arbeitsplatzsicherheit<br />
a) Halten Sie Ihren Arbeitsbereich sauber und gut beleuchtet. Unordnung oder<br />
unbeleuchtete Arbeitsbereiche können zu Unfällen führen.<br />
b) Arbeiten Sie mit dem Gerät nicht in explosionsgefährdeter Umgebung,<br />
in der sich brennbare Flüssigkeiten, Gase oder Stäube befinden.<br />
Elektrowerkzeuge erzeugen Funken, die den Staub oder die Dämpfe entzünden<br />
können.<br />
c) Halten Sie Kinder und andere Personen während der Benutzung des Elektrowerkzeugs<br />
fern. Bei Ablenkung können Sie die Kontrolle über das Gerät verlieren.<br />
2
<strong>WallPerfect</strong> W <strong>665</strong> I-<strong>Spray</strong><br />
D<br />
2. Elektrische Sicherheit<br />
a) Der Anschlussstecker des Gerätes muss in die Steckdose passen. Der Stecker<br />
darf in keiner Weise verändert werden. Verwenden Sie keine Adapterstecker<br />
gemeinsam mit schutzgeerdeten Geräten. Unveränderte Stecker und passende<br />
Steckdosen verringern das Risiko eines elektrischen Schlages.<br />
b) Vermeiden Sie Körperkontakt mit geerdeten Oberflächen, wie von Rohren,<br />
Heizungen, Herden und Kühlschränken. Es besteht ein erhöhtes Risiko durch<br />
elektrischen Schlag, wenn Ihr Körper geerdet ist.<br />
c) Halten Sie das Gerät von Regen oder Nässe fern. Das Eindringen von Wasser in<br />
ein Elektrogerät erhöht das Risiko eines elektrischen Schlages.<br />
d) Zweckentfremden Sie das Kabel nicht, um das Gerät zu tragen, aufzuhängen<br />
oder um den Stecker aus der Steckdose zu ziehen. Halten Sie das Kabel<br />
fern von Hitze, Öl, scharfen Kanten oder sich bewegenden Geräteteilen.<br />
Beschädigte oder verwickelte Kabel erhöhen das Risiko eines elektrischen Schlages.<br />
e) Wenn Sie mit einem Elektrowerkzeug im Freien arbeiten, verwenden Sie<br />
nur Verlängerungskabel, die auch für den Außenbereich geeignet sind. Die<br />
Anwendung eines für den Außenbereich geeigneten Verlängerungskabels verringert<br />
das Risiko eines elektrischen Schlages.<br />
f) Wenn der Betrieb des Gerätes in feuchter Umgebung nicht vermeidbar<br />
ist, verwenden Sie einen Fehlerstromschutzschalter. Der Einsatz eines<br />
Fehlerstromschutzschalters verhindert das Risiko eines elektrischen Schlages.<br />
3. Sicherheit von Personen<br />
a) Seien Sie aufmerksam, achten Sie darauf, was Sie tun, und gehen Sie mit<br />
Vernunft an die Arbeit mit einem Elektrowerkzeug. Benutzen Sie das Gerät<br />
nicht, wenn Sie müde sind oder unter dem Einfluss von Drogen, Alkohol<br />
oder Medikamenten stehen. Ein Moment der Unachtsamkeit beim Gebrauch des<br />
Gerätes kann zu ernsthaften Verletzungen führen.<br />
b) Tragen Sie persönliche Schutzausrüstung und immer eine Schutzbrille.<br />
Das Tragen persönlicher Schutzausrüstung, wie Staubmaske, rutschfeste<br />
Sicherheitsschuhe, Schutzhelm oder Gehörschutz, je nach Art und Einsatz des<br />
Elektrowerkzeuges, verringert das Risiko von Verletzungen.<br />
c) Vermeiden Sie eine unbeabsichtigte Inbetriebnahme. Vergewissern Sie<br />
sich, dass der Schalter in der Position “AUS” ist, bevor Sie den Stecker in die<br />
Steckdose stecken. Wenn Sie beim Tragen des Geräts den Finger am Schalter haben<br />
oder das Gerät eingeschaltet an die Stromversorgung anschließen, kann dies zu<br />
Unfällen führen.<br />
3
D<br />
<strong>WallPerfect</strong> W <strong>665</strong> I-<strong>Spray</strong><br />
d) Entfernen Sie Einstellwerkzeuge oder Schraubenschlüssel, bevor Sie das<br />
Gerät einschalten. Ein Werkzeug oder Schlüssel, der sich in einem drehenden<br />
Geräteteil befindet, kann zu Verletzungen führen.<br />
e) Vermeiden Sie eine abnormale Körperhaltung. Sorgen Sie für einen sicheren<br />
Stand und halten Sie jederzeit das Gleichgewicht. Dadurch können Sie das<br />
Gerät in unerwarteten Situationen besser kontrollieren.<br />
f) Tragen Sie geeignete Kleidung. Tragen Sie keine weite Kleidung oder<br />
Schmuck. Halten Sie Haare, Kleidung und Handschuhe fern von sich<br />
bewegenden Teilen. Lockere Kleidung, Schmuck oder lange Haare können von sich<br />
bewegenden Teilen erfasst werden.<br />
g) Dieses Gerät ist nicht dafür bestimmt, durch Personen (einschießlich<br />
Kinder) mit eingeschränktem physischen, sensorischen oder geistigen<br />
Fähigkeiten oder mangels Erfahrung und/oder mangels Wissen benutzt zu<br />
werden, es sei denn, sie werden durch eine für Ihre Sicherheit zuständige<br />
Person beaufsichtigt oder erhielten von ihr Anweisungen, wie das Gerät zu<br />
benutzen ist. Kinder sollen beaufsichtigt werden um sicherzustellen, dass sie nicht<br />
mit dem Gerät spielen.<br />
4. Sorgfältiger Umgang und Gebrauch von Elektrowerkzeugen<br />
a) Überlasten Sie das Gerät nicht. Verwenden Sie für Ihre Arbeit das dafür<br />
bestimmte Elektrowerkzeug. Mit dem passenden Elektrowerkzeug arbeiten Sie<br />
besser und sicherer im angegebenen Leistungsbereich.<br />
b) Benutzen Sie kein Elektrowerkzeug, dessen Schalter defekt ist. Ein<br />
Elektrowerkzeug, das sich nicht mehr ein- oder ausschalten lässt, ist gefährlich und<br />
muss repariert werden.<br />
c) Ziehen Sie den Stecker aus der Steckdose, bevor Sie Geräteeinstellungen<br />
vornehmen, Zubehörteile wechseln oder das Gerät weglegen. Diese<br />
Vorsichtsmaßnahme verhindert den unbeabsichtigten Start des Geräts.<br />
d) Bewahren Sie unbenutzte Elektrowerkzeuge außerhalb der Reichweite<br />
von Kindern auf. Lassen Sie Personen das Gerät nicht benutzen, die mit<br />
diesem nicht vertraut sind oder diese Anweisungen nicht gelesen haben.<br />
Elektrowerkzeuge sind gefährlich, wenn Sie von unerfahrenen Personen benutzt<br />
werden.<br />
4<br />
e) Pflegen Sie das Gerät mit Sorgfalt. Kontrollieren Sie, ob bewegliche<br />
Geräteteile einwandfrei funktionieren und nicht klemmen, ob Teile<br />
gebrochen oder so beschädigt sind, dass die Funktion des Gerätes<br />
beeinträchtigt ist. Lassen Sie beschädigte Teile vor dem Einsatz des<br />
Gerätes reparieren. Viele Unfälle haben ihre Ursache in schlecht gewarteten
<strong>WallPerfect</strong> W <strong>665</strong> I-<strong>Spray</strong><br />
D<br />
Elektrowerkzeugen.<br />
f) Verwenden Sie Elektrowerkzeug, Zubehör, Einsatzwerkzeuge<br />
usw. entsprechend diesen Anweisungen und so, wie es für diesen<br />
speziellen Gerätetyp vorgeschrieben ist. Berücksichtigen Sie dabei die<br />
Arbeitsbedingungen und die auszuführende Tätigkeit. Der Gebrauch<br />
von Elektrowerkzeugen für andere als die vorgesehenen Anwendungen kann zu<br />
gefährlichen Situationen führen.<br />
5. Service<br />
a) Lassen Sie Ihr Gerät nur von qualifiziertem Fachpersonal und nur mit<br />
Original-Ersatzteilen reparieren. Damit wird sichergestellt, dass die Sicherheit des<br />
Geräts erhalten bleibt.<br />
b) Wenn die Netzanschlussleitung dieses Gerätes beschädigt wird, muss sie<br />
durch den Hersteller oder sein Kundendienst oder eine ähnlich qualifizierte<br />
Person ersetzt werden, um Gefährdungen zu vermeiden.<br />
3. Sicherheitshinweise für Spritzpistolen<br />
• Achtung! Atemschutz tragen: Farbnebel und Lösungsmitteldämpfe sind gesundheitsschädlich.<br />
Nur in gut belüfteten Räumen oder bei künstlicher Belüftung arbeiten.<br />
Das Tragen von Arbeitskleidung, Schutzbrille, Gehörschutz und Handschuhen wird<br />
empfohlen.<br />
ACHTUNG VERLETZUNGSGEFAHR!<br />
Niemals die Pistole auf sich, Personen oder Tiere richten.<br />
Steckdosen und Schalter unbedingt abkleben.<br />
Gefahr eines elektrischen Schlages durch eindringendes Sprühmaterial!<br />
Die Spritzpistolen dürfen nicht zum Sprühen brennbarer Stoffe verwendet werden.<br />
Die Spritzpistolen dürfen nicht mit brennbaren Lösungsmitteln gereinigt werden.<br />
• Achten Sie auf die Gefahren die von dem versprühten Stoff ausgehen können und<br />
beachten Sie ebenfalls die Aufschriften auf den Behältern oder die vom Hersteller des<br />
Stoffes angegebenen Hinweise.<br />
Versprühen Sie keinerlei Stoffe von denen Sie die Gefährlichkeit nicht kennen.<br />
• In Betriebsstätten, die unter die Explosionsschutz-Verordnung fallen, dürfen die<br />
Spritzpistolen nicht benutzt werden.<br />
• Um Explosionsgefahr bei Spritzarbeiten zu vermeiden, muss für eine gute natürliche<br />
oder künstliche Lüftung gesorgt werden.<br />
5
D<br />
<strong>WallPerfect</strong> W <strong>665</strong> I-<strong>Spray</strong><br />
• Beim Spritzen dürfen in der Umgebung keine Zündquellen vorhanden sein, wie<br />
z. B. offenes Feuer, Rauchen von Zigaretten, Funken, glühende Drähte und heisse<br />
Oberflächen.<br />
• Achten Sie darauf, dass keine Lösemitteldämpfe vom Gerät angesaugt werden. Nicht<br />
auf das Gerät sprühen!<br />
• Die Spritzpistole ist kein Spielzeug. Lassen Sie deswegen Kinder nicht mit der<br />
Spritzpistole hantieren oder spielen.<br />
• Vor allen Arbeiten an der Spritzpistole den Netzstecker aus der Steckdose ziehen.<br />
• Decken Sie nicht zu spritzende Flächen ab. Beachten Sie beim Arbeiten, dass z. B.<br />
durch Wind, Farbnebel über größere Distanzen verfrachtet werden kann und dadurch<br />
Schäden verursacht werden können.<br />
• Das Gerät darf nur mit funktionsfähigem Ventil betrieben werden. Wenn Farbe<br />
in den Belüftungsschlauch (Abb. 1, 18) steigt, Gerät nicht weiter betreiben!<br />
Belüftungsschlauch, Ventil und Membran demontieren, reinigen und ggf. Membran<br />
ersetzen.<br />
Spritzpistole nicht legen<br />
• Das Gerät ist mit einer Thermosicherung ausgestattet, welche das Gerät bei<br />
Überhitzung abschaltet. In diesem Falle Gerät ausschalten, Netzstecker ziehen und<br />
das Gerät min. 30 Minuten abkühlen lassen. Überhitzungsursache abstellen, z. B.<br />
geknickter Schlauch, verschmutzter Luftfilter, abgedeckte Schlitze zur Luftansaugung.<br />
Mit original WAGNER Zubehör und Ersatzteilen haben Sie die Gewähr, dass alle<br />
Sicherheitsvorschriften erfüllt sind.<br />
Max. Viskosität:<br />
Spannung:<br />
Leistungsaufnahme:<br />
Zerstäubungsleistung:<br />
Max. Fördermenge:<br />
Doppelisolation:<br />
Schalldruckpegel*:<br />
Schallleistungspegel*:<br />
Schwingungspegel:<br />
Luftschlauchlänge:<br />
Gewicht:<br />
* Gemessen nach EN 50144-2-7:2000<br />
Technische Daten<br />
3300 mPas<br />
230 V ~ , 50 Hz<br />
370 W<br />
120 W<br />
375 ml/min<br />
80 dB (A); Unsicherheit K = 4 dB (A)<br />
93 dB (A); Unsicherheit K = 4 dB (A)<br />
< 2,5 m/s²; Unsicherheit K = 1,5 m/s<br />
3,5 m<br />
ca. 4,3 kg<br />
6<br />
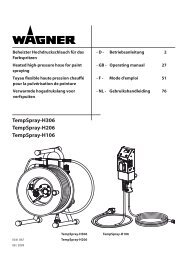
Beschreibung (Abb. 1)<br />
1 Luftkappe 2 Düse<br />
3 Einstellring Sprühstrahl 4 Überwurfmutter<br />
5 Sprühaufsatz <strong>WallPerfect</strong> I-<strong>Spray</strong> 6 Abzugsbügel
<strong>WallPerfect</strong> W <strong>665</strong> I-<strong>Spray</strong><br />
D<br />
Beschreibung (Abb. 1)<br />
7 Materialmengenregulierung 8 Pistolengriff<br />
9 EIN / AUS Schalter 10 Luftschlauch<br />
11 Tragegurt 12 Luftfilter<br />
13 Luftgitter 14 Netzkabel<br />
15 Spritzpistolenhalter 16 Behälter<br />
17 Ventil 18 Belüftungsschlauch<br />
19 Einfülltrichter 20 Rührstab<br />
4. Anwendungsbereich<br />
<strong>WallPerfect</strong> W <strong>665</strong> wurde speziell für den Auftrag von Innenwandfarben entwickelt.<br />
Zur Verarbeitungen von dünnflüssigen Materialen wie Lacke, Lasuren, usw. werden<br />
spezielle Sprühaufsätze benötig. Diese finden Sie unter dem Punkt "Zubehör".<br />
5. Verarbeitbare Beschichtungsstoffe<br />
Innenwandfarbe (Dispersionen und Latexfarbe)<br />
6. Nichtverarbeitbare Beschichtungsstoffe<br />
Materialien die stark schmirgelnde Bestandteile enthalten, Fassadenfarbe, Laugen und<br />
säurehaltige Beschichtungsstoffe. Brennbare Beschichtungsstoffe.<br />
7. Folgende Materialien lassen sich nur mit optionalem<br />
Zubehör verarbeiten.<br />
Lösemittelhaltige und wasserverdünnbare Lackfarben, Lasuren, Grundierungen,<br />
2-Komponenten Lacke, Klarlacke, Kraftfahrzeug-Decklacke, Beizen und Holz schutzmittel.<br />
8. Vorbereitung des Arbeitsplatzes<br />
Steckdosen und Schalter unbedingt abkleben. Gefahr eines<br />
elektrischen Schlages durch eindringendes Sprühmaterial!<br />
Decken Sie alle nicht zu sprühende Flächen und Objekte ab, bzw.<br />
entfernen Sie diese aus dem Arbeitsbereich. Für Schäden durch<br />
Farbnebel (Overspray) wird keine Haftung übernommen.<br />
Silikatfarbe verätzt bei Kontakt Glas- und Keramikflächen! Alle<br />
entsprechenden Oberflächen müssen daher unbedingt komplett<br />
abgedeckt werden.<br />
7
D<br />
i<br />
<strong>WallPerfect</strong> W <strong>665</strong> I-<strong>Spray</strong><br />
Achten Sie auf die Qualität des verwendeten Abklebebandes.<br />
Verwenden Sie auf Tapeten und gestrichenen Untergründen kein zu stark<br />
haftendes Klebeband, um Beschädigungen beim Entfernen zu vermeiden.<br />
Entfernen Sie Klebebänder langsam und gleichmäßig; keinesfalls ruckartig.<br />
Lassen Sie Flächen nur so lange wie nötig abgeklebt, um mögliche<br />
Rückstände beim Entfernen zu minimieren.<br />
Beachten Sie auch die Hinweise des Klebebandherstellers.<br />
9. Vorbereitung des Beschichtungsstoffes<br />
Sprühmaterial mit mindestens Zimmertemperatur (z.B. mit warmen Wasser<br />
i verdünnt) führt zu einem besseren Sprühergebnis.<br />
Achtung! Sprühmaterial nicht über 40°C erhitzen.<br />
Mit dem beiliegenden Sprühaufsatz können Innenwandfarben unverdünnt oder<br />
geringfügig verdünnt versprüht werden. Detaillierte Informationen können Sie dem<br />
Technischen Datenblatt des Farbherstellers entnehmen ( Internet Download).<br />
1. Rühren Sie das Material gründlich auf und verdünnen Sie es im Gebinde gemäß der<br />
Verdünnungsempfehlung (zum Umrühren wird ein Rührwerk empfohlen).<br />
Verdünnungsempfehlung<br />
Spritzmaterial<br />
Innenwandfarbe (Dispersionen und Latexfarben)<br />
0-10 % verdünnen<br />
2. Ist die Fördermenge auch bei maximaler Mengeneinstellung zu gering, schrittweise<br />
5 - 10 % verdünnen bis die Fördermenge Ihren Anforderungen entspricht.<br />
10. Inbetriebnahme<br />
Vor Anschluss an das Stromnetz darauf achten, dass die Netzspannung mit der Angabe<br />
auf dem Leistungsschild übereinstimmt.<br />
Tragegurt am Gerät anbringen. (Abb. 2)<br />
• Behälter von der Spritzpistole abschrauben.<br />
• Steigrohr ausrichten. (Abb. 3)<br />
Bei richtiger Position des Steigrohres kann der Behälterinhalt fast ohne Rest verspritzt<br />
werden.<br />
Bei Arbeiten an liegenden Objekten: Steigrohr nach vorne drehen. (Abb. 3 A)<br />
Spritzarbeiten bei über Kopf Objekten: Steigrohr nach hinten drehen. (Abb. 3 B)<br />
8<br />
i<br />
Wir empfehlen das Steigrohr nach hinten auszurichten, damit Wände und<br />
Decken optimal beschichtet werden können.<br />
• Behälter auf Papierunterlage stellen und vorbereiteten Beschichtungsstoff mit Hilfe<br />
des im Lieferumfang enthaltenen Einfülltrichters (Abb. 1, 19) einfüllen. Behälter fest an<br />
die Spritzpistole anschrauben.
<strong>WallPerfect</strong> W <strong>665</strong> I-<strong>Spray</strong><br />
• Luftschlauch montieren (Abb. 4, a + b). Luftschlauch in den Anschluss des Gerätes und<br />
des Pistolengriffs fest einstecken. Die Stellung des Schlauches kann dabei beliebig<br />
gewählt werden.<br />
Vorder- und Hinterteil der Pistole miteinander verbinden. (Abb. 5)<br />
• Gerät nur auf ebener und sauberer Fläche abstellen. Gerät kann sonst Staub usw.<br />
ansaugen.<br />
Gerät mit Tragegurt umhängen.<br />
• EIN / AUS Schalter am Gerät betätigen.<br />
11. Einstellung des gewünschten Spritzbildes (Abb. 6)<br />
WARNUNG! Verletzungsgefahr! Niemals während der Einstellung der<br />
Luftkappe den Abzugsbügel ziehen.<br />
Durch Drehen des Einstellringes (Abb. 6, 1) können 2 verschiedene Spritzstrahlformen<br />
eingestellt werden.<br />
Abb. 7 A = senkrechter Flachstrahl für horizontalen Farbauftrag<br />
Abb. 7 B = waagrechter Flachstrahl für vertikalen Farbauftrag<br />
D<br />
12. Einstellung der Materialmenge (Abb. 8)<br />
Materialmenge durch Drehen der Regulierung am Abzugsbügel der Pistole festlegen.<br />
- nach links drehen weniger Materialmenge<br />
+ nach rechts drehen mehr Materialmenge<br />
i<br />
Bei den meisten Wandfarben führt eine mittlere Mengeneinstellung zum<br />
besten Ergebnis.<br />
13. Spritztechnik<br />
Nicht zu spritzende Flächen abdecken.<br />
• Es ist zweckmäßig, auf Karton oder ähnlichem Untergrund eine Spritzprobe durchzuführen,<br />
um die passende Spritzpistoleneinstellung zu ermitteln.<br />
Wichtig: Am Rand der Spritzfläche beginnen. Zuerst mit der Sprühbewegung<br />
beginnen und dann den Abzugsbügel drücken. Unterbrechungen<br />
innerhalb der Spritzfläche vermeiden.<br />
• Die Spritzbewegung sollte nicht aus dem Handgelenk, sondern aus dem Arm<br />
kommen. Somit bleibt während des Spritzvorgangs immer der gleiche Abstand<br />
zwischen Spritzpistole und Fläche gewährleistet. Wählen Sie einen Abstand von 20-<br />
30 cm je nach gewünschter Spritzstrahlbreite.<br />
9
D<br />
<strong>WallPerfect</strong> W <strong>665</strong> I-<strong>Spray</strong><br />
Abb. 9 a: RICHTIG gleichmäßiger Abstand zum Objekt<br />
Abb. 9 b: FALSCH ungleichmäßiger Abstand erzeugt ungleichmäßigen Farbauftrag<br />
• Bewegen Sie die Spritzpistole gleichmäßig quer oder auf und ab, je nach<br />
Spritzbildeinstellung.<br />
Eine gleichmäßige Spritzpistolenführung ergibt eine einheitliche Oberflächenqualität.<br />
• Bei Verschmutzung der Düse und Luftkappe, beide Teile mit Wasser bzw. Lösemittel<br />
reinigen.<br />
i<br />
Sprühen Sie bei schlecht deckender Farbe oder stark saugendem<br />
Untergrund im "Kreuzgang" (Abb. 10).<br />
i<br />
Innenwandfarbe in kräftigen Farbtönen mindesten zweimal auftragen (erste<br />
Farbschicht zuerst trocknen lassen). Dadurch wird ein deckender Auftrag<br />
erreicht.<br />
14. Arbeitsunterbrechung<br />
Gerät ausschalten.<br />
•<br />
Bei längeren Pausen Behälter durch kurzes Aufdrehen und anschließendem<br />
Verschließen entlüften.<br />
• Nach der Arbeitsunterbrechung Düsenöffnungen reinigen.<br />
15. Außerbetriebnahme und Reinigung<br />
Eine sachgemäße Reinigung ist Voraussetzung für den einwandfreien Betrieb des<br />
Farbauftragsgerätes. Bei fehlender oder unsachgemäßer Reinigung werden keine<br />
Garantieansprüche übernommen.<br />
1) Gerät ausschalten.<br />
2) Pistole teilen. Haken (Abb. 5 “click”) leicht nach unten drücken.<br />
Pistolen-Vorderteil und Pistolen-Griff gegeneinander verdrehen.<br />
3) Behälter abschrauben und entleeren. Steigrohr mit Behälterdichtung herausziehen.<br />
4) Behälter und Steigrohr mit Pinsel vorreinigen. Entlüftungsbohrung reinigen<br />
(Abb. 11, 1)<br />
i<br />
Zur Reinigung des Behälters empfehlen wir die Verwendung einer<br />
haushaltsüblichen Spülbürste.<br />
5)<br />
6)<br />
7)<br />
8)<br />
Wasser bzw. Lösemittel in den Behälter einfüllen. Behälter anschrauben.<br />
Verwenden Sie zur Reinigung keine brennbaren Materialien.<br />
Pistole wieder zusammenbauen (Abb. 5)<br />
Gerät einschalten und Wasser bzw. Lösemittel in einen Behälter oder ein Tuch<br />
spritzen.<br />
Den obigen Vorgang wiederholen, bis an der Düse klares Wasser bzw. Lösemittel<br />
austritt.<br />
10
<strong>WallPerfect</strong> W <strong>665</strong> I-<strong>Spray</strong><br />
D<br />
9) Gerät ausschalten und Pistole teilen<br />
10) Behälter abschrauben und entleeren. Steigrohr mit Behälterdichtung<br />
herausziehen.<br />
ACHTUNG! Dichtungen, Membran und Düsen- oder Luftbohrungen der<br />
Spritzpistole niemals mit spitzen metallischen Gegenständen reinigen.<br />
Belüftungsschlauch und Membran sind nur bedingt lösemittelbeständig. Nicht in<br />
Lösemittel einlegen sondern nur abwischen.<br />
11) Belüftungsschlauch (Abb. 12, 1) oben vom Pistolenkörper ziehen. Ventildeckel (2)<br />
aufschrauben. Membran (3) entnehmen. Alle Teile sorgfältig reinigen.<br />
12) Einstellring (Abb. 13, 1) vorsichtig von der Überwurfmutter (2) abziehen.<br />
13) Überwurfmutter (Abb. 13, 2) abschrauben, Luftkappe (3) , Düse (4) und Düsendichtung<br />
(5) abnehmen. Luftkappe, Düsendichtung und Düse mit Pinsel und Lösemittel bzw.<br />
Wasser reinigen.<br />
14) Spritzpistole und Behälter außen mit einem in Lösemittel bzw. Wasser getränktem<br />
Tuch reinigen.<br />
15) Teile wieder zusammenbauen (siehe “Zusammenbau”).<br />
Zusammenbau<br />
Gerät darf nur mit unversehrter Membran (Abb. 12, 3) betrieben werden.<br />
1) Membran (Abb. 12, 3) mit Stift nach oben auf das Unterteil des Ventils setzen. Siehe<br />
hierzu auch Markierung auf dem Pistolenkörper.<br />
2) Ventildeckel (Abb. 12, 2) vorsichtig aufsetzen und zuschrauben.<br />
3) Belüftungsschlauch (Abb. 12, 1) auf Ventildeckel und auf Nippel am Pistolenkörper<br />
stecken.<br />
4) Düsendichtung (Abb. 14, 5) mit Nut (Schlitz) voraus in die Düse schieben.<br />
5) Düse (Abb. 14, 4) mit der Aussparung nach unten auf den Pistolenkörper stecken.<br />
Achtung: Stellung der Nadel muss mit der Düsenöffnung übereinstimmen. (Abb.<br />
15)<br />
6) Luftkappe (Abb. 16, 3) auf Düse (4) stecken und mit Überwurfmutter (2) festziehen.<br />
7) Einstellring (Abb. 17, 1) so auf die Überwurfmutter setzen, dass die Aussparungen am<br />
Einstellring in die beiden Hörner auf der Luftkappe einrasten.<br />
8) Behälterdichtung von unten auf das Steigrohr stecken und bis über den Bund schieben,<br />
dabei Behälterdichtung leicht drehen.<br />
9) Steigrohr mit Behälterdichtung in Pistolenkörper stecken.<br />
16. Wartung<br />
Wichtig! Gerät niemals ohne Luftfilter betreiben, es könnte Schmutz angesaugt<br />
werden und den Betrieb des Gerätes beeinflussen.<br />
Vor dem Wechsel Netzstecker ziehen.<br />
• Je nach Verschmutzung den Luftfilter auswechseln. Befestigung der Abdeckung durch<br />
Aushebeln mit einem Schraubendreher vom Gerät lösen (Abb. 18, Pfeil).<br />
• Neuen Luftfilter in das Fach einlegen (Abb. 18, 1).<br />
11
D<br />
<strong>WallPerfect</strong> W <strong>665</strong> I-<strong>Spray</strong><br />
• Abdeckung wieder am Gerät einrasten.<br />
Zum leichteren Montieren der Pistole, tragen Sie bitte nach dem Reinigen großzügig<br />
Gleitfett (ist beigelegt) auf den O-Ring am Pistolenvorderteil auf (Abb. 19, 7).<br />
17. Ersatzteile<br />
Ersatzteilliste (Abb. 19)<br />
Pos. Benennung Best. Nr.<br />
1 <strong>WallPerfect</strong> I-<strong>Spray</strong> Sprühaufsatz inkl. Behälter 1800 ml 2326 477<br />
2 Einstellring Sprühstrahl 2328 900<br />
3 Überwurfmutter 2328 903<br />
4 Luftkappe 2328 905<br />
5 Düse 2328 908<br />
6 Düsendichtung (2 Stk.) 2304 433<br />
7 O-Ring 0417 308<br />
8 Belüftungsschlauch, Ventildeckel, Membran 2304 027<br />
9 Behälterdichtung 2328 919<br />
10 Steigrohr 2328 922<br />
11 Behälter (1800 ml) mit Deckel (nur für <strong>WallPerfect</strong> 2304 025<br />
Sprühaufsatz)<br />
12 Pistolengriff 2303 300<br />
13 Luftschlauch 2303 410<br />
14 Tragegurt 0414 204<br />
15 Luftfilter 0414 700<br />
16 Abdeckung 0414 302<br />
17 Einfülltrichter (3 Stk.) 2304 028<br />
18 Rührstab 2304 419<br />
Gleitfett 2315 539<br />
18. Zubehör<br />
Das neue CLICK&PAINT SYSTEM bietet mit weiteren Sprühaufsätzen und Zubehör<br />
für jede Arbeit das richtige Werkzeug.<br />
Zubehör (nicht im Lieferumfang enthalten)<br />
Benennung<br />
Best. Nr.<br />
HVLP Griffverlängerung<br />
Zur einfacheren Beschichtung von Decken und liegenden Objekten 2307 678<br />
Brilliant Sprühaufsatz incl. Behälter 600 ml<br />
Optimierte Düse und Luftführung für brillante Lackierergebnisse 0417 932<br />
12
<strong>WallPerfect</strong> W <strong>665</strong> I-<strong>Spray</strong><br />
D<br />
Zubehör (nicht im Lieferumfang enthalten)<br />
Perfect <strong>Spray</strong> Sprühaufsatz incl. Behälter 800 ml<br />
Für schnellen Farbwechsel. Für mittlere und größere Objekte und Möbel. 0417 914<br />
Kleinmengen Sprühaufsatz incl. Behälter 250 ml<br />
Für filigrane Gegenstände, detaillierte und kreative Arbeiten. 0417 918<br />
Perfect <strong>Spray</strong> Sprühaufsatz incl. Behälter 1400 ml<br />
Zügiges Arbeiten für größere Objekte wie Holzhäuser, Garagentore etc. 0417 917<br />
Detail- und Heizkörper Sprühaufsatz mit Verlängerung<br />
incl. Behälter 600 ml<br />
Für schwer erreichbare Stellen, z. B. Heizkörper, Schrankecken, Nischen etc. 0417 915<br />
<strong>WallPerfect</strong> I-<strong>Spray</strong> Sprühaufsatz inkl. Behälter 1300 ml<br />
Zur Verarbeitung von Innenwandfarbe.<br />
2321 896<br />
Wir empfehlen den <strong>WallPerfect</strong> I-<strong>Spray</strong> Sprühaufsatz nicht mit der W550<br />
zu verwenden.<br />
Weitere Informationen zur WAGNER-Produktpalette rund ums Renovieren unter<br />
www.wagner-group.com/color<br />
19. Umweltschutz<br />
Das Gerät samt Zubehör sollte einer umweltgerechten Wiederverwertung<br />
zugeführt werden. Geben Sie das Gerät bei der Entsorgung nicht in den Hausmüll.<br />
Unterstützen Sie den Umweltschutz und bringen Sie deshalb Ihr Gerät zu einer<br />
örtlichen Entsorgungsstelle oder erkundigen Sie sich im Fachhandel.<br />
20. Wichtiger Hinweis zur Produkthaftung!<br />
Aufgrund einer seit 01.01.1990 gültigen EU-Verordnung haftet der Hersteller nur dann<br />
für sein Produkt, wenn alle Teile vom Hersteller stammen oder von diesem freigegeben<br />
wurden, bzw. die Geräte sachgemäß montiert und betrieben werden. Bei Verwendung<br />
von fremden Zubehör und Ersatzteilen kann die Haftung ganz oder teilweise entfallen.<br />
Die Handhabung des Produktes, einschließlich Vorbereitung von Arbeitsplatz und<br />
Sprühmaterial sowie das Endresultat der Arbeiten, liegen in der alleinigen Verantwortung<br />
des Anwenders. <strong>Wagner</strong> schließt jegliche Haftung für Schäden aus, die durch Farbnebel,<br />
Anwendungsfehler, Nachbesserungen des Arbeitsergebnisses oder Nichtbeachtung der<br />
Anweisungen in dieser Betriebsanleitung entstehen.<br />
13
D<br />
21. Behebung von Störungen<br />
<strong>WallPerfect</strong> W <strong>665</strong> I-<strong>Spray</strong><br />
Störung Ursache Abhilfe<br />
Kein<br />
Düse verstopft<br />
Beschichtungsstoffaustritt<br />
an der Düse zu weit nach links gedreht (-)<br />
Kein Druckaufbau im Behälter<br />
Behälter leer<br />
Steigrohr lose<br />
Steigrohr verstopft<br />
• Materialmengen-Einstellung<br />
• Entlüftungsbohrung<br />
(Abb. 11, 1) verstopft<br />
Beschichtungsstoff • Beschichtungsstoff-Aufbau an ➞➞Reinigen<br />
tropft an der Düse Luftkappe, Düse oder Nadel<br />
nach<br />
Düse lose<br />
Düsendichtung verschlissen<br />
• Düse verschlissen<br />
Zu grobe • Materialmenge zu groß<br />
Zerstäubung<br />
Spritzstrahl pulsiert<br />
Beschichtungsstoff-<br />
Läufer<br />
Materialmengen-<br />
Einstellschraube zu weit nach<br />
rechts gedreht (+)<br />
Düse verunreinigt<br />
• Beschichtungsstoff zu<br />
dickflüssig<br />
• Zu geringer Druckaufbau im<br />
Behälter<br />
• Luftfilter stark verschmutzt<br />
• Beschichtungsstoff im<br />
Behälter geht zu Ende<br />
Düsendichtung verschlissen<br />
• Luftfilter stark verschmutzt<br />
• Zuviel Beschichtungsstoff<br />
aufgetragen<br />
➞➞Reinigen<br />
➞➞Nach rechts drehen (+)<br />
➞➞Behälter anziehen<br />
➞➞Nachfüllen<br />
➞➞Einstecken<br />
➞➞Reinigen<br />
➞➞Reinigen<br />
➞➞Überwurfmutter anziehen<br />
➞➞Auswechseln<br />
➞➞Auswechseln<br />
➞➞Materialmengen-<br />
Einstellschraube nach links<br />
drehen (-)<br />
➞➞Reinigen<br />
➞➞Weiter verdünnen<br />
➞➞Behälter anziehen<br />
➞➞Auswechseln<br />
➞➞Nachfüllen<br />
➞➞Auswechseln<br />
➞➞Auswechseln<br />
➞➞Materialmengeneinstellschraube<br />
nach links<br />
drehen (-)<br />
➞➞Spritzabstand verringern<br />
• Beschichtungsstoff zu<br />
dünnflüssig<br />
Zuviel • Abstand zum Spritzobjekt zu<br />
Beschichtungsstoff- groß<br />
Nebel (Overspray) • Zuviel Beschichtungsstoff-<br />
Auftrag<br />
➞➞Materialmengeneinstellschraube<br />
nach links<br />
drehen (-)<br />
14
<strong>WallPerfect</strong> W <strong>665</strong> I-<strong>Spray</strong><br />
D<br />
Störung Ursache Abhilfe<br />
Gerät funktioniert<br />
nicht<br />
• Gerät überhitzt<br />
➞➞Netzstecker ziehen, Gerät<br />
30 Minuten abkühlen<br />
lassen, Schlauch nicht<br />
knicken, Luftfilter prüfen,<br />
Ansaugschlitze nicht<br />
abdecken<br />
Farbe im<br />
Belüftungsschlauch<br />
Schlechte Deckkraft<br />
an der Wand<br />
Membran verschmutzt<br />
• Membran defekt<br />
• Sprühmaterial zu kalt<br />
• Stark saugender Untergrund<br />
oder Farbe mit schlechter<br />
Deckkraft<br />
• Abstand zu groß<br />
➞➞Membran reinigen<br />
➞➞Membran ersetzen<br />
➞➞Sprühmaterial erwärmen<br />
(max. bis 40°C)<br />
➞➞Im Kreuzgang sprühen<br />
(Abb. 10)<br />
➞➞Näher ans Objekt<br />
2 Jahre Garantie<br />
Die Garantie beträgt 2 Jahre, gerechnet vom Tag des Verkaufes (Kassenbon). Sie umfasst<br />
und beschränkt sich auf die kostenlose Behebung der Mängel, die nachweisbar auf die<br />
Verwendung nicht einwandfreien Materials bei der Herstellung oder Montagefehler<br />
zurückzuführen sind oder kostenlosen Ersatz der defekten Teile. Verwendung oder<br />
Inbetriebnahme, sowie selbständig vorgenommene Montagen oder Reparaturen, die<br />
nicht in unserer Bedienungsanleitung angegeben sind, schließen eine Garantieleistung<br />
aus. Dem Verschleiß unterworfene Teile sind ebenfalls von der Garantie ausgeschlossen.<br />
Die Garantieleistung schließt den gewerblichen Einsatz aus. Die Garantieleistung behalten<br />
wir uns ausdrücklich vor. Die Garantie erlischt, wenn das Gerät von anderen Personen als<br />
dem WAGNER Service - Personal geöffnet wurde. Transportschäden, Wartungsarbeiten<br />
sowie Schäden und Störungen durch mangelhafte Wartungsarbeiten fallen, nicht unter die<br />
Garantieleistungen. Der Nachweis über den Erwerb des Gerätes muss bei Inanspruchnahme<br />
der Gewährleistung durch Vorlage des Originalbeleges geführt werden. Soweit gesetzlich<br />
möglich, schließen wir jede Haftung für jegliche Personen,- Sach- oder Folgeschäden aus,<br />
insbesondere, wenn das Gerät anders als für den in der Bedienungsanleitung angegebenen<br />
Verwendungszweck eingesetzt wurde, nicht nach unserer Bedienungsanleitung in<br />
Betrieb genommen oder instandgesetzt oder Reparaturen selbständig von einem<br />
Nichtfachmann ausgeführt wurden. Reparaturen oder Instandsetzungsarbeiten, die<br />
weitergehen als in dieser Bedienungsanleitung angegeben, behalten wir uns im Werk vor.<br />
Im Garantie- bzw. Reparaturfall wenden Sie sich bitte an Ihre Verkaufsstelle.<br />
15
D<br />
<strong>WallPerfect</strong> W <strong>665</strong> I-<strong>Spray</strong><br />
Sehr geehrter WAGNER-Kunde,<br />
unser Service-Zentrum bietet Ihnen die beste Unterstützung durch unsere Hotline,<br />
die wir für Sie unter der Telefonnummer 0180 5 59 24 637 (14 Cent/Min. aus dem<br />
deutschen Festnetz, Mobilfunk max. 42 Cent/Min) geschaltet haben. Unsere Experten<br />
garantieren Ihnen schnelle Hilfe und kompetente Auskunft. Sie geben Tips und Tricks<br />
zum Benutzen unserer Produkte.<br />
Email: hotline@wagner-group.com<br />
16
<strong>WallPerfect</strong> W <strong>665</strong> I-<strong>Spray</strong><br />
GB<br />
Translation of the original operating instructions<br />
Congratulations on purchasing your WAGNER spray guns.<br />
You have purchased a proprietary device that requires careful cleaning and care to ensure<br />
trouble-free functioning. Read the operating instructions carefully before using the<br />
tool and observe the safety instructions. Keep the operating instructions in a safe<br />
place.<br />
Contents<br />
1. Explanation of symbols used ................................................... 18<br />
2. General Safety Instructions . . . . . . . . . . . . . . . . . . . . . . . . . . . . . . . . . . . . . . . . . . . . . . . . . . . . 18<br />
3. Safety Instructions for <strong>Spray</strong> Guns . . . . . . . . . . . . . . . . . . . . . . . . . . . . . . . . . . . . . . . . . . . . . 21<br />
4. Field of application . . . . . . . . . . . . . . . . . . . . . . . . . . . . . . . . . . . . . . . . . . . . . . . . . . . . . . . . . . . . 22<br />
5. Coating Materials Suitable for Use .............................................. 22<br />
6. Coating Materials Not Suitable for Use .......................................... 23<br />
7. The following materials can only be processed with optional accessories: ........ 23<br />
9. Preparation of the Coating Material . . . . . . . . . . . . . . . . . . . . . . . . . . . . . . . . . . . . . . . . . . . . 23<br />
10. Start-up ...................................................................... 24<br />
11. Selecting the <strong>Spray</strong> Setting (Fig. 6) . . . . . . . . . . . . . . . . . . . . . . . . . . . . . . . . . . . . . . . . . . . . 24<br />
12. Adjusting the Material Volume (Fig. 8) ......................................... 25<br />
13. <strong>Spray</strong> Technique .............................................................. 25<br />
14. Interruption of Work .......................................................... 25<br />
15. Taking Out of Operation and Cleaning ......................................... 26<br />
16. Maintenance ................................................................. 27<br />
17. Spare Parts ................................................................... 27<br />
18. Accessories ................................................................... 28<br />
19. Environmental protection. . . . . . . . . . . . . . . . . . . . . . . . . . . . . . . . . . . . . . . . . . . . . . . . . . . . . 28<br />
20. Important Note regarding Product Liability! . . . . . . . . . . . . . . . . . . . . . . . . . . . . . . . . . . . 28<br />
21. Correction of Malfunctions .................................................... 29<br />
17
GB<br />
1. Explanation of symbols used<br />
<strong>WallPerfect</strong> W <strong>665</strong> I-<strong>Spray</strong><br />
This symbol indicates a potential danger for you or for the device.<br />
Under this symbol you can find important information on how to<br />
avoid injuries and damage to the device.<br />
Danger of electrical shock<br />
i<br />
Indicates tips for use and other particularly useful information.<br />
Devices and accessories marked with this symbol are suitable for<br />
processing high-viscosity materials such as e.g. interior wall paints<br />
(dispersions and latex paints).<br />
If a material bears this logo, it is particularly well suited for use with<br />
the relevant device.<br />
2. General Safety Instructions<br />
Caution!<br />
Read all the instructions. Non-observance of the instructions below can cause<br />
electric shock, fire and or serious personal injuries. The term "power tool"<br />
used below covers both mains-operated power tools (with mains lead) and<br />
accumulator-operated power tools (without mains lead).<br />
1. Safety at the workplace<br />
a) Keep your workplace clean and well lit. Disorder or unlit workplaces may result in<br />
accidents.<br />
b) Never use the tool in hazardous areas that contain flammable liquids, gases<br />
or dusts. Power tools generate sparks that can ignite the dust or vapors.<br />
c) Keep children and other persons away when using the power tool. You can<br />
lose control of the tool if you are distracted.<br />
2. Electrical Safety<br />
18<br />
a) The tool plug must fit into the socket. The plug may not be modified in any<br />
form. Do not use adaptor plugs together with protective-earthed tools.<br />
Unmodified plugs and suitable sockets reduce the risk of an electric shock.<br />
b) Avoid physical contact with earthed surfaces such as pipes, heating<br />
elements, stoves and refrigerators. The risk through electric shock increases if
<strong>WallPerfect</strong> W <strong>665</strong> I-<strong>Spray</strong><br />
GB<br />
your body is earthed.<br />
c) Keep the equipment away from rain and moisture. The risk of an electric shock<br />
increases if water penetrates electrical equipment.<br />
d) Do not misuse the mains lead by carrying the tool by the lead, hanging it<br />
from the lead or by pulling on the lead to remove the plug. Keep the lead<br />
away from heat, oil, sharp edges or moving tool parts. Damaged or twisted<br />
leads increase the risk of an electric shock.<br />
e) If you work outdoors with a power tool, only use extension cables suitable<br />
for outdoor use. The use of an extension lead that is suitable for outdoors reduces<br />
the risk of an electric shock.<br />
f) If you cannot avoid using the tool in a damp environment, use a residual<br />
current operated circuit-breaker. Using a residual current operated circuit-breaker<br />
avoids the risk of electric shock.<br />
3. Safety of Persons<br />
a) Be attentive. Pay attention to what you are doing and work sensibly with<br />
a power tool. Do not use the tool if you are tired or under the influence of<br />
drugs, alcohol or medication. Just a moment of inattentiveness while using the<br />
tool can lead to serious injuries.<br />
b) Wear personal safety equipment and always wear safety goggles. Wearing<br />
personal protective equipment, such as dust mask, non-slip safety shoes, safety helm<br />
or ear protection, depending on the type of power tools, reduces the risk of injury.<br />
c) Avoid accidental starting-up. Ensure that the switch is in the "OFF" position<br />
before inserting the plug into the socket. Accidents can occur if you carry the<br />
power tool while your finger is on the switch or if you connect the power tool to the<br />
power supply which it is on.<br />
d) Remove setting tools or wrenches before switching on the power tool. A tool<br />
or wrench that is in a rotating tool part can lead to injuries.<br />
e) Avoid an unnatural posture. Ensure that you are standing securely and<br />
have your balance at all times. This ensures that you can control the tool better in<br />
unexpected situations.<br />
f) Wear suitable clothing. Do not wear wide clothing or jewelry. Keep your hair,<br />
clothes and gloves away from moving parts. Loose clothing, jewelry or long hair<br />
can be caught in moving parts.<br />
g) This appliance is not intended for use by persons (including children) with<br />
19
GB<br />
<strong>WallPerfect</strong> W <strong>665</strong> I-<strong>Spray</strong><br />
reduced physical, sensory or mental capabilities, or lack of experience<br />
and knowledge, unless they have been given supervision or instruction<br />
concerning use of the appliance by a person responsible for their safety.<br />
Children should be supervised to ensure that they do not play with the appliance.<br />
4. Careful Handling and Use of Power Tools<br />
a) Do not overload the tool. Use the power tool designed for the work that you<br />
are doing. You work better and safer in the specified performance range if you use<br />
the suitable power tool.<br />
b) Do not use power tools whose switch is defective. A power tool that cannot be<br />
switched on or off is dangerous and has to be repaired.<br />
c) Remove the plug from the socket before carrying out tool settings, changing<br />
accessories or putting the tool away. This precautionary measure prevents<br />
unintentional starting of the tool.<br />
d) Store unused power tools so that they are inaccessible to children. Do not<br />
let persons use the tool who are not familiar with it or who have not read<br />
these instructions. Power tools are dangerous when they are used by inexperienced<br />
persons.<br />
e) Take proper care of your tools. Check whether the moving parts function<br />
trouble-free and do not jam, whether parts are broken or damaged so that<br />
the tool function is impaired. Have damaged parts repaired before using the tool.<br />
Many accidents have their origin in power tools that have been maintained badly.<br />
f) Use the power tool, accessories, insert tools, etc. in accordance with these<br />
instructions and in a fashion specified for this special tool type. Take the<br />
working conditions and the activity to be carried out into consideration. The<br />
use of power tools for purposes other than the intended ones can lead to dangerous<br />
situations.<br />
5. Service<br />
a) Have your tool repaired only by qualified specialist personnel and only with<br />
original spare parts. This ensures that the tool safety is maintained.<br />
b) If the supply cord is damaged, it must be replaced by the manufacturer or it’s<br />
service agent or a similarly qualified person in order to avoid a safety hazard.<br />
20
<strong>WallPerfect</strong> W <strong>665</strong> I-<strong>Spray</strong><br />
3. Safety Instructions for <strong>Spray</strong> Guns<br />
GB<br />
• Caution! Wear breathing equipment: Paint mist and solvent vapors are damaging to<br />
health. Always wear breathing equipment and only work in well ventilated rooms or<br />
using supplementary ventilating equipment. It is advisable to wear working clothing,<br />
safety glasses, ear protection and gloves.<br />
CAUTION: Danger of injury!<br />
Never point the spray stream towards human beings or animals.<br />
Sockets and plugs must be masked. Risk of an electric shock as a<br />
consequence of sprayed material entering the socket!<br />
Do not use the spray guns to spray flammable substances.<br />
The spray guns are not to be cleaned with flammable solvents.<br />
• Caution against dangers that can arise from the sprayed substance and observe the<br />
text and information on the containers or the specifications given by the substance<br />
manufacturer.<br />
Do not spray any liquid of unknown hazard potential.<br />
• The device may not be used in workplaces covered by the explosion-protection<br />
regulations.<br />
• To avoid the hazard of explosion when spraying, provide for effective natural or<br />
artificial ventilation.<br />
• There must be no sources of ignition such as, for example, open fires, smoke of lit<br />
cigarettes, cigars and tobacco pipes, sparks, glowing wires, hot surfaces, etc. in the<br />
vicinity during spraying.<br />
Ensure that no solvent vapors are sucked in by the unit. Do not spray onto the unit!<br />
• The spray gun is not a toy; children must therefore not be allowed to handle it or play<br />
with it.<br />
Before working on the spray gun remove the power plug from the socket.<br />
• Cover areas that are not to be sprayed. When working keep in mind that wind, for<br />
example, may transport paint mist over great distances and cause damage.<br />
• The units may only be used with a functional valve. If paints rises in the ventilating<br />
hose (Fig. 1, item 18) do not operate the unit further! Dismantle and clean the<br />
ventilating hose, valve and diaphragm and replace the diaphragm if necessary.<br />
Do not lay the spray gun.<br />
• The device is equipped with a thermal release which disconnects the device in case of<br />
overheating. In this case, turn off the device, remove the plug and let the device cool<br />
down for at least 1/2 hour. Eliminate the cause of heating, e.g. bent hose, soiled air filter,<br />
slots for air intake covered.<br />
With original WAGNER accessories and spare parts, you have the guarantee that all<br />
safety regulations are fulfilled.<br />
21
GB<br />
<strong>WallPerfect</strong> W <strong>665</strong> I-<strong>Spray</strong><br />
Max. viscosity:<br />
Power source:<br />
Power consumption:<br />
Atomizing output:<br />
Max. delivery rate<br />
Double insulation:<br />
Sound pressure level*:<br />
Sound pressure output*<br />
Oscillation level:<br />
Air hose length:<br />
Weight:<br />
Technical Data<br />
3300 mPas<br />
230 V ~ , 50 Hz<br />
370 W<br />
120 W<br />
375 ml/min<br />
80 dB (A); Uncertainty K = 4 dB<br />
93 dB (A); Uncertainty K = 4 dB<br />
< 2.5 m/s²; Uncertainty K = 1.5 m/s<br />
3.5 m<br />
approx. 4.3 kg<br />
* Measured in accordance with EN 50144-2-7:2000<br />
Description (Fig. 1)<br />
1 Air cap 2 Nozzle<br />
3 <strong>Spray</strong> jet adjustment ring 4 Union nut<br />
5 <strong>WallPerfect</strong> I-<strong>Spray</strong> spray attachment 6 Trigger guard<br />
7 Material volume regulation 8 Handle<br />
9 ON/OFF switch 10 Air hose<br />
11 Carrying belt 12 Air filter<br />
13 Air screen 14 Mains lead<br />
15 <strong>Spray</strong> gun holder 16 Container<br />
17 Valve 18 Ventilating hose<br />
19 Feed hopper 20 Stirring rod<br />
4. Field of application<br />
<strong>WallPerfect</strong> W <strong>665</strong> has been specially developed for the application of interior wall<br />
paints.<br />
Special spray attachments are required to process low-viscosity materials such as<br />
paints, glazes etc.. These can be found under "Accessories".<br />
5. Coating Materials Suitable for Use<br />
Interior wall paint (dispersions and latex paint)<br />
22
<strong>WallPerfect</strong> W <strong>665</strong> I-<strong>Spray</strong><br />
6. Coating Materials Not Suitable for Use<br />
Materials that contain highly abrasive components, facade paint, caustic solutions and<br />
acidic coating substances. Flammable materials.<br />
GB<br />
7. The following materials can only be processed with<br />
optional accessories:<br />
Water- and solvent-based paints, finishes, primers, 2-component paints, clear finishes,<br />
automotive finishes, staining sealers and wood sealer-preservatives.<br />
8. Preparation of the workplace<br />
Sockets and plugs must be masked. Risk of an electric shock as a<br />
consequence of sprayed material entering the socket!<br />
Mask all the areas and objects that are not to be spray painted, or<br />
remove them from the work area. No liability is assumed for damage<br />
due to overspray.<br />
Silicate paint corrodes glass and ceramic surfaces upon contact! All<br />
such surfaces must therefore be completely covered.<br />
i<br />
Pay attention to the quality of the adhesive tape used.<br />
Do not use excessively strong adhesive tape on wallpaper and painted<br />
surfaces, in order to avoid damaging these surfaces when removing the<br />
tape. Remove adhesive tape slowly and evenly; do not use jerky movements.<br />
Do not leave adhesive tape on surfaces any longer than necessary, in order<br />
to minimise the possibility of residues when removing.<br />
Also observe the adhesive tape manufacturer's instructions.<br />
9. Preparation of the Coating Material<br />
i<br />
<strong>Spray</strong> material that is at least at room temperature (e.g. diluted with warm<br />
water) provides a better spray result.<br />
Attention! Do not heat spray material above 40°C.<br />
Interior wall paints can be sprayed undiluted or slightly diluted with the spray attachment<br />
provided. Detailed information is available in the technical data sheet of the manufacturer<br />
( Internet Download).<br />
1. Stir the material thoroughly and dilute it in the container as per the recommended<br />
dilution (an agitator is recommended for stirring).<br />
23
GB<br />
<strong>WallPerfect</strong> W <strong>665</strong> I-<strong>Spray</strong><br />
Thinning recommendation<br />
<strong>Spray</strong>ed material<br />
Interior wall paint (dispersions and latex paint) dilute by 0-10 %<br />
2. If the feed rate is too low even at maximum flow setting, dilute in steps of 5 - 10 % until<br />
the feed rate meets your requirements.<br />
10. Start-up<br />
Before connecting to the mains supply, be sure that the supply voltage is identical with<br />
the value given on the rating plate.<br />
Attach the carrying strap to the unit. (Fig. 2)<br />
• Unscrew the container from the spray gun.<br />
• Aligning suction tube. (Fig. 3)<br />
If the suction tube is positioned correctly, the container contents can be sprayed<br />
without almost any residue.<br />
When spraying horizontal surfaces, turn suction tube forward. (Fig. 3 A)<br />
When spraying objects overhead, turn suction tube back. (Fig. 3 B)<br />
We recommend orienting the feed tube to the rear, to ensure optimal<br />
i coating of walls and ceilings.<br />
• Place the container on a paper base and pour in the prepared coating substance with<br />
the aid of the feed hopper included in the scope of supply (Fig. 1, 18).<br />
Screw the container tightly onto the spray gun.<br />
Connect the front part with the rear part of the gun. (Fig. 5)<br />
• Mount the air hose (Fig. 4, a + b). Insert the air hose firmly into the connection of the<br />
unit and the gun handle. The position of the hose is not relevant.<br />
• Put the machine down only on a level, clean surface. Otherwise, the gun may suck in<br />
dust, etc.<br />
Sling on the carrying strap with the unit.<br />
• Press the ON/OFF switch at the device.<br />
11. Selecting the <strong>Spray</strong> Setting (Fig. 6)<br />
WARNING! Danger of injury! Never pull the trigger guard while adjusting<br />
the air cap.<br />
2 different spray jet shapes can be set by turning the adjustment ring (fig. 6, 1)<br />
Fig. 7 A = vertical flat jet for horizontal surfaces<br />
Fig. 7 B = horizontal flat jet for vertical surfaces<br />
24
<strong>WallPerfect</strong> W <strong>665</strong> I-<strong>Spray</strong><br />
12. Adjusting the Material Volume (Fig. 8)<br />
GB<br />
Set the material volume by turning the regulator on the trigger guard of the spray gun<br />
- turn to the left lower material volume<br />
+ turn to the right higher material volume<br />
i<br />
An average flow setting provides the best result for most wall paints.<br />
13. <strong>Spray</strong> Technique<br />
•<br />
Cover all surfaces not to be sprayed.<br />
It is advisable to test the spray gun on cardboard or a similar surface to find the<br />
correct setting.<br />
Important: Start at the edge of the area to be sprayed. Start the spray movement<br />
first of all, and then press the trigger. Avoid interruptions within the area<br />
to be sprayed.<br />
The spray movement should come from the arm, not just from the wrist. This ensures<br />
that a uniform distance is maintained between the spray gun and the spray surface<br />
during the spray operation. Select a distance of 20-30 cm, depending on the desired<br />
spray jet width.<br />
Fig. 9 a:<br />
Fig. 9 b:<br />
•<br />
•<br />
CORRECT Even distance to the object.<br />
INCORRECT An uneven distance will result in uneven paint application.<br />
Move the spray gun evenly cross-wise or up-and-down, depending on the spray<br />
pattern setting.<br />
An even movement of the spray gun results in an even surface quality.<br />
If nozzle and air cap are soiled, clean both parts with water and solvent.<br />
i<br />
i<br />
"Cross spray" when using paint with a poor covering capacity or if the<br />
surface is highly absorbent (Fig. 10).<br />
Interior wall paint in strong colour shades should be applied at least twice<br />
(allow first paint coat to dry first). This will ensure good coverage.<br />
14. Interruption of Work<br />
Turn the machine off.<br />
•<br />
During longer breaks, vent the container by briefly opening and then closing it again.<br />
Clean nozzle openings after an interruption in operation.<br />
25
GB<br />
15. Taking Out of Operation and Cleaning<br />
<strong>WallPerfect</strong> W <strong>665</strong> I-<strong>Spray</strong><br />
Proper cleaning is the prerequisite for problem-free operation of the paint application<br />
device. No warranty claims are accepted in case of improper or no cleaning.<br />
1) Turn the machine off.<br />
2) Divide the spray gun. Press the hook (Fig. 5 "click") slightly downwards. Turn the gun<br />
front part and gun rear part against each other.<br />
3) Screw of the container and empty it. Pull out the suction tube with container seal.<br />
4) Preclean the container and feed tube with a brush. Clean the ventilating bore (Fig. 11, 1).<br />
i<br />
We recommend the use of a common household washing-up brush to<br />
clean the container.<br />
5) Pour water or solvent into the container. Screw the container back on.<br />
Do not use flammable materials for cleaning purposes.<br />
6) Assemble the gun again (Fig. 5).<br />
7) Turn on the machine and spray the water or solvent into a container or a cloth.<br />
8) Repeat the above procedure until the water or solvent emerging from the nozzle is<br />
clear.<br />
9) Turn off the machine and divide the spray gun.<br />
10) Screw of the container and empty it. Pull out the suction tub with container seal.<br />
CAUTION! Never clean seals, diaphragm and nozzle or air holes of the spray gun with<br />
metal objects.<br />
The ventilation hose and diaphragm are only solvent-resistant to a limited<br />
extent. Do not immerse in solvent, only wipe.<br />
11) Pull the ventilating hose (Fig.12, 1) at the top from the gun body. Screw off the valve<br />
cover (2). Remove the diaphragm (3). Clean all the parts carefully.<br />
12) Remove the adjustment ring (fig. 13, 1) carefully from the union nut (2).<br />
13) Unscrew the union nut (Fig. 13, 2) and remove the air cap (3), nozzle (4) and nozzle seal<br />
(5). Clean the air cap, nozzle seal and nozzle with a brush and water or solvent.<br />
14) Clean the outside of the spray gun and container with a cloth soaked in solvent or<br />
water.<br />
15) Assemble the parts again (see “Assembly”).<br />
Assembly<br />
The unit may only be operated with an integer diaphragm (Fig. 12, 3).<br />
1) Place the diaphragm (Fig. 12, 3) with the pin facing upwards on the bottom section<br />
of the valve. Also see the marking on the gun body.<br />
2) Place on the valve cover (Fig. 12, 2) and screw it closed.<br />
3) Place the ventilating hose (Fig. 12, 1) on the valve cover and on the nipple at the gun<br />
body.<br />
4) Slide the nozzle seal (Fig. 14, 5) with the groove (slot) facing forwards into the<br />
nozzle.<br />
5) Place the nozzle (fig. 14, 4) on to the gun body with the recess facing downwards.<br />
26
<strong>WallPerfect</strong> W <strong>665</strong> I-<strong>Spray</strong><br />
GB<br />
6)<br />
7)<br />
8)<br />
9)<br />
Attention: Position of needle must be congruent with the nozzle aperture.<br />
(Fig.15)<br />
Put the air cap (Fig. 16, 3) onto the nozzle (4) and tighten it using the union nut (2).<br />
Position the adjustment ring (fig. 17, 1) on the union nut so that the recesses on the<br />
adjustment ring can snap into both horns on the air cap.<br />
Place the container seal from below on the suction tube and slide it over the collar,<br />
while turning the container seal slightly.<br />
Insert the suction tube with container seal in the gun body.<br />
16. Maintenance<br />
WARNING! Never operate the machine without the air filter; dirt could be sucked<br />
in and interfere with the function of the machine.<br />
Disconnect plug before changing parts.<br />
• Change the air filter if it is soiled. Use a screwdriver to lever the cover fastening from<br />
the unit (Fig. 18, arrow).<br />
Insert a new air filter into the compartment (Fig. 18, 1).<br />
• Replace the cover on the unit until it latches.<br />
In order to mount the gun more easily apply lubricating grease (enclosed) liberally<br />
to the O-ring at the gun front part (Fig. 19, 7).<br />
17. Spare Parts<br />
Spare Parts List (Fig. 19)<br />
Pos. Name Order No.<br />
1 <strong>WallPerfect</strong> I-<strong>Spray</strong> spray attachment incl. 1800 ml container 2326 477<br />
2 <strong>Spray</strong> jet adjustment ring 2328 900<br />
3 Union nut 2328 903<br />
4 Air cap 2328 905<br />
5 Nozzle 2328 908<br />
6 Nozzle seal (2 pcs.) 2304 433<br />
7 O-ring 0417 308<br />
8 Ventilating hose, valve cover, diaphragm 2304 027<br />
9 Container seal 2328 919<br />
10 Suction tube 2328 922<br />
11 Container with cover 1800 ml (only for <strong>WallPerfect</strong> spray 2304 025<br />
attachment)<br />
12 Handle 2303 300<br />
13 Air hose 2303 410<br />
14 Carrying belt 0414 204<br />
15 Air filter 0414 700<br />
16 Cover 0414 302<br />
27
GB<br />
<strong>WallPerfect</strong> W <strong>665</strong> I-<strong>Spray</strong><br />
28<br />
Spare Parts List (Fig. 19)<br />
17 Feed hopper (3 pcs.) 2304 028<br />
18 Stirring rod 2304 419<br />
Lubricating grease 2315 539<br />
18. Accessories<br />
The new CLICK&PAINT SYSTEM with additional spray attachments and accessories<br />
offers the right tool for each work.<br />
Accessories (not included in the delivery)<br />
Name<br />
Order No.<br />
HVLP handle extension<br />
For easier coating of ceilings and horizontal objects. 2307 678<br />
Brilliant spray attachment incl. 600 ml container<br />
Optimised nozzle and air guidance for brilliant paint results 0417 932<br />
Perfect <strong>Spray</strong> spray attachment incl. 800 ml. container<br />
For a rapid paint change. For medium- and large-scale objects and furniture. 0417 914<br />
Small-scale spray attachment incl. 250 ml container<br />
For filigree objects, detailed and creative work. 0417 918<br />
Perfect <strong>Spray</strong> spray attachment incl. 1400 ml container<br />
Rapid working at larger objects such as timber houses, garage doors, etc. 0417 917<br />
Detail / Radiator spray attachment incl. 600 ml container<br />
For inaccessible places, such as radiators, cupboard corners, recesses etc. 0417 915<br />
<strong>WallPerfect</strong> I-<strong>Spray</strong> spray attachment incl. 1300 ml container<br />
For processing interior wall paint<br />
2321 896<br />
We recommend against using the <strong>WallPerfect</strong> I-<strong>Spray</strong> spray attachment<br />
with the W550.<br />
Further information about the WAGNER range of products for renovating is available<br />
under www.wagner-group.com<br />
19. Environmental protection<br />
The appliance and accessories should be recycled in an environmentally<br />
friendly way. Do not dispose of the appliance with household waste. Support<br />
environmental protection by taking the appliance to a local collection point or<br />
obtain information from a specialist retailer.<br />
20. Important Note regarding Product Liability!<br />
Due to an EC ordinance in effect since 01.01.1990, the manufacturer is liable for his product<br />
only if all parts originate from or were approved by the manufacturer and the devices<br />
are assembled and operated correctly. The use of other accessories and spare parts can
<strong>WallPerfect</strong> W <strong>665</strong> I-<strong>Spray</strong><br />
GB<br />
partially or completely invalidate the liability.<br />
How the product is handled, including preparation of the work place and spray<br />
paint as well as the final result, is the sole responsibility of the operator.<br />
<strong>Wagner</strong> excludes any liability for damage which may arise from overspray, application<br />
errors, touch-ups, or non-compliance with the instructions provided here.<br />
21. Correction of Malfunctions<br />
Problem Cause Remedy<br />
No coating material<br />
Nozzle clogged<br />
➞➞Clean<br />
emerges from the • Material volume setting ➞➞Turn to the right (+)<br />
nozzle<br />
turned too far to the left (-)<br />
• No pressure build-up in ➞➞Tighten container<br />
container<br />
Container empty<br />
➞➞Refill<br />
Feed tube loose<br />
➞➞Insert<br />
Feed tube clogged ➞➞Clean<br />
• Ventilating bore (Fig.11, C) ➞➞Clean<br />
clogged<br />
Coating material • Coating material assembly ➞➞Clean<br />
drips from the at air cap, nozzle or needle<br />
nozzle<br />
Nozzle loose<br />
➞➞Union nut tighten<br />
Nozzle seal worn<br />
➞➞Change<br />
• Nozzle worn<br />
➞➞Change<br />
Atomisation too<br />
Material volume too large<br />
coarse • Material volume adjusting<br />
screw turned too far to the<br />
right (+)<br />
Nozzle contaminated ➞➞Clean<br />
• Viscosity of coating material ➞ ➞Dilute further<br />
too high<br />
• Too little pressure build-up ➞➞Tighten container<br />
in container<br />
• Air filter heavily soiled ➞➞Change<br />
<strong>Spray</strong> jet pulsates • Coating material in ➞➞Refill<br />
container running out<br />
Nozzle seal worn<br />
➞➞Replace<br />
• Air filter heavily soiled ➞➞Change<br />
Coating material • Too much coating material<br />
causes "paint tears" applied<br />
• Viscosity of coating material<br />
too low<br />
➞➞Turn material volume<br />
adjusting screw to the<br />
left (-)<br />
➞➞Turn material volume<br />
adjusting screw to the left (-)<br />
29
GB<br />
<strong>WallPerfect</strong> W <strong>665</strong> I-<strong>Spray</strong><br />
Problem Cause Remedy<br />
Too much fog of • Distance to the object too ➞➞Reduce distance<br />
coating material large<br />
(Overspray) • Too much coating material ➞➞Turn material volume<br />
applied<br />
adjusting screw to the left (-)<br />
Device does not<br />
function<br />
• Device overheated ➞➞Unplug the power plug,<br />
let the device cool down<br />
approx. 30 minutes, do not<br />
bend the hose, check the<br />
air filter, do not cover the<br />
intake slots<br />
Paint in the<br />
ventilating hose<br />
Poor covering<br />
capacity on the wall<br />
Diaphragm soiled<br />
• Diaphragm defective<br />
• <strong>Spray</strong> material is too cold<br />
• Highly absorbent surface<br />
or paint with poor covering<br />
capacity<br />
• Distance too large<br />
➞➞Clean the diaphragm<br />
➞➞Replace the diaphragm<br />
➞ ➞Heat spray material (to<br />
maximum 40°C)<br />
➞➞Cross spray (Fig. 10)<br />
➞➞Closer to the object<br />
2 years guarantee<br />
The guarantee runs for two years, counting from the date of sale (sales slip). It covers and<br />
is restricted to free-of-charge rectification of faults which are demonstrably attributable<br />
to the use of faulty materials in manufacture, or assembly errors; or free-of-charge<br />
replacement of the defective parts. The guarantee does not cover incorrect use or<br />
commissioning or fitting or repair work which is not stated in our operating instructions.<br />
Wearing parts are also excluded from the guarantee. The guarantee excludes commercial<br />
use. We expressly reserve the right to fulfil the guarantee. The guarantee expires if<br />
the tool is opened up by persons other than WAGNER service personnel. Transport<br />
damage, maintenance work and loss and damage due to faulty maintenance work<br />
are not covered by the guarantee. Under any guarantee claim, there must be proof<br />
of purchase of the tool through submission of the original receipt. Wherever legally<br />
possible, we exclude all liability for injury, damage or consequential loss, especially if the<br />
tool has been used for a purpose other than that stated in the operating instructions,<br />
commissioned or repaired other than in accordance with our operating instructions<br />
or if repairs are performed by someone who is unqualified. We reserve the right to<br />
perform any repairs in excess of those stated in our operating instructions. In case of<br />
guarantee or repair, please refer to your point of sale.<br />
30
<strong>WallPerfect</strong> W <strong>665</strong> I-<strong>Spray</strong><br />
GB<br />
Warning<br />
If the supply cord of this appliance is damaged, it must only be replaced by a repair<br />
shop appointed by the manufacturer, because special purpose tools are required.<br />
Warning: Do not connect the blue or brown wire to the earth terminal of the plug!<br />
The wires in this mains lead are coloured in accordance with the following<br />
code:<br />
blue = neutral brown = live<br />
As the colours of the wires in the mains<br />
lead of this appliance may not correspond<br />
with the coloured markings identifiying<br />
the terminals in your plug, proceed as<br />
follows:<br />
• Should the moulded plug have to be<br />
replaced, never re-use the defective<br />
plug or attempt to plug it into a<br />
different 13 A socket. This could result<br />
in an electric shock.<br />
• Should it be necessary to exchange<br />
the fuse in the plug only use fuses approved by ASTA in accordance with BS 1362. 5<br />
Amp fuses may be used.<br />
• To ensure that the fuse and fuse carrier are correctly mounted please observe the<br />
provided markings or colour coding in the plug.<br />
• After changing the fuse, always make sure that the fuse carrier is correctly inserted.<br />
With out the fuse carrier, it is not permissible to use the plug.<br />
• The correct fuses and fuse carriers are available from your local electrical supplies<br />
stockist.<br />
31
F<br />
<strong>WallPerfect</strong> W <strong>665</strong> I-<strong>Spray</strong><br />
Traduction du mode d'emploi original<br />
Nos félicitations pour l'achat de votre pistolet de pulvérisation WAGNER.<br />
Vous avez acquis un appareil de marque dont le parfait fonctionnement requiert un<br />
nettoyage et un entretien soigneux. Veuillez lire le mode d’emploi avec attention<br />
avant la mise en service de l’appareil et respecter les consigne de sécurité. Rangez<br />
soigneusement le mode d’emploi.<br />
Table des matières<br />
1. Explication des symboles utilisés . . . . . . . . . . . . . . . . . . . . . . . . . . . . . . . . . . . . . . . . . . . . . . . 33<br />
2. Consignes générales de sécurité . . . . . . . . . . . . . . . . . . . . . . . . . . . . . . . . . . . . . . . . . . . . . . . 33<br />
3. Consignes de sécurité pour pistolet électrique basse pression ................... 36<br />
4. Domaine d’utilisation .......................................................... 38<br />
5. Produits de revêtement traitables . . . . . . . . . . . . . . . . . . . . . . . . . . . . . . . . . . . . . . . . . . . . . . 38<br />
6. Produits de revêtement non traitables .......................................... 38<br />
7. On ne peut pulvériser les produits suivants qu'avec les accessoires proposés<br />
dans le chapitre "accessoires" (en option non livré avec votre produit): . . . . . . . . . . 38<br />
8. Préparation de la zone de travail . . . . . . . . . . . . . . . . . . . . . . . . . . . . . . . . . . . . . . . . . . . . . . . 39<br />
9. Préparation des produits de revêtement ........................................ 39<br />
10. Mise en service ............................................................... 40<br />
11. Réglage de la forme de jet désiré (Fig. 6) ....................................... 40<br />
12. Réglage du débit de produit (Fig. 8) . . . . . . . . . . . . . . . . . . . . . . . . . . . . . . . . . . . . . . . . . . . 40<br />
13. Pulvérisation . . . . . . . . . . . . . . . . . . . . . . . . . . . . . . . . . . . . . . . . . . . . . . . . . . . . . . . . . . . . . . . . . 41<br />
14. Interruption de travail . . . . . . . . . . . . . . . . . . . . . . . . . . . . . . . . . . . . . . . . . . . . . . . . . . . . . . . . 41<br />
15. Mise hors service et nettoyage ................................................ 41<br />
16. Entretien . . . . . . . . . . . . . . . . . . . . . . . . . . . . . . . . . . . . . . . . . . . . . . . . . . . . . . . . . . . . . . . . . . . . 43<br />
17. Pièces de rechange . . . . . . . . . . . . . . . . . . . . . . . . . . . . . . . . . . . . . . . . . . . . . . . . . . . . . . . . . . 43<br />
18. Accessoires ................................................................... 44<br />
19. Protection de l’environnement ................................................ 45<br />
20. Indication importante de responsabilité de produit! . . . . . . . . . . . . . . . . . . . . . . . . . . . 45<br />
21. Elimination des défauts ....................................................... 45<br />
32
<strong>WallPerfect</strong> W <strong>665</strong> I-<strong>Spray</strong><br />
1. Explication des symboles utilisés<br />
Ce symbole attire l'attention sur un danger potentiel pour<br />
vous-même ou pour l'appareil. Au-dessous de ce symbole,<br />
vous trouverez des informations importantes visant à éviter les<br />
blessures et les dommages sur l'appareil.<br />
Danger de choc électrique<br />
F<br />
i<br />
Caractérise des conseils d’utilisation et d’autres remarques<br />
particulièrement utiles.<br />
Les appareils et accessoires pourvus de ce symbole peuvent être<br />
utilisés pour l'application de produits à consistance épaisse, tels que<br />
les peintures murales intérieures (en phase aqueuse ou solvantée).<br />
Les produits qui portent ce logo se prêtent particulièrement bien à<br />
une application avec l'appareil correspondant.<br />
2. Consignes générales de sécurité<br />
Attention!<br />
Lire toutes les instructions. Des erreurs lors de l’application des instructions<br />
mentionnées dans la suite peuvent provoquer un choc électrique, un incendie<br />
et/ou de graves blessures. Le terme utilisé dans la suite d’"outils électriques"<br />
se rapporte aux outils électriques fonctionnant sur le secteur (avec câble<br />
d’alimentation) et aux outils électriques fonctionnant sur accus (sans câble<br />
d’alimentation).<br />
1. Sécurité du poste de travail<br />
a) Maintenez votre zone de travail propre et veillez à ce qu'elle soit bien<br />
éclairée. Le désordre et le manque d'éclairage des zones de travail peuvent être<br />
sources d'accident.<br />
b) Ne travaillez pas avec l’appareil dans un environnement à risque<br />
d’explosion, là où se trouvent des liquides, gaz ou poussières inflammables.<br />
Les outils électriques génèrent des étincelles, qui peuvent enflammer la poussière ou<br />
les vapeurs.<br />
c) Maintenez les enfants et les autres personnes à distance pendant l’utilisation<br />
de l’outil électrique. Si vous êtes distrait, vous risquez de perdre le contrôle de<br />
l’appareil.<br />
33
F<br />
<strong>WallPerfect</strong> W <strong>665</strong> I-<strong>Spray</strong><br />
2. Sécurité électrique<br />
a) La fiche de l’appareil doit convenir pour la prise de courant. La fiche ne peut<br />
en aucune manière être modifiée. N’utilisez pas d’adaptateur en même<br />
temps que des appareils avec protection de terre. Une fiche non modifiée et des<br />
prises de courant appropriées diminuent le risque de choc électrique.<br />
b) Evitez le contact corporel avec des surfaces mises à la terre, telles que celles<br />
de tuyaux de plomberie et de chauffage, cuisinières et réfrigérateurs. Il existe<br />
un risque accru de choc électrique lorsque votre corps est mis à la terre.<br />
c) Maintenez l’appareil à l’écart de la pluie et de l’humidité. L’infiltration d’eau<br />
dans un appareil électrique augmente le risque de choc électrique.<br />
d) N’utilisez pas le câble dans un autre but que celui auquel il est destiné,<br />
notamment pour porter l’appareil, le suspendre ou pour tirer la fiche de la<br />
prise de courant. Maintenez le câble à l’écart de la chaleur, de l’huile, des arêtes<br />
vives ou de parties d’appareil en mouvement. Les câbles endommagés ou emmêlés<br />
augmentent le risque de choc électrique.<br />
e) Lorsque vous travaillez en extérieur, n'utilisez que des rallonges également<br />
adaptées à une utilisation en extérieur. L’utilisation d’une rallonge appropriée<br />
pour l’extérieur diminue le risque de choc électrique.<br />
f) S'il n'est pas possible d'éviter l'utilisation de l'appareil dans un<br />
environnement humide, ayez recours à un disjoncteur différentiel.<br />
Ceci évite le risque d'une décharge électrique.<br />
3. Sécurité des personnes<br />
34<br />
a) Soyez attentif à ce que vous faites et faites preuve de bon sens lors de<br />
l’utilisation d’un outil électrique. N’utilisez pas l’appareil si vous êtes fatigué<br />
ou sous l’influence de drogues, de l’alcool ou de médicaments. Un moment<br />
d’inattention lors de l’utilisation de l’appareil peut provoquer des blessures sérieuses.<br />
b) Portez un équipement de protection personnelle et toujours des lunettes<br />
de sécurité. Le port d’un équipement de protection personnelle tel que masque<br />
anti-poussière, gants de protection manuelle, chaussures de sécurité antidérapantes,<br />
casque de protection ou protection auditive, selon la nature et l’utilisation de l’outil<br />
électrique, diminue le risque de blessures.<br />
c) Evitez toute mise en service intempestive de l’appareil. Vérifiez que<br />
l’interrupteur est en position "ARRÊT" avant de mettre la fiche dans la<br />
prise de courant. Si vous avez le doigt sur l’interrupteur de l’appareil pendant son<br />
transport ou si vous raccordez l’appareil enclenché à l’alimentation électrique, ceci<br />
peut conduire à des accidents.
<strong>WallPerfect</strong> W <strong>665</strong> I-<strong>Spray</strong><br />
F<br />
d) Enlevez les outils de réglage ou la clé à vis avant d’enclencher l’appareil.<br />
Un outil ou une clé qui se trouve dans une partie d’appareil en mouvement peut être<br />
source de blessures.<br />
e) Évitez une posture anormale. Veillez à une position stable et gardez à tout<br />
moment l’équilibre. De la sorte, vous pourrez mieux maîtriser l’appareil en cas de<br />
situation inattendue.<br />
f) Portez des vêtements appropriés. Ne portez pas de vêtements amples ni<br />
de bijoux. Maintenez les cheveux, les vêtements et les chaussures à l’écart<br />
des pièces en mouvement. Les vêtements amples, les bijoux ou les cheveux longs<br />
peuvent être saisis par des pièces en mouvement.<br />
g) Cet appareil n'est pas conçu pour être utilisés par des personnes (y compris<br />
des enfants) présentant des aptitudes physiques, sensorielles ou mentales<br />
limitées ou disposant d'une expérience et/ou de connaissances insuffisantes,<br />
à moins qu'elles ne soient sous la surveillance d'une personne responsable<br />
de leur sécurité ou n'aient reçu de celle-ci des instructions sur la manière<br />
d'utiliser l'appareil. Les enfants devraient être surveillés afin de s'assurer qu'ils ne<br />
jouent pas avec l'appareil.<br />
4. Manipulation et utilisation soigneuses des outils électriques<br />
a) Ne surchargez pas l’appareil. Utilisez l’outil électrique approprié pour votre<br />
travail. Avec l’outil électrique approprié, vous travaillerez mieux et de manière plus<br />
sûre dans la plage de puissance indiquée.<br />
b) N’utilisez pas d’outil électrique dont l’interrupteur est défectueux. Un outil<br />
électrique qui ne se laisse plus mettre en service et hors service est dangereux et doit<br />
être réparé.<br />
c) Retirez la fiche de la prise de courant avant de procéder à des réglages sur<br />
l’appareil, de changer des accessoires ou de ranger l’appareil. Cette mesure de<br />
précaution empêche le démarrage intempestif de l’appareil.<br />
d) Rangez les outils électriques non utilisés hors de portée des enfants. Ne<br />
laissez aucune personne utiliser l’appareil si elle n’est pas familiarisée avec<br />
celui-ci ou n’a pas lu ces instructions. Les outils électriques sont dangereux<br />
lorsqu’ils sont utilisés par des personnes inexpérimentées.<br />
e) Traitez l’appareil avec soin. Contrôlez si les éléments mobiles de l’appareil<br />
fonctionnent correctement et se coincent pas, si des pièces sont cassées ou<br />
endommagées au point d’entraver le fonctionnement de l’appareil. Faites<br />
réparer les pièces endommagées avant d’utiliser l’appareil. De nombreux<br />
accidents sont causés par des outils électriques mal entretenus.<br />
35
F<br />
<strong>WallPerfect</strong> W <strong>665</strong> I-<strong>Spray</strong><br />
f) Utilisez l’outil électrique, les accessoires, les outils d’intervention etc.<br />
conformément à ces instructions et de la manière prescrite pour ce type<br />
particulier d’appareil. Tenez compte à cet effet des conditions de travail et<br />
de l’activité à effectuer. L’utilisation d’outils électriques pour d’autres buts que les<br />
applications prévues peut conduire à des situations dangereuses.<br />
5. Maintenance<br />
a) Faites réparer l’appareil uniquement par du personnel spécialisé qualifié et<br />
uniquement avec des pièces de rechange d’origine. Ceci garantira le maintien<br />
de la sécurité de l’appareil.<br />
b) Si le cordon de raccordement secteur de cet appareil est endommagé, elle<br />
doit être remplacée par le fabricant ou son service après-vente ou une<br />
personne de qualification similaire, afin d'éviter des dangers.<br />
3. Consignes de sécurité pour pistolet électrique basse<br />
pression<br />
• Attention! Porter une protection respiratoire: le brouillard de peinture et les vapeurs<br />
de solvant sont nocifs pour la santé. Travailler uniquement dans des locaux bien<br />
ventilés ou avec une ventilation artificielle. Le port de vêtements de travail, de gants,<br />
des protections pour les oreilles et un masque de protection respiratoire est vivement<br />
recommandé.<br />
36<br />
Attention: Danger de blessures!<br />
Ne pas diriger l'appareil sur les personnes et les animaux!<br />
Coller obligatoirement les prises et les interrupteurs.<br />
Danger de choc électrique en cas de pénétration du produit pulvérisé !<br />
Ne pas pulvériser vers des produits inflammables.<br />
Ne pas nettoyer le pistolet avec des solvants inflammables.<br />
• Veuillez vérifier et suivre les instructions données sur le conditionnement de ces<br />
produits ou les recommandations des fabricants de produits.<br />
Ne pas pulvériser de liquides présentant un risque.<br />
• Ne pas utiliser le pistolet en ateliers et bureaux d'usines qui tombent sous le coup de<br />
la loi de protection contre les explosions.<br />
• Pendant la projection, toute source d'inflammation est prohibée dans l'entourage,<br />
comme par exemple des flammes, cigarettes allumées, étincelles, fils incandescents<br />
ou surfaces chaudes.<br />
• Veiller à ce que l'appareil n'aspire pas de vapeurs de solvants. Ne pas pulvériser en<br />
direction de la turbine !
<strong>WallPerfect</strong> W <strong>665</strong> I-<strong>Spray</strong><br />
• Le pistolet n'est pas un jouet. Ne pas laisser les enfants jouer avec l'appareil ou le<br />
manipuler.<br />
• Avant tout travail sur le pistolet, débrancher l'appareil.<br />
• Recouvrir les surfaces à protéger avec du ruban de masquage et du papier journal.<br />
Ne pas oublier qu'en cas de vent par exemple, les particules de peinture se déplacent<br />
et peuvent causer des dégâts.<br />
• L'appareil peut uniquement être exploité avec une vanne fonctionnelle. Ne plus<br />
utiliser l'appareil si de la peinture monte dans le tube de dépressurisation (Fig. 1,<br />
18)! Démonter le tuyau flexible de ventilation, la vanne et la membrane, nettoyer et le<br />
cas échéant remplacer la membrane.<br />
Poser le pistolet et son godet à plat, de manière stable.<br />
• L'appareil est équipé d'une protection thermique qui met l'appareil hors tension en<br />
cas de surchauffe. Dans ce cas, mettre l'appareil hors service, tirer la fiche mâle de la<br />
prise de courant et laisser refroidir l'appareil pendant au moins 1/2 heure. Supprimer<br />
la cause de la surchauffe, p. ex. flexible plié, filtre à air encrassé, fentes d'aspiration<br />
d'air obturées.<br />
Les accessoires et pièces de rechange de WAGNER remplissent l'ensemble des<br />
prescriptions de sécurité.<br />
Caractéristiques techniques<br />
Viscosité max.:<br />
3300 mPas<br />
Tension:<br />
230 V ~ , 50 Hz<br />
Puissance absorbée:<br />
370 W<br />
Piussance de pulvérisation: 120 W<br />
Débit max.<br />
375 ml/min<br />
Double insolation:<br />
Niveau de pression sonore*:<br />
Niveau sonore en fonction*:<br />
Niveau de vibrations:<br />
Longueur du flexible à air:<br />
Poids:<br />
80 dB (A); Incertitude K = 4 dB (A)<br />
93 dB (A); Incertitude K = 4 dB (A)<br />
< 2,5 m/s²; Incertitude K = 1,5 m/s<br />
3,5 m<br />
env. 4,3 kg<br />
* Mesure effectuée en conformité avec EN 50144-2-7:2000<br />
F<br />
37
F<br />
<strong>WallPerfect</strong> W <strong>665</strong> I-<strong>Spray</strong><br />
Description (Fig. 1)<br />
1 Capot d’air 2 Buse<br />
3 Bague de réglage du jet de pulvérisation 4 Ecrou-raccord<br />
5 Façade amovible <strong>WallPerfect</strong> I-<strong>Spray</strong> 6 Gâchette<br />
7 Réglage de quantité 8 Poignée de pistolet<br />
9 Interrupteur marche - arrêt 10 Flexible d’air<br />
11 Bretelle 12 Filtre à air<br />
13 Grille 14 Cordon d'alimentation<br />
15 Porte-pistolet 16 Réservoir<br />
17 Soupape 18 Tube de dépressurisation<br />
19 Entonnoir 20 Mélangeur-agitateur<br />
4. Domaine d’utilisation<br />
<strong>WallPerfect</strong> W <strong>665</strong> été spécialement conçu pour l'application de peintures pour murs et<br />
plafonds en intérieur.<br />
Pour pulvériser des produits fluides ou très fluides tels que laques, lasures, vernis etc,<br />
Nous vous conseillons de vous doter des accessoires appropriés à la réalisation de votre<br />
projet parmi un choix proposé dans la rubrique "accessoires".<br />
5. Produits de revêtement traitables<br />
Peintures murales intérieures (en phase aqueuse ou solvantée)<br />
6. Produits de revêtement non traitables<br />
Produits renfermant des composants fortement abrasifs, peinture pour façades,<br />
produits de revêtement acides et alcalins.<br />
Produits de revêtement combustibles.<br />
7. On ne peut pulvériser les produits suivants qu'avec les<br />
accessoires proposés dans le chapitre "accessoires" (en<br />
option non livré avec votre produit):<br />
Peinture a base d'eau ou de solvant, comme les vernis, laques, lasures, produits de<br />
traitement et de préservation des bois, huile, couches primaires, décapants, peintures bi<br />
composants (avec durcisseur).<br />
38
<strong>WallPerfect</strong> W <strong>665</strong> I-<strong>Spray</strong><br />
8. Préparation de la zone de travail<br />
Coller obligatoirement les prises et les interrupteurs.<br />
Danger de choc électrique en cas de pénétration du produit pulvérisé !<br />
Recouvrez toutes les surfaces et tous les objets que vous ne souhaitez<br />
pas peindre ou retirez-les de la zone de travail. Le fabricant ne peut<br />
être tenu responsable des dommages dû à des brouillards de peinture<br />
(overspray).<br />
Certaines peintures contenant de la silice peuvent endommager les<br />
surfaces en verre et en céramique! Il faut donc absolument recouvrir<br />
complètement les surfaces concernées.<br />
F<br />
i<br />
Veillez à la qualité de l'adhésif utilisé pour le masquage.<br />
N'utilisez pas d'adhésif trop puissant sur les tapisseries et supports peints,<br />
afin d'éviter de les endommager lorsque vous le retirerez. Enlevez l'adhésif<br />
en procédant lentement et régulièrement, jamais brusquement. Masquez<br />
les surfaces juste le temps nécessaire, afin de minimiser le risque d'y laisser<br />
des traces d'adhésif quand vous l'enlèverez.<br />
Respectez également les instructions du fabricant de l'adhésif.<br />
9. Préparation des produits de revêtement<br />
i<br />
Si le produit à pulvériser est au moins à la température ambiante de la pièce<br />
(en le diluant par ex. avec de l'eau chaude), on obtiendra un meilleur résultat<br />
de pulvérisation.<br />
Attention ! Ne pas échauffer le produit à pulvériser à plus de 40° C.<br />
La façade amovible jointe permet de pulvériser des peintures murales intérieures non dilués<br />
ou faiblement dilués. Vous trouverez des informations détaillées sur la fiche technique du<br />
fabricant ( téléchargement par internet).<br />
1. Mélangez le produit avec soin et diluez-le dans le godet conformément aux<br />
recommandations pour la dilution (pour mélanger, il est recommandé d'utiliser un<br />
mélangeur).<br />
Recommandation de dilution<br />
Produits<br />
Peintures murales intérieures (en phase aqueuse ou<br />
solvantée)<br />
diluer de 0-10 % éventuellement<br />
2. Si le débit est trop faible malgré un réglage maximal, procédez par étapes à une dilution<br />
de 5 à 10%, jusqu'à ce que le débit corresponde à vos exigences.<br />
39
F<br />
40<br />
<strong>WallPerfect</strong> W <strong>665</strong> I-<strong>Spray</strong><br />
10. Mise en service<br />
Avant le branchement au réseau, vérifier que la tension du réseau corresponde à celle<br />
indiquée sur la plaque de puissance.<br />
Monter la sangle de suspension sur l'appareil (Fig.2).<br />
Dévisser le réservoir du pistolet pulvérisateur.<br />
• Aligner le tube d'aspiration (Fig. 3).<br />
Pour la pulvérisation d'objets plats, tourner le tuyau de montée A vers l'avant.<br />
Pour la pulvérisation d'objets se trouvant plus haut que la tête, tourner le tuyau de<br />
montée B vers l'arrière.<br />
Nous recommandons d'orienter l'extrémité du tube d'aspiration vers<br />
i l'arrière afin de pouvoir appliquer une couche de peinture optimale sur<br />
murs et plafonds.<br />
• Poser le godet à plat sur une feuille de papier et y verser le produit de revêtement<br />
préparé en se servant de l'entonnoir fourni avec l'équipement (fig. 1, 19). Ensuite, bien<br />
visser le réservoir sur le pistolet.<br />
Assembler les parties et arrière du pistolet (Fig. 5).<br />
• Monter le flexible à air (Fig. 4, a + b). Insérer fermement le flexible à air dans le<br />
raccordement de l'appareil et de la poignée de pistolet. Ce faisant, la position du<br />
flexible peut être choisie librement.<br />
• Ne poser l'appareil que sur une surface plane et propre. L'appareil risque sinon de se<br />
renverser!<br />
Placer l'appareil à l'épaule à l'aide de la sangle de suspension prévue.<br />
• Actionner l'interrupteur MARCHE/ARRET sur l'appareil.<br />
11. Réglage de la forme de jet désiré (Fig. 6)<br />
AVERTISSEMENT! Danger de blessures! Ne jamais tirer le pointeau pendant<br />
le réglage du capot d'air.<br />
En tournant la bague de réglage (fig. 6, 1), il est possible de régler 2 formes différentes<br />
de jet de pulvérisation.<br />
Fig. 7 A = Jet vertical plat pour appliquer de gauche à droite<br />
Fig. 7 B = Jet horizontal plat pour appliquer de haut en bas<br />
12. Réglage du débit de produit (Fig. 8)<br />
Régler le débit de peinture en tournant la bague de réglage de la gâchette du pistolet.<br />
- rotation à gauche moins de peinture<br />
+ rotation à droite plus de peinture<br />
i<br />
Pour la plupart des peintures murales, un réglage moyen donne le meilleur<br />
résultat.
<strong>WallPerfect</strong> W <strong>665</strong> I-<strong>Spray</strong><br />
13. Pulvérisation<br />
Recouvrir les endroits devant rester protégés.<br />
• Effectuer d'abord un essai sur du carton ou sur une surface similaire afin d'obtenir le<br />
réglage désiré du pistolet.<br />
Important: Commencer sur le bord de la surface à peindre par pulvérisation.<br />
Commencer en effectuant le mouvement de pulvérisation, puis<br />
appuyer sur la gâchette. Éviter les interruptions à l'intérieur de la surface<br />
à peindre par pulvérisation.<br />
• Le mouvement de pulvérisation doit venir du bras et non pas du poignet. On garantit<br />
ainsi que la distance entre le pistolet de pulvérisation et la surface reste toujours la<br />
même pendant la pulvérisation. Sélectionnez une distance de 20 - 30 cm selon la<br />
largeur de jet de pulvérisation désirée.<br />
Fig. 9 a: CORRECT: Distance régulière à l'objet.<br />
Fig. 9 b: FAUX: Une distance irrégulière aura pour conséquence une application de<br />
peinture irrégulière.<br />
• Déplacez le pistolet pulvérisateur d'un mouvement transversal ou vertical régulier,<br />
selon le réglage du schéma de pulvérisation.<br />
On obtient une qualité de surface uniforme en guidant le pistolet régulièrement.<br />
• En cas de formation de dépôts de produit sur la buse et sur le capot, nettoyer les deux<br />
pièces à l'eau ou au solvant.<br />
i<br />
Si la peinture couvre mal ou que le support absorbe beaucoup, pulvérisez<br />
"en croix" (fig. 10).<br />
F<br />
i<br />
Appliquer au moins deux couches pour les peintures murales intérieures<br />
de couleur vive (laisser d'abord sécher la première couche de peinture).<br />
Ceci est nécessaire pour que la peinture couvre bien.<br />
14. Interruption de travail<br />
Arrêter le pistolet.<br />
•<br />
Pour une interruption prolongée du travail, depressuriser le réservoir en le dévissant<br />
brièvement et en le revissant ensuite.<br />
• Nettoyer les orifices de la buse après avoir interrompu le travail.<br />
15. Mise hors service et nettoyage<br />
Un nettoyage approprié est une condition pour le fonctionnement impeccable de<br />
l'appareil d'application de peinture. Nous déclinons tout droit à la garantie en cas<br />
d'absence de nettoyage ou de nettoyage inapproprié.<br />
1) Arrêter le pistolet.<br />
2) Ouvrir le pistolet. Pousser légèrement le crochet (Fig. 5 "clic") vers le bas. Faire tourner<br />
la partie avant et la partie arrière du pistolet l'une par rapport à l'autre.<br />
3) Dévisser le godet et le vider. Extraire le tube plongeur avec le joint de godet.<br />
41
F<br />
<strong>WallPerfect</strong> W <strong>665</strong> I-<strong>Spray</strong><br />
4) Effectuer un nettoyage préalable du godet et du tube plongeur avec un pinceau.<br />
Nettoyer l'orifice de désaération (Fig. 11, 1).<br />
i<br />
Pour nettoyer le réservoir, nous vous recommandons une brosse douce<br />
synthétique.<br />
5) Remplir de l'eau ou du solvant dans le réservoir puis le revisser.<br />
N'utilisez aucun matériau combustible pour le nettoyage.<br />
6) Remonter le pistolet (Fig. 5).<br />
7) Brancher la fiche dans la prise, enclencher l'appareil et pulvériser l'eau ou le solvant<br />
dans un récipient ou sur un chiffon.<br />
8) Répéter ce processus jusqu'à ce qu'il sorte du solvant clair ou de l'eau claire de la<br />
buse.<br />
9) Arrêter le pistolet. Ouvrir le pistolet.<br />
10) Dévisser le godet et le vider. Extraire le tube plongeur avec le joint de godet.<br />
ATTENTION! Ne jamais nettoyer les joints d'étanchéité, la membrane et les<br />
buses ou les trous pour l'air du pistolet de pulvérisation avec<br />
des objets métalliques pointus.<br />
Le tuyau d'aération et la membrane ne résistent aux solvants que sous<br />
certaines conditions. Ne pas les plonger dans le solvant, mais les essuyer<br />
simplement.<br />
11) Tirer le tuyau flexible de ventilation (Fig. 12, 1) du corps de pistolet en haut.<br />
Dévisser le chapeau de vanne (2). Enlever la membrane (3). Nettoyer soigneusement<br />
toutes les pièces.<br />
12) Enlever la bague de réglage (fig. 13, 1) avec précaution de l'écrou-raccord (2).<br />
13) Dévisser l'écrou-raccord (fig. 13, 2). Nettoyer le capot d'air (3), le joint de buse (5) et la<br />
buse (4) avec un pinceau et du solvant ou de l'eau.<br />
14) Nettoyer l'extérieur du pistolet et du réservoir au moyen d'un torchon imbibé dans<br />
du solvant ou dans l'eau.<br />
15) Remonter le pistolet (voir "Assemblage").<br />
Assemblage<br />
L'appareil peut uniquement être exploité avec une membrane intacte (Fig. 12, 3).<br />
1) Placer la membrane (Fig. 12, 3) avec la goupille vers le haut sur la partie inférieure de<br />
la vanne. Voir également à ce sujet le marquage sur le corps de pistolet.<br />
2) Placer avec prudence le chapeau de vanne (Fig. 12, 2) et visser.<br />
3) Insérer le tuyau de dépressurisation (Fig. 12, 1) sur le chapeau de vanne et sur le raccord<br />
fileté du corps de pistolet.<br />
4) Insérer d'abord le joint de buse (Fig. 14, 5) avec rainure (fente) dans la buse.<br />
5) Enficher la buse (fig. 14, 4) sur le corps du pistolet avec l'encoche tournée vers le bas.<br />
Attention : la position de l'aiguille doit concorder avec l'orifice de la buse.<br />
(Fig.15)<br />
6) Enficher le capot d'air (Fig. 16, 3) sur la buse (4) et le serrer avec l'écrou-raccord (2).<br />
7) Poser la bague de réglage (fig. 17, 1) sur l'écrou-raccord de manière à ce que les encoches<br />
42
<strong>WallPerfect</strong> W <strong>665</strong> I-<strong>Spray</strong><br />
F<br />
8)<br />
9)<br />
sur la bague de réglage s'emboîtent dans les deux cornes du capot d'air.<br />
Insérer le joint de réservoir d'en bas sur le tube d'aspiration et le pousser jusqu'au<br />
dessus du collet. Ce faisant, tourner légèrement le joint de réservoir.<br />
Insérer le tube plongeur avec le joint de réservoir dans le corps de pistolet.<br />
16. Entretien<br />
AVERTISSEMENT!<br />
Ne jamais faire marcher le pistolet sans le filtre à air. Il risquerait<br />
d'aspirer des impuretés et son fonctionnement en serait<br />
compromis. Débrancher la fiche de contact avant d'effectuer un<br />
remplacement.<br />
• Remplacer le filtre à air selon le degré d'encrassement. Défaire la fixation du couvercle<br />
de l'appareil en faisant levier avec un tournevis (Fig. 18, flèche).<br />
Placer le nouveau filtre à air dans le compartiment (Fig. 18, 1).<br />
• Reverrouiller le couvercle sur l'appareil.<br />
Afin de faciliter le montage du pistolet, veuillez appliquer généreusement de la<br />
graisse lubrifiante (fournie) sur le joint torique à la partie avant du pistolet après le<br />
nettoyage (Fig. 19, 7).<br />
17. Pièces de rechange<br />
Liste des pièces de rechange (Fig. 19)<br />
Poste Désignation Référence<br />
1 Façade amovible <strong>WallPerfect</strong> I-<strong>Spray</strong> cpl. avec godet 1800 ml 2326 477<br />
2 Bague de réglage du jet de pulvérisation 2328 900<br />
3 Ecrou-raccord 2328 903<br />
4 Capot d'air 2328 905<br />
5 Buse 2328 908<br />
6 Joint de buse (2 unités) 2304 433<br />
7 Joint torique 0417 308<br />
8 Tube de depressurisation, chapeau de vanne, membrane 2304 027<br />
9 Joint du godet 2328 919<br />
10 Tube d'aspiration 2328 922<br />
11 Godet 1800 ml avec couvercle (uniquement pour façade 2304 025<br />
amovible <strong>WallPerfect</strong>)<br />
12 Poignée de pistolet 2303 300<br />
13 Flexible d’air 2303 410<br />
14 Bretelle 0414 204<br />
15 Filtre à air 0414 700<br />
16 Recouvrement 0414 302<br />
43
F<br />
<strong>WallPerfect</strong> W <strong>665</strong> I-<strong>Spray</strong><br />
Liste des pièces de rechange (Fig. 19)<br />
17 Entonnoir (3 unités) 2304 028<br />
18 Mélangeur-agitateur 2304 419<br />
Graisse lubrifiante 2315 539<br />
18. Accessoires<br />
Le nouveau système Click & Paint avec ses façades amovibles supplémentaires et<br />
ses accessoires, propose un outil pour chaque application.<br />
Accessoires (non compris dans la livraison)<br />
Désignation<br />
Référence<br />
Lance Basse Pression<br />
Pour un revêtement plus aisé des plafonds et des objets se trouvant au sol 2307 678<br />
Façade amovible Brilliant avec godet 600 ml<br />
Mise en peinture des boiseries avec des laques, lasures pour une finition et<br />
un tendu impeccable. 0417 932<br />
Façade amovible Prémium avec godet 600 ml<br />
Mise en peinture des boiseries avec des laques, lasures pour une finition et<br />
un tendu impeccable. Uniquement disponible en France. 0417 935<br />
Façade amovible Perfect <strong>Spray</strong> avec godet 800 ml<br />
Pour un changement rapide de peinture. pour objets et meubles de<br />
moyenne et grande taille. 0417 914<br />
Façade amovible petites surfaces avec godet 250 ml<br />
Pour objets filigranes, travaux détaillés et créatifs. 0417 918<br />
Façade amovible Perfect <strong>Spray</strong> avec godet 1400 ml<br />
Travail rapide pour objets de grande taille tels que maisons en bois, portes<br />
de garages, etc. 0417 917<br />
Façade amovible pour accès difficiles avec prolongement, avec godet<br />
600 ml. Pour endroits difficilement accessibles, p. ex. radiateurs, coins<br />
d'armoires, niches, etc. 0417 915<br />
Tuyau d'air - Longueur 4 m 0414 909<br />
Façade amovible <strong>WallPerfect</strong> I-<strong>Spray</strong> avec godet 1300 ml<br />
Pour l'application de peintures murales intérieures.<br />
2321 896<br />
Nous recommandons de ne pas utiliser cette façade <strong>WallPerfect</strong> I-<strong>Spray</strong><br />
avec le modèle W550.<br />
Vous trouverez des informations complémentaires sur la palette de produits WAGNER<br />
concernant la rénovation sous www.wagner-group.com<br />
44
<strong>WallPerfect</strong> W <strong>665</strong> I-<strong>Spray</strong><br />
19. Protection de l’environnement<br />
L'appareil ainsi que l'ensemble des accessoires sont à amener à un point de<br />
recyclage dans votre région. Ne pas jeter l'appareil dans les ordures ménagères.<br />
Protégez l'environnement et amener dès lors l'appareil à un point de recyclage<br />
local ou renseignez-vous auprès de votre commerçant spécialisé.<br />
F<br />
20. Indication importante de responsabilité de produit!<br />
En raison d'un règlement UE en vigueur depuis le 01.01.1990, le fabricant est<br />
uniquement responsable pour son produit si toutes les pièces proviennent du<br />
fabricant ou ont été approuvées par celui-ci, et si les appareils sont montés et utilisés<br />
correctement. En cas d'utilisation d'accessoires et de pièces de rechange non d'origine,<br />
la responsabilité du fabricant peut devenir partiellement ou entièrement caduque.<br />
L'utilisateur est seul responsable de la manipulation du produit, notamment de la<br />
préparation de la zone de travail et de la matière à pulvériser, ainsi que du résultat final.<br />
<strong>Wagner</strong> décline toute responsabilité pour les dommages causés par les brouillards de<br />
peinture, les erreurs d'application, la correction des résultats obtenus ou en cas de non<br />
respect des instructions de ce manuel d'utilisation.<br />
21. Elimination des défauts<br />
Problème Cause Mesure<br />
Il ne sort pas de<br />
Buse colmatée<br />
produit de la buse • Réglage du débit de peinture<br />
tourné trop loin vers la<br />
gauche (-)<br />
• Pas d’établissement de<br />
pression dans le réservoir<br />
Godet vide<br />
Tube de montée desserré<br />
Tube de montée colmatée<br />
• L'orifice de désaération (Fig.<br />
11,1) colmatée<br />
Le produit forme • Accumulation de produit de<br />
des gouttelettes sur revêtement sur le capuchon<br />
la buse<br />
d'air, la buse ou l'aiguille<br />
Buse desserrée<br />
Joint de buse usée<br />
• Buse usée<br />
➞➞La nettoyer<br />
➞➞Tourner vers la droite (+)<br />
➞➞Serrer le réservoir<br />
➞➞Le remplir<br />
➞➞Le resserrer<br />
➞➞Le nettoyer<br />
➞➞Le nettoyer<br />
➞➞Les nettoyer<br />
➞➞La serrer<br />
➞➞La remplacer<br />
➞➞La remplacer<br />
45
F<br />
<strong>WallPerfect</strong> W <strong>665</strong> I-<strong>Spray</strong><br />
Problème Cause Mesure<br />
Pulvérisation trop<br />
Flux de produit trop élevé<br />
grossière • Vis de réglage du débit de<br />
peinture tournée trop loin<br />
vers la droite (+)<br />
• Viscosité trop élevée du<br />
produit de revêtement<br />
Buse encrassée<br />
• Etablissement de pression<br />
dans le réservoir trop faible<br />
• Filtre à air fortement colmaté<br />
Pulsation du jet • La quantité de produit dans le<br />
réservoir touche à sa fin<br />
Joint de buse usé<br />
• Filtre à air fortement colmaté<br />
• Apport excessif de produit<br />
Ecoulement<br />
de produit de<br />
revêtement<br />
Brouillard de<br />
produit trop<br />
intense (Overspray)<br />
L'appareil ne<br />
fonctionne pas<br />
Peinture dans le<br />
tuyau flexible de<br />
ventilation<br />
• Viscosité trop fluide du<br />
produit de revêtement<br />
• Trop grande distance de<br />
l’objet<br />
• Apport excessif de produit<br />
➞➞Tourner la vis de réglage<br />
du débit de peinture vers<br />
la gauche (-)<br />
➞➞Diluer davantage<br />
➞➞La nettoyer<br />
➞➞Serrer le réservoir<br />
➞➞Le remplacer<br />
➞➞Le remplir<br />
➞➞Le remplacer<br />
➞➞Le remplacer<br />
➞➞Tourner la vis de réglage<br />
du débit de peinture vers<br />
la gauche (-)<br />
➞➞Réduire la distance<br />
➞➞Tourner la vis de réglage<br />
du débit de peinture vers<br />
la gauche (-)<br />
• Appareil en surchauffe ➞➞Tirer la fiche de la prise,<br />
Membrane encrassée<br />
• Membrane défectueuse<br />
laisser refroidir l'appareil<br />
pendant env. 30 minutes,<br />
ne pas plier le flexible,<br />
contrôler le filtre à air,<br />
ne pas couvrir les fentes<br />
d'aspiration<br />
➞➞Nettoyer la membrane<br />
➞➞Remplacer la membrane<br />
46
<strong>WallPerfect</strong> W <strong>665</strong> I-<strong>Spray</strong><br />
F<br />
Problème Cause Mesure<br />
Mauvais pouvoir • Produit à pulvériser trop froid<br />
couvrant sur le mur<br />
• Support fortement absorbant<br />
ou mauvais pouvoir couvrant<br />
de la peinture<br />
• Trop loin de l'objet à peindre<br />
➞➞Réchauffer le produit à<br />
pulvériser (jusqu'à 40° C<br />
au plus)<br />
➞➞Pulvériser en croix (fig. 10)<br />
➞➞Se rapprocher de l'objet à<br />
peindre<br />
Durée de garantie: 2 ans<br />
La durée de garantie s'élève à deux ans, à compter de la date de la vente (bon de caisse).<br />
Elle comprend et est limitée à l'élimination gratuite des défauts dus à un vice de matériel<br />
ou de fabrication, ou à un remplacement gratuit des pièces défectueuses. L'utilisation ou<br />
la mise en service, ainsi que des montages ou réparations effectués et qui ne figurent pas<br />
dans nos instructions de service, excluent toute responsabilité. Il en va de même pour<br />
des pièces assujetties à l'usure. La garantie ne s'étend pas sur l'utilisation commerciale.<br />
Nous nous réservons formellement la fourniture de la garantie. La garantie est exclue si<br />
l'appareil a été ouvert par des personnes ne faisant pas partie du personnel de service de<br />
WAGNER. Des dommages de transport, des travaux d'entretien ainsi que des dommages<br />
et dérangements dus à des travaux d'entretien non appropriés ne sont pas couverts par<br />
la garantie. Le recours à la garantie ne pourra se faire que contre présentation du bon<br />
de caisse. Dans la mesure stipulée par la loi, il est exclu toute responsabilité pour des<br />
dommages corporels, matériels ou consécutifs, notamment si l'appareil a été utilisé à des<br />
fins non prévues dans les instructions de service, si la mise en service et les réparations<br />
n'ont pas été exécutées conformément aux instructions de service ou si des réparations<br />
ont été effectuées par une personne non spécialisée. Nous nous réservons l'exécution<br />
à l'usine des réparations allant au delà de ce qui est décrit dans les instructions de<br />
service.<br />
Merci de vous-adressez dans la garantie ou un cas de réparation à votre point de<br />
vente.<br />
47
NL<br />
<strong>WallPerfect</strong> W <strong>665</strong> I-<strong>Spray</strong><br />
Vertaling van de originele gebruiksaanwijzing<br />
Hartelijk gefeliciteerd met de aankoop van uw WAGNER spuitpistool.<br />
U bezit nu een merkproduct, dat voor een storingvrije werking zorgvuldig moet<br />
worden gereinigd en onderhouden. Lees voor inbedrijfstelling van het apparaat de<br />
gebruikshandleiding nauwkeurig door en neem de veiligheidsaanwijzingen in<br />
acht. Bewaar de gebruikshandleiding zorgvuldig.<br />
Inhoudsopgave<br />
1. Uitleg van de gebruikte symbolen .............................................. 49<br />
2. Algemene veiligheidsaanwijzingen ............................................. 49<br />
3. Veiligheidsaanwijzingen voor spuitpistolen ..................................... 52<br />
4. Toepassingsbereik . . . . . . . . . . . . . . . . . . . . . . . . . . . . . . . . . . . . . . . . . . . . . . . . . . . . . . . . . . . . . 54<br />
5. Verwerkbare materialen ........................................................ 54<br />
6. Niet-verwerkbare materialen ................................................... 54<br />
7. De volgende materialen kunnen alleen met optioneel toebehoren worden<br />
verwerkt. . . . . . . . . . . . . . . . . . . . . . . . . . . . . . . . . . . . . . . . . . . . . . . . . . . . . . . . . . . . . . . . . . . . . . . 54<br />
8. Voorbereiding van de werkplek . . . . . . . . . . . . . . . . . . . . . . . . . . . . . . . . . . . . . . . . . . . . . . . . 54<br />
9. Voorbereiden van het materiaal . . . . . . . . . . . . . . . . . . . . . . . . . . . . . . . . . . . . . . . . . . . . . . . . 55<br />
10. Inbedrijfstelling . . . . . . . . . . . . . . . . . . . . . . . . . . . . . . . . . . . . . . . . . . . . . . . . . . . . . . . . . . . . . . 55<br />
11. Instelling van de gewenste spuitstraalvorm (Afb. 6) ............................ 56<br />
12. Instelling van de materiaalhoeveelheid (Afb. 8) . . . . . . . . . . . . . . . . . . . . . . . . . . . . . . . . 56<br />
13. Spuittechniek . . . . . . . . . . . . . . . . . . . . . . . . . . . . . . . . . . . . . . . . . . . . . . . . . . . . . . . . . . . . . . . . 56<br />
14. Werkonderbreking . . . . . . . . . . . . . . . . . . . . . . . . . . . . . . . . . . . . . . . . . . . . . . . . . . . . . . . . . . . 57<br />
15. Buiten bedrijf stellen en reinigen .............................................. 57<br />
16. Onderhoud .................................................................. 59<br />
17. Reserveonderdelenlijst . . . . . . . . . . . . . . . . . . . . . . . . . . . . . . . . . . . . . . . . . . . . . . . . . . . . . . . 59<br />
18. Accessoires ................................................................... 60<br />
19. Milieu ........................................................................ 60<br />
20. Belangrijke aanwijzing m.b.t. productaansprakelijkheid! . . . . . . . . . . . . . . . . . . . . . . . 60<br />
21. Verhelpen van storingen ...................................................... 61<br />
48
<strong>WallPerfect</strong> W <strong>665</strong> I-<strong>Spray</strong><br />
1. Uitleg van de gebruikte symbolen<br />
NL<br />
Dit symbool duidt op een potentieel gevaar voor u, resp. het<br />
apparaat. Onder dit symbool vindt u belangrijke informatie over<br />
het vermijden van letsel en schade op het apparaat.<br />
Gevaar voor een elektrische schok<br />
i<br />
Duidt toepassingstips en andere bijzonder nuttige aanwijzingen<br />
aan.<br />
Met dit symbool aangeduide apparaten en accessoires zijn<br />
geschikt voor de verwerking van dikvloeibare materialen<br />
zoals bijvoorbeeld binnenwandverf (dispersies en latexverf).<br />
Als het materiaal dit logo heeft is het bijzonder goed geschikt voor<br />
het gebruik met het overeenkomstige apparaat.<br />
2. Algemene veiligheidsaanwijzingen<br />
Let op!<br />
Lees alle aanwijzingen goed door. Fouten bij het opvolgen van hieronder<br />
vermelde aanwijzingen kunnen leiden tot elektrische schokken, brand en/<br />
of ernstig letsel. Met het hieronder gebruikte begrip "elektrisch gereedschap"<br />
wordt zowel elektrisch gereedschap op netvoeding (met netkabel) bedoeld<br />
als oplaadbaar elektrisch gereedschap (zonder netkabel).<br />
1. Veiligheid op de werkplek<br />
a) Houd de werkplek schoon en goed verlicht. Wanorde en niet verlichte<br />
werkplekken kunnen tot ongevallen leiden.<br />
b) Gebruik het apparaat niet in een explosiegevaarlijke omgeving met<br />
brandbare vloeistoffen, gassen of stof. Elektrisch gereedschap wekt vonken op<br />
die stof of dampen kunnen ontsteken.<br />
c) Houd kinderen en andere personen tijdens het gebruik van elektrisch<br />
gereedschap op afstand. Wanneer u wordt afgeleid, kunt u de controle over het<br />
apparaat verliezen.<br />
2. Elektrische veiligheid<br />
a) De netstekker van het apparaat moet passen in de wandcontactdoos.<br />
De stekker mag op geen enkele manier worden gewijzigd. Gebruik geen<br />
stekkeradapter voor geaarde apparaten. Ongewijzigde stekkers en passende<br />
49
NL<br />
<strong>WallPerfect</strong> W <strong>665</strong> I-<strong>Spray</strong><br />
wandcontactdozen verminderen het risico van elektrische schokken.<br />
b) Voorkom contact van uw lichaam met geaarde oppervlakken van b.v.<br />
buizen, radiatoren, fornuizen en koelkasten. Er bestaat een verhoogd risico op<br />
elektrische schokken wanneer uw lichaam is geaard.<br />
c) Houd het apparaat uit de regen en breng het niet in contact met water. In<br />
een elektrisch apparaat binnendringend water verhoogd het risico van elektrische<br />
schokken.<br />
d) Gebruik de netkabel niet voor andere doeleinden, b.v. om het apparaat<br />
aan te dragen, op te hangen of om de stekker uit de wandcontactdoos<br />
te trekken. Houd de kabel verwijderd van warmtebronnen, olie, scherpe<br />
randen of bewegende delen van apparaten. Beschadigde kabels en kabels die in<br />
de war zijn verhogen het risico van elektrische schokken.<br />
e) Als u met elektrisch gereedschap buiten werkt, gebruik dan uitsluitend<br />
verlengsnoeren die ook voor buiten geschikt zijn. Het gebruik van voor<br />
buitengebruik geschikte verlengkabels vermindert het risico van elektrische schokken.<br />
f) Als het gebruik van het apparaat in een vochtige omgeving niet valt<br />
te vermijden, gebruik dan een aardlekschakelaar. Het gebruik van een<br />
aardlekschakelaar voorkomt het risico van een elektrische schok.<br />
3. Veiligheid van personen<br />
50<br />
a) Wees alert, let op wat u doet en gebruik uw gezond verstand bij het werken<br />
met elektrisch gereedschap. Gebruik het apparaat niet wanneer u moe bent<br />
of onder de invloed bent van drugs, alcohol of medicijnen. Eén moment van<br />
onachtzaamheid tijdens het gebruik van het apparaat kan leiden tot ernstig letsel.<br />
b) Gebruik persoonlijke beschermingsmiddelen en draag altijd een<br />
veiligheidsbril. Het gebruik van persoonlijke beschermingsmiddelen, zoals<br />
stofmasker, antislip veiligheidsschoenen, veiligheidshelm of gehoorbescherming,<br />
afhankelijk van type en gebruik van het elektrisch gereedschap, vermindert het risico<br />
van letsel.<br />
c) Voorkom onbedoeld starten van het gereedschap. Verzeker u ervan<br />
dat de schakelaar in de stand "UIT" staat, voordat u de netstekker in de<br />
wandcontactdoos steekt. Wanneer u tijdens het dragen van het apparaat een<br />
vinger op de schakelaar houdt of het apparaat ingeschakeld op de netvoeding<br />
aansluit, kan dit leiden tot ongevallen.<br />
d) Verwijder afstelgereedschap of moersleutels voordat u het apparaat<br />
inschakelt. Gereedschap of een moersleutel die zich in een draaiend deel van het<br />
apparaat bevindt, kan leiden tot letsel.
<strong>WallPerfect</strong> W <strong>665</strong> I-<strong>Spray</strong><br />
NL<br />
e) Vermijd een abnormale lichaamshouding. Zorg voor een goede houding en<br />
bewaar op elk moment uw evenwicht. Dan kunt u het apparaat in onverwachte<br />
situaties beter onder controle houden.<br />
f) Draag geschikte kleding. Draag geen loszittende kleding of sierraden.<br />
Houd haren, kleding en handschoenen verwijderd van bewegende delen.<br />
Loszittende kleding, sierraden of lange haren kunnen door bewegende delen worden<br />
gegrepen.<br />
g) Dit apparaat is niet bedoeld om te worden gebruikt door personen (inclusief<br />
kinderen) met beperkte fysieke, zintuiglijke of geestelijke vaardigheden,<br />
met onvoldoende ervaring en/of met onvoldoende kennis, tenzij zij onder<br />
toezicht staan van een persoon die voor hun veiligheid verantwoordelijk is<br />
of zij door deze persoon zijn geïnstrueerd in het gebruik van het apparaat.<br />
Kinderen moeten onder toezicht staan om te voorkomen dat zij spelen met het<br />
apparaat.<br />
4. Zorgvuldige omgang met en gebruik van elektrisch gereedschap<br />
a) Zorg dat u het apparaat niet overbelast. Gebruik voor uw werkzaamheden<br />
het daarvoor bedoelde elektrische gereedschap. Met het juiste elektrische<br />
gereedschap werkt u beter en veiliger binnen het aangegeven vermogensbereik.<br />
b) Gebruik geen elektrisch gereedschap waarvan de schakelaar defect is.<br />
Elektrisch gereedschap dat niet meer kan worden in- of uitgeschakeld, is gevaarlijk en<br />
moet worden gerepareerd.<br />
c) Verwijder de stekker uit de wandcontactdoos voordat u afstellingen aan het<br />
apparaat uitvoert, accessoires vervangt of het apparaat aan de kant legt.<br />
Deze voorzorgsmaatregel voorkomt dat het apparaat onbedoeld wordt<br />
gestart.<br />
d) Bewaar elektrisch gereedschap, wanneer het niet wordt gebruikt, buiten<br />
bereik van kinderen. Laat geen personen met het apparaat werken die daar<br />
niet mee vertrouwd zijn of die deze aanwijzingen niet hebben gelezen. Elektrisch<br />
gereedschap is gevaarlijk wanneer dit door onervaren personen wordt gebruikt.<br />
e) Onderhoud het apparaat zorgvuldig. Controleer dat bewegende delen<br />
correct functioneren en niet klemmen en dat er geen onderdelen zijn<br />
gebroken of zodanig beschadigd dat de werking van het apparaat nadelig<br />
wordt beïnvloed. Laat beschadigde onderdelen voor gebruik van het<br />
apparaat repareren. Veel ongevallen worden veroorzaakt door slecht onderhouden<br />
elektrisch gereedschap.<br />
f) Gebruik elektrisch gereedschap, accessoires, hulpmiddelen enz. in overeenstemming<br />
met deze aanwijzingen en zoals voor dit specifieke type apparaat<br />
51
NL<br />
<strong>WallPerfect</strong> W <strong>665</strong> I-<strong>Spray</strong><br />
is voorgeschreven. Houd daarbij rekening met de werkomstandigheden en<br />
de uit te voeren werkzaamheden. Het gebruik van elektrisch gereedschap voor<br />
ander dan het bedoelde gebruik kan leiden tot gevaarlijke situaties.<br />
5. Service<br />
a) Laat het apparaat uitsluitend repareren door gekwalificeerd technisch<br />
personeel en uitsluitend met originele onderdelen. Daarmee blijft de veiligheid<br />
van het apparaat gewaarborgd.<br />
b) Wanneer het netsnoer van dit apparaat is beschadigd, moet dit door de<br />
fabrikant, zijn klantenservice of een gelijkwaardig gekwalificeerd persoon<br />
worden vervangen om gevaren te voorkomen.<br />
3. Veiligheidsaanwijzingen voor spuitpistolen<br />
• Let op! Draag adembescherming: verfnevel en oplosmiddeldampen zijn schadelijk<br />
voor de gezondheid. Werk uitsluitend in ruimten met goede natuurlijke ventilatie<br />
of gebruik geforceerde ventilatie. Het dragen van werkkleding, veiligheidsbril,<br />
gehoorbescherming en handschoenen wordt aanbevolen.<br />
52<br />
Let op! Gevaar voor letsel!<br />
Richt de spuitstraal nooit op personen of dieren!<br />
Stopcontacten en schakelaars beslist afplakken. Gevaar voor een<br />
elektrische schok door binnendringend spuitmateriaal!<br />
• De spuitpistolen mogen niet worden gebruikt voor het verspuiten van brandbare<br />
stoffen.<br />
De spuitpistolen mogen niet worden gereinigd met brandbare oplosmiddelen.<br />
• Houd rekening met gevaren die het gevolg kunnen zijn van het verspoten materiaal<br />
en neem tevens de aanwijzingen op de verpakking of van de fabrikant van het<br />
materiaal in acht.<br />
Verspuit geen materialen waarvan u de eventuele gevaren niet kent.<br />
•<br />
wetgeving voor plaatsen waar ontploffingsgevaar kan heersen.<br />
• Om explosiegevaar tijdens spuitwerkzaamheden te voorkomen, moet worden<br />
gezorgd voor goede natuurlijke of geforceerde ventilatie.<br />
• Tijdens het spuiten mogen zich in de omgeving geen ontstekingsbronnen bevinden,<br />
zoals open vuur, brandende sigaretten, vonken, gloeidraden en hete oppervlakken.<br />
• Let erop, dat er geen oplosmiddeldampen door het apparaat worden aangezogen.<br />
Spuit niet over het apparaat!<br />
• Het spuitpistool is geen speelgoed. Laat nooit kinderen met het spuitpistool werken<br />
De spuitpistolen mogen niet worden gebruikt op arbeidsplaatsen, die vallen onder de<br />
of ermee spelen.
<strong>WallPerfect</strong> W <strong>665</strong> I-<strong>Spray</strong><br />
NL<br />
• Verwijder voor alle werkzaamheden aan het spuitpistool de netstekker uit de<br />
wandcontactdoos.<br />
• Dek de oppervlakken die niet moeten worden gespoten af. Houd er tijdens de<br />
werkzaamheden rekening mee dat verfnevel b.v door de wind over grote afstanden<br />
kan worden verplaats en daardoor schade kan veroorzaken.<br />
• Het apparaat mag uitsluitend worden gebruikt met goede werkend ventiel. Stop<br />
het gebruik van het apparaat wanneer er verf in de ventilatieslang (Afb. 1, 18)<br />
omhoog komt! Demonteer en reinig de ventilatieslang, het ventiel en het membraan;<br />
vervang zonodig het membraan.<br />
Leg het spuitpistool niet neer.<br />
• Het apparaat is voorzien van een thermische beveiliging die het apparaat bij oververhitting<br />
uitschakelt. Schakel in dat geval het apparaat uit, verwijder de netstekker en laat het<br />
apparaat tenminste ½ uur afkoelen. Verhelp de oorzaak van de oververhitting, b.v. een<br />
geknikte slang, een vervuild luchtfilter of een afgedekte sleuf voor het aanzuigen van<br />
lucht.<br />
Met originele WAGNER accessoires en reserveonderdelen heeft u de garantie dat<br />
aan alle veiligheidsvoorschriften is voldaan.<br />
Technische gegevens<br />
Max. viscositeit:<br />
3300 mPas<br />
Spanning:<br />
230 V ~ , 50 Hz<br />
Opgenomen vermogen: 370 W<br />
Verstuivingsvermogen: 120 W<br />
Max. opbrengst<br />
375 ml/min<br />
Dubbel geïsoleerd:<br />
Geluidsdrukniveau*:<br />
Geluidsdrukvermogen*<br />
Trillingsniveau:<br />
Lengte luchtslang:<br />
Gewicht:<br />
* Gemeten volgens EN 50144-2-7:2000<br />
80 dB (A); Onzekerheid K = 4 dB (A)<br />
93 dB (A); Onzekerheid K = 4 dB (A)<br />
< 2,5 m/s²; Onzekerheid K = 1,5 m/s<br />
3,5 m<br />
ca. 4,3 kg<br />
Beschrijving (Afb. 1)<br />
1 Luchtkap 2 Spuitkop<br />
3 Instelring spuitstraal 4 Wartel<br />
5 <strong>WallPerfect</strong> I-<strong>Spray</strong> spuitopzet 6 Trekker<br />
7 Stelschroef materiaalhoeveelheid 8 Pistoolgreep<br />
9 AAN/UIT-schakelaar 10 Luchtslang<br />
11 Draagriem 12 Luchtfilter<br />
13 Luchtrooster 14 Netkabel<br />
53
NL<br />
<strong>WallPerfect</strong> W <strong>665</strong> I-<strong>Spray</strong><br />
Beschrijving (Afb. 1)<br />
15 Pistoolhouder 16 Reservoir<br />
17 Ventiel 18 Ventilatieslang<br />
19 Vultrechter 20 Roerstaaf<br />
4. Toepassingsbereik<br />
<strong>WallPerfect</strong> W <strong>665</strong> werd speciaal voor het aanbrengen van binnenwandverven ontwikkeld.<br />
Voor het verwerken van dunvloeibare materialen zoals lakken, lazuurverven enz. zijn<br />
speciale spuitopzetstukken nodig. Deze vindt u onder het punt "Accessoires".<br />
5. Verwerkbare materialen<br />
Binnenwandverf (dispersies en latexverf)<br />
6. Niet-verwerkbare materialen<br />
Materialen die sterk schurende bestanddelen bevatten, façadeverf, logen en<br />
zuurhoudende coatingmaterialen.<br />
Brandbare coatingmaterialen.<br />
7. De volgende materialen kunnen alleen met optioneel<br />
toebehoren worden verwerkt.<br />
Oplosmiddelhoudende en waterverdunbare lakken, beitsen, grondverven,<br />
2-componentlakken, blanke lakken, autolakken en houtveredelingsmiddelen.<br />
8. Voorbereiding van de werkplek<br />
Stopcontacten en schakelaars beslist afplakken. Gevaar voor een<br />
elektrische schok door binnendringend spuitmateriaal!<br />
Dek alle oppervlakken en objecten af, die niet gespoten moeten<br />
worden of verwijder deze uit het werkbereik. <strong>Wagner</strong> stelt zich niet<br />
aansprakelijk voor schade die ontstaat door verfnevel (overspray).<br />
Silicaatverf tast bij contact glas- en keramiekvlakken aan! Alle<br />
overeenkomstige oppervlaken moeten daarom beslist compleet<br />
worden afgedekt.<br />
54
<strong>WallPerfect</strong> W <strong>665</strong> I-<strong>Spray</strong><br />
NL<br />
i<br />
Let op de kwaliteit van het gebruikte afplakband.<br />
Gebruik op behang en geverfde ondergronden niet een te sterk hechtend<br />
plakband om beschadigingen bij het verwijderen te vermijden. Verwijder de<br />
plakbanden langzaam en gelijkmatig; in geen geval schoksgewijs. Laat de<br />
oppervlakken alleen zo lang als nodig is afgeplakt, om mogelijke resten bij<br />
het verwijderen te minimaliseren.<br />
Let ook op de instructies van de plakbandfabrikant.<br />
9. Voorbereiden van het materiaal<br />
i<br />
Spuitmateriaal minimaal op kamertemperatuur (bijv. met warm water<br />
verdund) leidt tot een beter spuitresultaat.<br />
Pas op! Spuitmateriaal niet verwarmen boven 40°C.<br />
Met het bijgesloten spuitopzet kunnen binnenwandverven onverdund of licht verdund<br />
verspoten worden. Gedetailleerde informatie vindt u in het technische datablad van de<br />
fabrikant ( downloaden via internet).<br />
1. Roer het materiaal grondig op en verdun het in het gebinte conform de<br />
verdunningsaanbeveling (voor het omroeren wordt een roermachine aanbevolen).<br />
Verdunningsadvies<br />
Te verspuiten materiaal<br />
Binnenwandverf (dispersies en latexverf)<br />
0-10 % verdunnen<br />
2. Als de transporthoeveelheid ook bij maximale hoeveelheidsinstelling te gering is, stap<br />
voor stap 5 - 10 % verdunnen tot de transporthoeveelheid voldoet aan uw eisen.<br />
10. Inbedrijfstelling<br />
Controleer voor aansluiting op het lichtnet dat de netspanning overeenkomt met de<br />
gegevens op het typeplaatje.<br />
Bevestig de draagriem aan het apparaat. (Afb. 2)<br />
Schroef het reservoir los van het spuitpistool.<br />
• Positioneer de stijgbuis. (Afb. 3)<br />
Bij een juiste stand van de stijgbuis kan de inhoud van het reservoir nagenoeg zonder<br />
achterblijvende restanten worden verspoten.<br />
Bij spuitwerkzaamheden op liggende voorwerpen: stijgbuis naar voren draaien.<br />
(Afb. 3 A)<br />
Bij spuitwerkzaamheden boven het hoofd: stijgbuis naar achteren draaien. (Afb. 3 B)<br />
i<br />
Wij adviseren om de stijgbuis naar achteren uit te lijnen, zodat wanden en<br />
plafonds optimaal gecoat kunnen worden.<br />
55
NL<br />
<strong>WallPerfect</strong> W <strong>665</strong> I-<strong>Spray</strong><br />
• Reservoir op papieren onderlaag zetten en geprepareerd coatingmateriaal m.b.v.<br />
de meegeleverde vultrechter (afb. 1, 19) vullen. Draai het reservoir stevig aan het<br />
spuitpistool vast.<br />
Koppel voor- en achterstuk van het pistool aan elkaar. (Afb. 5)<br />
• Monteer de luchtslang (Afb. 4, a + b). Steek de luchtslang stevig in de aansluiting op<br />
het apparaat en op de pistoolgreep. De stand van de slang kan daarbij willekeurig<br />
worden gekozen.<br />
• Plaats het apparaat uitsluitend op een schone, vlakke ondergrond zodat het geen stof<br />
kan aanzuigen.<br />
Hang het apparaat met de draagriem om.<br />
Neem het spuitpistool uit de pistoolhouder en richt deze op het spuitobject.<br />
• Bedien de AAN/UIT-schakelaar op het apparaat.<br />
11. Instelling van de gewenste spuitstraalvorm (Afb. 6)<br />
WAARSCHUWING! Gevaar voor verwonding! Nooit tijdens het instellen<br />
van de luchtkap aan de handbeugel trekken.<br />
Door draaien aan de instelring (afb. 6, 1) kunnen 2 verschillende spuitstraalvormen<br />
ingesteld worden.<br />
Afb. 7 A = verticale vlakke straal voor het horizontaal opbrengen van verf<br />
Afb. 7 B = horizontale vlakke straal voor het verticaal opbrengen van verf<br />
12. Instelling van de materiaalhoeveelheid (Afb. 8)<br />
Bepaal de materiaalhoeveelhid door de stelschroef op de trekker van het pistool te<br />
verdraaien.<br />
- naar links draaien minder materiaal<br />
+ naar rechts draaien meer materiaal<br />
i<br />
Bij de meeste muurverven geeft een gemiddelde hoeveelheidsinstelling<br />
het beste resultaat.<br />
13. Spuittechniek<br />
•<br />
Dek oppervlakken die niet moeten worden gespoten af.<br />
Een spuitproef op karton of iets dergelijks is aan te bevelen om de juiste instelling<br />
voor het spuitpistool te bepalen.<br />
Belangrijk: Op de rand van het spuitvlak beginnen. Eerst met de spuitbeweging<br />
beginnen en dan de handbeugel indrukken. Onderbrekingen binnen<br />
het spuitvlak vermijden.<br />
56
<strong>WallPerfect</strong> W <strong>665</strong> I-<strong>Spray</strong><br />
• De spuitbeweging moet niet met de pols worden uitgevoerd, maar met de arm. Zo<br />
blijft tijdens het spuiten de afstand tussen het spuitpistool en het oppervlak altijd<br />
gelijk. Kies een afstand van 20 - 30 cm, afhankelijk van de gewenste straalbreedte.<br />
Afb. 9 a: GOED gelijkmatige afstand tot het object.<br />
Afb. 9 b: FOUT ongelijke afstand heeft een ongelijke verfaanbrenging als resultaat.<br />
• Beweeg het spuitpistool gelijkmatig heen en weer of op en neer, afhankelijk van de<br />
instelling van de spuitstraalvorm.<br />
• Gelijkmatige bewegingen met het spuitpistool geven een uniforme<br />
oppervlaktekwaliteit.<br />
• Reinig spuitkop en luchtkap met water resp. oplosmiddel wanneer zich daarop<br />
materiaal heeft opgebouwd.<br />
i<br />
NL<br />
Spuit bij slecht dekkende verf of sterk zuigende ondergrund in "kruisgang"<br />
(afb. 10).<br />
i<br />
Binnenwandverf in krachtige tinten minstens tweemaal aanbrengen<br />
(eerste verflaag eerst laten drogen). Daardoor word een dekkende<br />
aanbrenging bereikt.<br />
14. Werkonderbreking<br />
Schakel het apparaat uit.<br />
•<br />
Bij langere pauzes reservoir door kort opendraaien en vervolgens weer afsluiten<br />
ontluchten.<br />
• Na de werkonderbreking mondstukopeningen reinigen.<br />
15. Buiten bedrijf stellen en reinigen<br />
Deskundige reiniging is een voorwaarde voor een storingsvrij gebruik van het<br />
verfopbrengapparaat. Bij niet of ondeskundig uitgevoerde reiniging vervalt elke<br />
aanspraak op garantie.<br />
1) Schakel het apparaat uit.<br />
2) Demonteer het pistool. Druk de haak (Afb. 5 "klik") iets omlaag. Verdraai het voorstuk<br />
van het pistool en de pistoolgreep ten opzichte van elkaar.<br />
3) Draai het reservoir los en maak het leeg. Verwijder de stijgbuis met reservoirafdichting.<br />
4) Maak reservoir en stijgbuis met een kwast zo ver mogelijk schoon. Reinig de<br />
ontluchtingsboring (Afb. 11, 1).<br />
i<br />
Voor de reiniging van het reservoir adviseren wij het gebruik van een<br />
normale afwasborstel.<br />
5)<br />
Vul het reservoir met water resp. oplosmiddel. Draai het reservoir weer vast.<br />
Gebruik voor het schoonmaken geen brandbare materialen.<br />
57
NL<br />
<strong>WallPerfect</strong> W <strong>665</strong> I-<strong>Spray</strong><br />
6) Zet het pistool weer in elkaar. (Afb. 5)<br />
7) Schakel het apparaat in en spuit het water resp. het oplosmiddel in een reservoir of<br />
op een doek.<br />
8) Herhaal dit proces tot er helder oplosmiddel resp. water uit de spuitkop komt.<br />
9) Schakel het apparaat uit en demonteer het pistool.<br />
10) Draai het reservoir los en maak het leeg. Verwijder de stijgbuis met reservoirafdichting.<br />
LET OP! Reinig nooit afdichtingen, membraan en spuit- of luchtopeningen<br />
van het spuitpistool met spitse metalen voorwerpen.<br />
Luchttoevoerslang en membraan zijn slechts beperkt oplosmiddelbestendig.<br />
Niet in oplosmiddel leggen, maar alleen afvegen.<br />
11) Trek de ventilatieslang (Afb. 12, 1) boven van het pistoollichaam af. Draai het ventieldeksel<br />
(2) los. Verwijder het membraan (3). Reinig alle delen zorgvuldig.<br />
12) Instelring (afb. 13, 1) voorzichtig van de wartelmoer (2) trekken.<br />
13) Draai de wartel (afb. 13, 2) los en verwijder luchtkap (3), spuitkop (4) en spuitkopafdichting<br />
(5). Reinig luchtkap, spuitkopafdichting en spuitkop met kwast en oplosmiddel resp.<br />
water.<br />
14) Maak de buitenzijde van spuitpistool en reservoir schoon met een in oplosmiddel<br />
resp. water gedrenkte doek.<br />
15) Zet alle delen weer in elkaar (zie “Montage”).<br />
Montage<br />
Het apparaat mag uitsluitend met onbeschadigd membraan (afb. 12, 3) worden<br />
gebruikt.<br />
1) Plaats het membraan (afb. 12, 3) met de stift naar boven op het onderste deel van<br />
het ventiel. Zie daarvoor ook de markering op het pistoollichaam.<br />
2) Breng voorzichtig het ventieldeksel (afb. 12, 2) aan en draai het vast.<br />
3) Steek de ventilatieslang (afb. 12,1) op het ventieldeksel en op de nippel op het<br />
pistoollichaam.<br />
4) Schuif de spuitkopafdichting (afb. 14, 5) met de groef (sleuf) naar voren in de<br />
spuitkop.<br />
5) Spuitkop (afb. 14, 4) met de uitsparing naar beneden op het pistoollichaam stekken.<br />
Pas op: Stand van de naald moet met de spuitkopopening overeenkomen. (Afb.<br />
15)<br />
6) Breng de luchtkap (afb. 16, 3) aan op de spuitkop (4) en draai deze met de wartelmoer<br />
vast.<br />
7) Instelring (afb. 17, 1) zo op de wartelmoer zetten dat de uitsparingen aan de instelring<br />
in beide hoorns op de luchtkap ineensluiten.<br />
8) Steek de reservoirafdichting van onder af op de stijgbuis en schuif deze door tot over<br />
de kraag. Draai de reservoirafdichting daarbij licht heen en weer.<br />
9) Steek de stijgbuis met reservoirafdichting in het pistoollichaam.<br />
58
<strong>WallPerfect</strong> W <strong>665</strong> I-<strong>Spray</strong><br />
16. Onderhoud<br />
Belangrijk!<br />
NL<br />
Gebruik het apparaat nooit zonder luchtfilter omdat eventueel aangezogen<br />
vuil de werking van het apparaat kan beïnvloeden. Voor het wisselen<br />
stekker eruit trekken.<br />
• Vervang afhankelijk van de mate van vervuiling het luchtfilter. Verwijder de afdekking<br />
door deze met een schroevendraaier uit het apparaat te wippen (Afb. 18, pijl).<br />
Plaats een nieuw luchtfilter in het compartiment (Afb. 18, 1).<br />
• Klik de afdekking weer vast in het apparaat.<br />
Om het pistool gemakkelijker te kunnen monteren, kunt u na het reinigen een ruime<br />
hoeveelheid smeervet (bijgeleverd) aanbrengen op de O-ring van het voorstuk van<br />
het pistool (Afb. 19, 7).<br />
17. Reserveonderdelenlijst<br />
Reserveonderdelenlijst (Afb. 19)<br />
Pos. Benaming Bestelnr.<br />
1 <strong>WallPerfect</strong> I-<strong>Spray</strong> spuitopzet incl. reservoir 1800 ml 2326 477<br />
2 Instelring spuitstraal 2328 900<br />
3 Wartel 2328 903<br />
4 Luchtkap 2328 905<br />
5 Spuitkop 2328 908<br />
6 Spuitkopafdichting (2 stuks) 2304 433<br />
7 O-ring 0417 308<br />
8 Ventilatieslang, ventieldeksel, membraan 2304 027<br />
9 Reservoirafdichting 2328 919<br />
10 Stijgbuis 2328 922<br />
11 Reservoir (1800 ml) met deksel (alleen voor<br />
2304 025<br />
<strong>WallPerfect</strong> spuitopzet)<br />
12 Pistoolgreep 2303 300<br />
13 Luchtslang 2303 410<br />
14 Draagriem 0414 204<br />
15 Luchtfilter 0414 700<br />
16 Afdekking 0414 302<br />
17 Vultrechter (3 stuks) 2304 028<br />
18 Roerstaaf 2304 419<br />
Smeervet 2315 539<br />
59
NL<br />
18. Accessoires<br />
<strong>WallPerfect</strong> W <strong>665</strong> I-<strong>Spray</strong><br />
Het nieuwe CLICK&PAINT SYSTEM biedt met het juist opzetstuk en diverse toebehoren<br />
voor elke klus het juiste gereedschap.<br />
Accessoires (niet bij levering inbegrepen)<br />
Benaming<br />
Bestelnr.<br />
HVLP-handgreepverlenging<br />
Voor het eenvoudig aanbrengen van verf op plafonds en liggende<br />
objecten 2307 678<br />
Brilliant-spuitopzet incl. reservoir 600 ml<br />
Geoptimaliseerd mondstuk en luchtgeleiding voor briljante lakresultaten 0417 932<br />
Perfect <strong>Spray</strong> Spuitopzet incl. reservoir 800 ml<br />
Voor het snel wisselen van verf. Voor middelgrote en grote voorwerpen en<br />
meubels. 0417 914<br />
Spuitopzet voor kleine hoeveelheden incl. reservoir 250 ml<br />
Foor filigreine voorwerpen, gedetailleerd en creatief werk. 0417 918<br />
Perfect <strong>Spray</strong> Spuitopzet incl. reservoir 1400 ml<br />
Vlot werken op grote voorwerpen zoals blokhutten, garagedeuren. enz. 0417 917<br />
Detail- en radiatorspuitopzet met verlengstuk incl. reservoir 600 ml<br />
Voor moeilijk bereikbare plaatsen, b. v. radiatoren, hoekjes in kasten,<br />
nissen, enz. 0417 915<br />
<strong>WallPerfect</strong> I-<strong>Spray</strong> Spuitopzet incl. reservoir 1300 ml<br />
Voor de verwerking van binnenwandverf<br />
2321 896<br />
Wij adviseren om het <strong>WallPerfect</strong> I-<strong>Spray</strong> spuitopzetstuk niet met de<br />
W550 te gebruiken.<br />
Meer informatie over de productenreeks van WAGNER voor renovatiewerkzaamheden<br />
onder www.wagner-group.com<br />
19. Milieu<br />
Het apparaat met accessoires dient milieubewust te worden gerecycled.<br />
Deponeer het apparaat niet bij het huisvuil. Bescherm het milieu en lever het<br />
apparaat in bij een lokaal inzamelpunt of informeer bij de winkel.<br />
20. Belangrijke aanwijzing m.b.t. productaansprakelijkheid!<br />
Op basis van een sinds 01.01.1990 geldende EU-verordening is de fabrikant uitsluitend<br />
aansprakelijk voor zijn product, wanneer alle onderdelen van hem afkomstig zijn of door<br />
hem zijn vrijgegeven, resp. wanneer de apparatuur correct is gemonteerd en wordt gebruikt.<br />
Bij gebruik van niet-originele accessoires en reserveonderdelen kan de aansprakelijkheid<br />
60
<strong>WallPerfect</strong> W <strong>665</strong> I-<strong>Spray</strong><br />
NL<br />
geheel of gedeeltelijk vervallen.<br />
Het gebruik van het product, inclusief voorbereiding van werkplaats en spuitmateriaal<br />
alsmede het eindresultaat van de werkzaamheden, vallen uitsluitend onder de<br />
verantwoordelijkheid van de gebruiker.<br />
<strong>Wagner</strong> sluit elke aansprakelijkheid voor schade uit, die door verfnevel, gebruiksfouten,<br />
verbeteringen achteraf van de werkreultaten of niet-naleving van aanwijzingen in deze<br />
handleiding ontstaat.<br />
21. Verhelpen van storingen<br />
Storing Oorzaak Oplossing<br />
Er komt geen<br />
Spuitkop verstopt<br />
materiaal uit de • Stelschroef<br />
spuitkop<br />
Materiaal<br />
druppelt na uit<br />
de spuitkop<br />
Te grove<br />
verstuiving<br />
Spuitstraal<br />
pulseert<br />
materiaalhoeveelheid te ver<br />
naar rechts gedraaid (-)<br />
• Geen drukopbouw in het<br />
reservoir<br />
Reservoir leeg<br />
Stijgbuis los<br />
Stijgbuis verstopt<br />
• Ontluchtingsboring (Afb. 11,<br />
1) verstopt<br />
• Ophoping van materiaal op<br />
luchtkap, spuitkop of naald<br />
Spuitkop los<br />
Spuitkopafdichting versleten<br />
• Spuitkop versleten<br />
Materiaalhoeveelheid te hoog<br />
• Stelschroef<br />
materiaalhoeveelheid te ver<br />
naar links gedraaid (+)<br />
Spuitkop vuil<br />
Materiaal te dikvloeibaar<br />
• Te lage drukopbouw in het<br />
reservoir<br />
• Luchtfilter sterk vervuild<br />
• Materiaal in het reservoir is<br />
bijna op<br />
Spuitkopafdichting versleten<br />
• Luchtfilter sterk vervuild<br />
➞➞Reinigen<br />
➞➞Naar links draaien (+)<br />
➞➞Reservoir vastdraaien<br />
➞➞Bijvullen<br />
➞➞Insteken<br />
➞➞Reinigen<br />
➞➞Reinigen<br />
➞➞Reinigen<br />
➞➞Wartel vastdraaien<br />
➞➞Vervangen<br />
➞➞Vervangen<br />
➞➞Stelschroef<br />
materiaalhoeveelheid naar<br />
rechts draaien (-)<br />
➞➞Reinigen<br />
➞➞Verder verdunnen<br />
➞➞Reservoir vastdraaien<br />
➞➞Vervangen<br />
➞➞Bijvullen<br />
➞➞Vervangen<br />
➞➞Vervangen<br />
61
NL<br />
<strong>WallPerfect</strong> W <strong>665</strong> I-<strong>Spray</strong><br />
Storing Oorzaak Oplossing<br />
Materiaal vormt • Teveel materiaal opgebracht ➞➞Stelschroef materiaalhoeveelheid<br />
naar rechts draaien (-)<br />
tot uitlopers<br />
• Materiaal te dunvloeibaar<br />
• Afstand tot het spuitobject te ➞➞Spuitafstand verkleinen<br />
Teveel<br />
materiaalnevel<br />
(overspray)<br />
Het apparaat<br />
werkt niet<br />
Verf in de<br />
ventilatieslang<br />
Slechte<br />
dekkracht aan<br />
de wand<br />
groot<br />
Materiaalhoeveelheid te hoog<br />
•<br />
➞➞Stelschroef materiaalhoeveelheid<br />
naar rechts<br />
draaien (-)<br />
• Het apparaat is oververhit ➞➞Verwijder de netstekker, laat<br />
Membraan vuil<br />
• Membraan defect<br />
• Spuitmateriaal te koud<br />
• Sterk zuigende ondergrond of<br />
verf met slechte dekkracht<br />
• Afstand te groot<br />
het apparaat ca. 30 minuten<br />
afkoelen, slang niet knikken,<br />
luchtfilter controleren,<br />
aanzuigsleuven niet afdekken<br />
➞➞Membraan reinigen<br />
➞➞Membraan vervangen<br />
➞➞Spuitmateriaal verwarmen<br />
(tot max. 40°C)<br />
➞➞In kruisgang spuiten (afb. 10)<br />
➞➞Dichter bij het object<br />
62
<strong>WallPerfect</strong> W <strong>665</strong> I-<strong>Spray</strong><br />
NL<br />
2 jaar garantie<br />
De garantie bedraagt 2 jaar, gerekend vanaf de dag van verkoop (kassabon). Deze<br />
garantie omvat en is beperkt tot het gratis verhelpen van eventuele gebreken, die<br />
aantoonbaar te wijten zijn aan het gebruik van niet onberispelijk materiaal bij de<br />
fabricage of montagefouten of tot het kosteloos vervangen van de defecte onderdelen.<br />
De garantie geldt niet in geval van beschadigingen te wijten aan ondeskundig gebruik of<br />
ondeskundige inbedrijfname. De garantie vervalt bij zelfstandig uitgevoerde montages<br />
of reparaties, die niet in onze bedieningshandleiding zijn vermeld. De aan normale<br />
slijtage onderhevige onderdelen zijn eveneens uitgesloten van garantie. Industriële<br />
toepassingen zijn van aansprakelijkheid uitgesloten. Wij behouden ons het recht op<br />
garantieclaim uitdrukkelijk voor. De garantie vervalt indien het apparaat door andere<br />
personen dan het <strong>Wagner</strong>-personeel wordt geopend.<br />
Transportschade, onderhoudswerkzaam heden evenals schade en storingen door<br />
ondeskundige onderhoudswerkzaamheden zijn uitgesloten van garantie. De garantie<br />
geldt alleen als het aankoopbewijs en de volledig ingevulde garantiekaart kunnen<br />
worden voorgelegd. Tenzij de Wet anders oordeelt, zijn garantieclaims uitgesloten<br />
voor alle persoonlijke ongelukken, materiële schade of verdere schade voortvloeiend<br />
uit een schadegeval, in het bijzonder indien het apparaat voor een andere toepassing<br />
dan in de bedieningshandleiding beschreven werd gebruikt, niet volgens onze<br />
bedieningshandleiding in bedrijf werd genomen of onderhouden, of indien reparaties<br />
zelfstandig door niet deskundigen werden uitgevoerd. Wij behouden ons alle reparaties<br />
en reparaties in onze werkplaats voor, die buiten het aangegeven bestek van deze<br />
handleiding vallen.<br />
Indien het een garantie of reparatie betreft, richt u zich tot de desbetreffende dealer.<br />
63
I<br />
<strong>WallPerfect</strong> W <strong>665</strong> I-<strong>Spray</strong><br />
Traduzione delle istruzioni per l’uso<br />
Congratulazioni per l’acquisto di un aerografo WAGNER.<br />
È stato acquistato un prodotto di marca che richiede un’accurata pulizia e cura per funzionare<br />
correttamente. Prima di mettere in funzione l’apparecchio leggere attentamente le<br />
istruzioni per l’uso ed in particolare le norme di sicurezza. Conservare le istruzioni<br />
per l’uso in un luogo sicuro.<br />
Sommario<br />
1. Spiegazione dei simboli utilizzati ............................................... 65<br />
2. Norme di sicurezza generali . . . . . . . . . . . . . . . . . . . . . . . . . . . . . . . . . . . . . . . . . . . . . . . . . . . 65<br />
3. Norme di sicurezza per aerografi . . . . . . . . . . . . . . . . . . . . . . . . . . . . . . . . . . . . . . . . . . . . . . . 68<br />
4. Campo di utilizzo . . . . . . . . . . . . . . . . . . . . . . . . . . . . . . . . . . . . . . . . . . . . . . . . . . . . . . . . . . . . . . 69<br />
5. Materiali di copertura lavorabili . . . . . . . . . . . . . . . . . . . . . . . . . . . . . . . . . . . . . . . . . . . . . . . . 70<br />
6. Materiali di copertura non lavorabili ............................................ 70<br />
7. I materiali seguenti possono essere trattati solamente con gli accessori opzionali. 70<br />
8. Preparazione del luogo di lavoro . . . . . . . . . . . . . . . . . . . . . . . . . . . . . . . . . . . . . . . . . . . . . . . 70<br />
9. Preparazione del materiale di copertura . . . . . . . . . . . . . . . . . . . . . . . . . . . . . . . . . . . . . . . . 70<br />
10. Messa in servizio . . . . . . . . . . . . . . . . . . . . . . . . . . . . . . . . . . . . . . . . . . . . . . . . . . . . . . . . . . . . . 71<br />
11. Regolazione della figura di spruzzatura (fig. 6) . . . . . . . . . . . . . . . . . . . . . . . . . . . . . . . . . 72<br />
12. Regolazione della portata di materiale (fig. 8) .................................. 72<br />
13.Tecnica di spruzzatura ......................................................... 72<br />
14. Interruzione del lavoro ........................................................ 73<br />
15. Messa fuori servizio e pulizia .................................................. 73<br />
16. Manutenzione ................................................................ 74<br />
17. Elenco dei ricambi ............................................................ 75<br />
18. Accessorii . . . . . . . . . . . . . . . . . . . . . . . . . . . . . . . . . . . . . . . . . . . . . . . . . . . . . . . . . . . . . . . . . . . . 75<br />
19. Indicazione per lo smaltimento . . . . . . . . . . . . . . . . . . . . . . . . . . . . . . . . . . . . . . . . . . . . . . . 76<br />
20. Avvertenza importante sulla responsabilità sul prodotto! . . . . . . . . . . . . . . . . . . . . . . 76<br />
21. Eliminazione di anomalie . . . . . . . . . . . . . . . . . . . . . . . . . . . . . . . . . . . . . . . . . . . . . . . . . . . . . 77<br />
64
<strong>WallPerfect</strong> W <strong>665</strong> I-<strong>Spray</strong><br />
I<br />
1. Spiegazione dei simboli utilizzati<br />
Questo simbolo segnala un potenziale pericolo per Lei o per<br />
l'apparecchio. Al di sotto di tale simbolo troverà informazioni<br />
importanti che eviteranno a Lei di ferirsi e all'apparecchio di<br />
danneggiarsi.<br />
Pericolo di shock elettrico<br />
i<br />
Indica i tipi di utilizzo e fornisce altre informazioni particolarmente<br />
utili.<br />
Gli apparecchi e gli accessori contrassegnati da questo simbolo<br />
sono adatti alla lavorazione con materiali densi come ad es.<br />
pitture murali per interni (dispersioni e pitture latex).<br />
Se un materiale riporta questo logo ciò indica che è particolarmente<br />
indicato per l’utilizzo con il dispositivo corrispondente.<br />
2. Norme di sicurezza generali<br />
Attenzione!<br />
Leggere tutte le istruzioni. L’inosservanza delle istruzioni riportate nel seguito<br />
può causare la folgorazione elettrica, incendi o gravi lesioni. Il termine "attrezzo<br />
elettrico" utilizzato nel manuale si riferisce ad attrezzi elettrici collegati alla<br />
rete elettrica (con cavo di rete) e ad attrezzi elettrici ad accumulatore (senza<br />
cavo di rete).<br />
1. Sicurezza del luogo di lavoro<br />
a) Tenere pulita e ben illuminata la propria postazione di lavoro. Il disordine e la<br />
scarsa illuminazione possono causare incidenti.<br />
b) Non lavorare con l’apparecchio in ambienti a rischio di esplosione in cui<br />
siano presenti liquidi, gas o polveri infiammabili. Gli attrezzi elettrici generano<br />
scintille che possono incendiare la polvere o i vapori.<br />
c) Durante l’uso dell’attrezzo elettrico tenere lontano i bambini o le persone<br />
estranee. In caso di distrazione, si può perdere il controllo dell’attrezzo.<br />
2. Sicurezza elettrica<br />
a) La spina di collegamento dell’apparecchio deve essere adatta alla presa.<br />
La spina non deve essere modificata in nessun modo. Non utilizzare spine<br />
65
I<br />
<strong>WallPerfect</strong> W <strong>665</strong> I-<strong>Spray</strong><br />
adattatrici per apparecchi collegati a terra. Le spine non modificate e le prese<br />
adatte ad esse riducono il rischio di folgorazione elettrica.<br />
b) Evitare il contatto del corpo con oggetti messi a terra, ad esempio tubi,<br />
radiatori, cucine elettriche e frigoriferi. Se il corpo è collegato a terra, il rischio di<br />
folgorazione elettrica aumenta.<br />
c) Non esporre l’apparecchio alla pioggia o all’umidità. La penetrazione di acqua<br />
in un apparecchio elettrico fa aumentare il rischio di folgorazione elettrica.<br />
d) Non utilizzare il cavo elettrico per trasportare l’apparecchio, per appenderlo<br />
o per estrarre la spina dalla presa. Tenere lontano il cavo da fonti di calore,<br />
dall’olio, da spigoli vivi o da parti in movimento dell’apparecchio. Un cavo<br />
danneggiato o aggrovigliato fa aumentare il rischio di folgorazione elettrica.<br />
e) Se si lavora all'aperto con utensili elettrici, utilizzare solo prolunghe adatte<br />
all'uso esterno. Un cavo di prolunga adatto per l’impiego all’aperto riduce il rischio<br />
di folgorazione elettrica.<br />
f) Se non si può evitare l'uso dell'apparecchio in ambienti umidi, utilizzare un<br />
interruttore differenziale. L'utilizzo di un interruttore differenziale evita il rischio di<br />
una scossa elettrica.<br />
3. Sicurezza di persone<br />
a) Prestare attenzione nel compiere qualsiasi operazione e concentrarsi<br />
durante il lavoro con un attrezzo elettrico. Non utilizzare l’apparecchio se si è<br />
stanchi o se sono stati assunti alcool, sostanze stupefacenti o medicinali. Un<br />
istante di disattenzione nell’uso dell’apparecchio può provocare serie lesioni.<br />
b) Indossare un equipaggiamento di protezione personale e sempre occhiali<br />
protettivi. L’utilizzo di un equipaggiamento di protezione personale (maschera<br />
antipolvere, scarpe di sicurezza antisdrucciolo, elmetto e protezione dell’udito, a<br />
seconda del tipo di impiego dell’apparecchio) riduce il rischio di lesioni.<br />
c) Evitare la messa in funzione non intenzionale. Verificare che l’interruttore si<br />
trovi in posizione "SPENTO" prima di inserire la spina nella presa. Se si tiene<br />
il dito sull’interruttore mentre si trasporta l’apparecchio o si collega l’apparecchio<br />
acceso all’alimentazione elettrica, si possono verificare incidenti.<br />
d) Prima di accendere l’apparecchio togliere qualsiasi attrezzo di regolazione e<br />
chiavi. Un attrezzo o una chiave all’interno di una parte in rotazione dell’apparecchio<br />
può provocare lesioni.<br />
66
<strong>WallPerfect</strong> W <strong>665</strong> I-<strong>Spray</strong><br />
I<br />
e) Evitare posizioni del corpo anomale. Provvedere costantemente ad un buon<br />
equilibrio. In questo modo l’apparecchio può essere controllato meglio in situazioni<br />
impreviste.<br />
f) Indossare indumenti adatti. Non indossare indumenti larghi o monili. Tenere<br />
lontani i capelli, gli indumenti ed i guanti lontano da parti in movimento. Gli<br />
indumenti larghi, i monili o i capelli lunghi possono impigliarsi in parti in movimento.<br />
g) Questo apparecchio non deve essere utilizzato da persone (bambini<br />
compresi) con capacità psichiche, sensoriali o mentali limitate o che non<br />
dispongono di esperienza e di conoscenze adatte, a meno che non vengano<br />
supervisionate da una persona addetta alla loro sicurezza o che dia loro<br />
istruzioni sull'utilizzo corretto dell'apparecchio. I bambini devono essere<br />
controllati per assicurare che non giochino con l'apparecchio.<br />
4. Impiego corretto di attrezzi elettrici<br />
a) Non sovraccaricare l’apparecchio. Utilizzare l’attrezzo elettrico adatto al<br />
lavoro da svolgere. Con l’attrezzo elettrico idoneo all’operazione da eseguire si<br />
lavora meglio e con più sicurezza.<br />
b) Non utilizzare un attrezzo elettrico il cui interruttore è guasto. Un attrezzo<br />
elettrico che non può essere più acceso o spento è pericoloso e deve essere riparato.<br />
c) Estrarre la spina dalla presa prima di regolare l’apparecchio, di sostituire<br />
accessori o di riporre l’apparecchio. Queste misure precauzionali evitano<br />
l’avviamento non intenzionale dell’apparecchio.<br />
d) Riporre gli attrezzi non utilizzati fuori dalla portata dei bambini.<br />
L’apparecchio non deve essere utilizzato da persone che non abbiano<br />
familiarità con esso o che non abbiano letto le sue istruzioni.<br />
Gli attrezzi elettrici sono pericolosi se utilizzate da persone inesperte.<br />
e) Sottoporre l’apparecchio a manutenzione con la massima cura.<br />
Controllare se le parti mobili dell’apparecchio funzionano regolarmente e<br />
non si incastrano, se parti di esso sono rotte o danneggiate in maniera tale<br />
da influenzare negativamente il funzionamento dell’apparecchio.<br />
Far riparare le parti danneggiate prima di utilizzare l’apparecchio.<br />
Molti incidenti sono dovuti all’insufficiente manutenzione di attrezzi elettrici.<br />
f) Utilizzare attrezzi elettrici, accessori, utensili, ecc. conformemente alle<br />
istruzioni e come prescritto per il particolare tipo di apparecchio. Tenere<br />
conto delle condizioni di lavoro e delle attività da svolgere. L’utilizzo di attrezzi<br />
elettrici per applicazioni diverse da quelle previste può portare a situazioni pericolose.<br />
67
I<br />
<strong>WallPerfect</strong> W <strong>665</strong> I-<strong>Spray</strong><br />
5. Assistenza<br />
a) Far riparare l’apparecchio solo da tecnici qualificati e con ricambi originali.<br />
Ciò garantisce il mantenimento della sicurezza dell’apparecchio.<br />
b) Se è danneggiato, per evitare pericoli il cavo di collegamento in rete di<br />
questo apparecchio deve essere sostituito dal costruttore o dal suo servizio<br />
di assistenza, oppure da una persona sufficientemente qualificata.<br />
3. Norme di sicurezza per aerografi<br />
• Attenzione! Indossare una maschera respiratoria: la nebbia di vernice ed i vapori<br />
dei solventi sono nocivi. Lavorare solo in ambienti ben ventilati o con ventilazione<br />
artificiale. Si raccomanda di indossare una tuta, occhiali di protezione, cuffie e guanti.<br />
ATTENZIONE! Pericolo di lesioni!<br />
Non dirigere il getto su persone o animali.<br />
68<br />
Coprire assolutamente le prese e gli interruttori.<br />
Pericolo di shock elettrico per penetrazione di materiale nebulizzato!<br />
Non è consentito utilizzare aerografi per spruzzare sostanze infiammabili.<br />
Non è consentito pulire gli aerografi con solventi infiammabili.<br />
• Attenzione ai pericoli derivanti dalla sostanza spruzzata e rispettare anche le scritte<br />
sulle confezioni e le avvertenze fornite dal produttore della sostanza.<br />
Non spruzzare nessun tipo di sostanza la cui pericolosità non è nota.<br />
• L’aerografo non deve essere utilizzato in luoghi contemplati dalle norme sulla<br />
protezione antideflagrante.<br />
• Per evitare il pericolo di esplosione durante il lavoro di spruzzatura, è necessario<br />
assicurare una buona ventilazione naturale o artificiale.<br />
• Nell’ambiente di spruzzatura non deve essere presente nessun tipo di fonte di<br />
accensione, ad esempio fiamme libere, fumare sigarette, scintille, fili incandescenti e<br />
superfici ad alta temperatura.<br />
• Attenzione a non aspirare vapori di solventi con l’apparecchio. Non spruzzare<br />
sull’apparecchio!<br />
L’aerografo non è un giocattolo: tenerlo fuori dalla portata dei bambini.<br />
Prima di iniziare qualsiasi lavoro con l’aerografo staccare la spina elettrica dalla presa.<br />
• Coprire le superfici da non verniciare. Durante il lavoro tenere presente che il vento<br />
può rasportare la nebbia di vernice per distanze notevoli e provocare danni.<br />
• L'apparecchio deve funzionare solo con valvola correttamente funzionante. Se la<br />
vernice sale nel tubo flessibile di aerazione (fig. 1, 18), spegnere l'apparecchio!<br />
Smontare il tubo flessibile di aerazione, la valvola e la membrana, pulirli e, se<br />
necessario, sostituire la membrana.<br />
• Non collocare la pistola a spruzzo.
<strong>WallPerfect</strong> W <strong>665</strong> I-<strong>Spray</strong><br />
• L'apparecchio possiede una protezione termica che spegne l'apparecchio se si surriscalda. In<br />
questo caso spegnere l'apparecchio, estrarre la spina di rete e far raffreddare l'apparecchio<br />
per almeno 30 minuti. Eliminare la causa del surriscaldamento, ad esempio tubo flessibile<br />
schiacciato, filtro dell'aria sporco, fessure di aspirazione dell'aria coperte.<br />
Con gli accessori ed i ricambi originali WAGNER si ha la garanzia del rispetto di tutte<br />
le norme di sicurezza.<br />
I<br />
Viscosità massima:<br />
Tensione:<br />
Potenza assorbita:<br />
Potenza di nebulizzazione:<br />
Portata massima:<br />
Isolamento doppio:<br />
Livello di pressione acustica:*<br />
Potenza acustica:*<br />
Intensità di vibrazione:<br />
Lunghezza del tubo flessibile:<br />
Peso:<br />
Dati tecnici<br />
3300 mPas<br />
230 V ~ , 50 Hz<br />
370 W<br />
120 W<br />
375 ml/min<br />
80 dB (A); Insicurezza K = 4 dB (A)<br />
93 dB (A); Insicurezza K = 4 dB (A)<br />
< 2,5 m/s²; Insicurezza K = 1,5 m/s<br />
3,5 m<br />
ca. 4,3 kg<br />
* Misurato secondo la normativa EN 50144-2-7:2000<br />
Descrizione (fig. 1)<br />
1 Calotta dell’aria 2 Ugello<br />
3 Anello di regolazione del getto<br />
4 Dado a risvolto<br />
nebulizzato<br />
5 Spruzzatore <strong>WallPerfect</strong> I-<strong>Spray</strong> 6 Grilletto<br />
7 Regolazione della quantità di materiale 8 Impugnatura dell’aerografo<br />
9 Interruttore ON/OFF 10 Tubo flessibile dell’aria<br />
11 Cinghia di trasporto 12 Filtro dell’aria<br />
13 Griglia dell’aria 14 Cavo di rete<br />
15 Supporto dell’aerografo 16 Serbatoio<br />
17 Valvola 18 Tubo flessibile di aerazione<br />
19 Imbuto di riempimento 20 Agitatore<br />
4. Campo di utilizzo<br />
<strong>WallPerfect</strong> W <strong>665</strong> è stato appositamente sviluppato per applicare pitture murali per interni.<br />
Per trattare materiali fluidi come vernici, vernici trasparenti, ecc. sono necessari dispositivi<br />
spruzzatori speciali. Questi sono descritti alla voce "Accessori".<br />
69
I<br />
5. Materiali di copertura lavorabili<br />
Pittura murale per interni (idropitture e pittura a base di lattice)<br />
<strong>WallPerfect</strong> W <strong>665</strong> I-<strong>Spray</strong><br />
6. Materiali di copertura non lavorabili<br />
Materiali che contengono componenti fortemente smeriglianti, pittura per facciate,<br />
materiali di copertura acidi e di lisciviazione.<br />
Materiali di rivestimento infiammabili<br />
7. I materiali seguenti possono essere trattati solamente<br />
con gli accessori opzionali<br />
Lacche contenenti solventi ed idrosolubili, vernici trasparenti, primer, vernici a 2<br />
componenti, vernici per ultima mano per autoveicoli, mordenti e sostanze conservanti<br />
del legno.<br />
8. Preparazione del luogo di lavoro<br />
Coprire assolutamente le prese e gli interruttori.<br />
Pericolo di shock elettrico per penetrazione di materiale nebulizzato!<br />
Coprite tutte le superfici e gli oggetti che non devono essere verniciati,<br />
oppure allontanate questi ultimi dall'area di lavoro. L'azienda non si<br />
assume alcuna responsabilità per danni causati dalla nebbia di pittura<br />
(Overspray).<br />
La pittura ai silicati si corrode a contatto con superfici di vetro e<br />
di ceramica! Tutte le superfici di questo tipo perciò devono essere<br />
assolutamente coperte completamente.<br />
i<br />
Prestate attenzione alla qualità del nastro adesivo utilizzato.<br />
Su carta da parati e superfici verniciate non utilizzare nastri adesivi<br />
dall'aderenza troppo elevata per evitare danni al momento della loro<br />
rimozione. Staccare lentamente e in modo uniforme i nastri adesivi. In<br />
nessun caso a strattoni. Lasciate i nastri adesivi sulle pareti solo per il tempo<br />
necessario, onde evitare residui al momento della rimozione.<br />
Attenetevi anche alle indicazioni del produttore del nastro adesivo.<br />
9. Preparazione del materiale di copertura<br />
i<br />
Materiale nebulizzato almeno a temperatura ambiente (p.e. diluito con<br />
acqua calda) garantisce un risultato ottimale.<br />
Attenzione! Non riscaldare il materiale nebulizzato oltre 40°C.<br />
70
<strong>WallPerfect</strong> W <strong>665</strong> I-<strong>Spray</strong><br />
I<br />
Con questo spruzzatore è possibile spruzzare pitture murali per interni non diluite o solo<br />
leggermente diluite. Per informazioni dettagliate vedere la scheda dei dati tecnici del<br />
produttore della vernice ( scaricamento da Internet).<br />
1. Mescolare per bene il materiale e diluirlo nel bidone secondo le relative istruzioni (per<br />
mescolare si consiglia un agitatore).<br />
Consigli per la diluizione<br />
Materiale di spruzzatura<br />
Pittura murale per interni (idropitture e pittura a base di lattice) diluiti 0-10 %<br />
2. Se la portata è troppo poca anche dopo aver regolato la quantità massima,<br />
diluire gradualmente il 5 - 10 % fino a che la portata non corrisponde alle proprie<br />
esigenze.<br />
10. Messa in servizio<br />
Prima dell’allacciamento alla rete elettrica verificare che il valore della tensione di rete<br />
corrisponda a quello indicato sulla targhetta dell’apparecchio.<br />
Agganciare la cinghia di trasporto all'apparecchio. (Fig. 2)<br />
• Svitare il serbatoio dall’aerografo.<br />
• Posizionamento del tubo montante. (Fig. 3)<br />
Se il tubo montante è posizionato correttamente, il contenuto del serbatoio può<br />
essere spruzzato quasi completamente.<br />
Per i lavori su oggetti in posizione orizzontale, ruotare il tubo montante in avanti.<br />
(Fig. 3 A)<br />
Per i lavori di spruzzatura di oggetti sopra testa: ruotare il tubo montante all’indietro.<br />
(Fig. 3 B)<br />
i<br />
Si consiglia di orientare verso l'interno il tubo montante, in modo da poter<br />
verniciare in maniera ottimale pareti e soffitti.<br />
• Appoggiare il contenitore su un'area protetta da fogli di carta e versare il prodotto<br />
verniciante preparato utilizzando l'imbuto di riempimento fornito in dotazione (fig.<br />
1, 19). Avvitare saldamente il serbatoio all’aerografo.<br />
Collegare la parte anteriore alla parte posteriore dell’aerografo. (Fig. 5)<br />
• Montare il tubo flessibile dell’aria (fig. 4, a + b). Inserire saldamente il tubo flessibile<br />
dell’aria nel raccordo dell’apparecchio e dell’impugnatura dell’aerografo. La<br />
posizione del tubo flessibile può essere qualsiasi.<br />
• Collocare l’apparecchio solo su una superficie piana e pulita, altrimenti potrebbe<br />
aspirare polvere, ecc.<br />
Agganciare l’apparecchio con la cinghia di trasporto.<br />
• Azionare l’interruttore ON/OFF dell’apparecchio.<br />
71
I<br />
<strong>WallPerfect</strong> W <strong>665</strong> I-<strong>Spray</strong><br />
11. Regolazione della figura di spruzzatura (fig. 6)<br />
AVVERTENZA! Pericolo di lesioni! Non tirare in nessun caso il grilletto<br />
mentre si regola la calotta dell’aria.<br />
Ruotando l’anello di regolazione (Fig. 6, 1) è possibile impostare 2 diverse forme di getto<br />
nebulizzato.<br />
Fig. 7 A = getto a ventaglio verticale per superfici orizzontali<br />
Fig. 7 B = getto a ventaglio orizzontale per superfici verticali<br />
12. Regolazione della portata di materiale (fig. 8)<br />
Regolare la portata di materiale ruotando il regolatore sul grilletto dell’aerografo.<br />
- rotazione a sinistra riduzione della portata di materiale<br />
+ rotazione a destra aumento della portata di materiale<br />
i<br />
Per la maggior parte delle idropitture murali una regolazione media della<br />
quantità assicura il risultato migliore.<br />
13.Tecnica di spruzzatura<br />
Coprire le filettature ed elementi simili dell’oggetto da spruzzare.<br />
• Si suggerisce di eseguire una prova di spruzzatura su cartone o materiale simile per<br />
stabilire la regolazione migliore dell’aerografo.<br />
Importante: IIniziare dal bordo della superficie da spruzzare. Iniziare con l'eseguire<br />
il movimento di spruzzatura e solo dopo premere il grilletto. Evitare<br />
interruzioni all'interno della superficie da spruzzare.<br />
• Eseguire il movimento di spruzzatura con il braccio e non con il polso. In questo<br />
modo durante la spruzzatura la distanza dell’aerografo dalla superficie resta costante.<br />
Scegliere una distanza di 20-30 cm a seconda dell’ampiezza del getto.<br />
Fig. 9 a: CORRETTO distanza costante dall’oggetto<br />
Fig. 9 b: ERRATO una distanza variabile genera una verniciatura non uniforme<br />
• Spostare uniformemente l’aerografo in direzione trasversale o verticale, a seconda<br />
della regolazione della figura di spruzzatura.<br />
• Con un movimento uniforme dell’aerografo si ottiene una qualità costante della<br />
superficie.<br />
• In caso di accumulo di materiale di copertura sull’ugello e sulla calotta dell’aria, pulire<br />
entrambi i componenti con acqua o solvente.<br />
i<br />
In caso di vernice scarsamente coprente o fondo molto assorbente<br />
nebulizzare secondo uno "schema incrociato" (fig. 10).<br />
72
<strong>WallPerfect</strong> W <strong>665</strong> I-<strong>Spray</strong><br />
I<br />
i<br />
Applicare almeno due volte la pittura murale per interni in tonalità di colore<br />
forti (prima lasciar asciugare il primo strato di pittura). In questo modo si<br />
ottiene un'applicazione coprente.<br />
14. Interruzione del lavoro<br />
Spegnere l’apparecchio.<br />
•<br />
In caso di pause prolungate far sfiatare il contenitore aprendolo brevemente e poi<br />
richiuderlo.<br />
• Dopo aver interrotto il lavoro pulire i fori degli ugelli.<br />
15. Messa fuori servizio e pulizia<br />
Una pulizia corretta è condizione necessaria per il funzionamento regolare<br />
dell'apparecchio verniciatore. Se la pulizia non viene eseguita o viene eseguita in<br />
modo scorretto, la garanzia diventa nulla.<br />
1) Estrarre la spina di rete.<br />
2) Dividere l’aerografo. Premere leggermente in basso il gancio (fig. 5 "clic"). Ruotare la<br />
parte anteriore rispetto alla parte posteriore dell’aerografo.<br />
3) Svitare il serbatoio e svuotarlo. Estrarre il tubo montante con la guarnizione del<br />
serbatoio.<br />
4) Eseguire una prima pulizia del serbatoio e del tubo montante con un pennello.<br />
Pulire il foro di sfiato (fig. 11, 1).<br />
i<br />
Per la pulizia del contenitore si consiglia di utilizzare una spazzola di<br />
lavaggio comunemente in commercio.<br />
5) Versare acqua o solvente nel serbatoio. Avvitare il serbatoio.<br />
Per la pulizia non utilizzare materiali infiammabili.<br />
6) Riassemblare l’aerografo (fig. 5).<br />
7) Inserire la spina di rete, accendere l’apparecchio e spruzzare l’acqua o il solvente in<br />
un recipiente o su un panno.<br />
8) Ripetere le operazioni descritte fino ad assistere alla fuoriuscita di acqua o di solvente<br />
pulita dall’ugello.<br />
9) Spegnere l’apparecchio ed estrarre la spina di rete.<br />
10) Svitare il serbatoio e svuotarlo. Estrarre il tubo montante con la guarnizione del<br />
serbatoio.<br />
ATTENZIONE!<br />
Non pulire le guarnizioni, la membrana ed i fori dell'ugello o<br />
dell'aria dell'aerografo con oggetti metallici acuminati.<br />
Il tubo flessibile di sfiato e la membrana resistono ai solventi solo in<br />
modo limitato. Non inserire solventi, ma strofinare solamente.<br />
11) Togliere il tubo flessibile di aerazione (fig. 12, 1) in alto dal corpo dell'aerografo. Avvitare<br />
il coperchio della valvola (2). Togliere la membrana (3). Pulire accuratamente tutti i<br />
componenti.<br />
73
I<br />
<strong>WallPerfect</strong> W <strong>665</strong> I-<strong>Spray</strong><br />
12) Estrarre delicatamente l'anello di regolazione (Fig. 13,1) del dado a risvolto (2).<br />
13) Svitare il dado a risvolto (Fig. 13, 2) e togliere la calotta dell’aria (3), l’ugello (4) e la<br />
guarnizione dell’ugello (5). Pulire la calotta dell’aria, la guarnizione dell’ugello e l’ugello<br />
con un pennello e solvente o acqua.<br />
14) Pulire l'esterno dell'aerografo e del serbatoio con un panno imbevuto di solvente o<br />
di acqua.<br />
15) Riassemblare l’aerografo. Nel montaggio dell’ugello, verificarne il corretto<br />
posizionamento (vedi montaggio).<br />
Rimontaggio<br />
L'apparecchio deve funzionar solo con membrana (Fig. 12, 3) integra.<br />
1) Collocare la membrana (Fig. 12, 3) sulla parte inferiore della valvola con la punta verso<br />
l'alto. Vedi anche la tacca sul corpo dell'aerografo.<br />
2) Applicare ed avvitare con cautela coperchio della valvola (Fig. 12, 2).<br />
3) Collegare il tubo flessibile di aerazione (Fig. 12, 1) al coperchio della valvola ed al nipplo<br />
del corpo dell'aerografo.<br />
4) Inserire la guarnizione dell'ugello (Fig. 14, 5) nell'ugello con la scanalatura (fessura)<br />
in avanti.<br />
5) Collocare l’ugello (Fig. 14, 4) con lo spazio libero verso il basso sul corpo dell’aerografo.<br />
Attenzione: La posizione dell’ago deve corrispondere all'apertura dell’ugello.<br />
(Fig. 15)<br />
6) Applicare la calotta dell'aria (Fig. 16, 3) sull'ugello (4) e bloccarla serrando a fondo il<br />
dado a risvolto (2).<br />
7) Collocare l'anello di regolazione (Fig. 17, 1) sul dado di raccordo in modo che gli spazi<br />
liberi dell’anello di regolazione coincidano e si incastrino nelle orecchie del tappo<br />
dell’aria.<br />
8) Applicare dal basso la guarnizione del serbatoio sul tubo montante e spingerla oltre<br />
il collare ruotandola leggermente.<br />
9) Inserire il tubo montante con la guarnizione del serbatoio nel corpo dell'aerografo.<br />
16. Manutenzione<br />
Importante! Non mettere in funzione l’apparecchio senza filtro dell’aria; lo sporco<br />
aspirato ne potrebbe influenzare negativamente il funzionamento.<br />
Prima di procedere alla sostituzione estrarre la presa di rete.<br />
• Pulire il filtro dell’aria se eccessivamente intasato Sbloccare la copertura<br />
dall’apparecchio facendo leva con un cacciavite (fig. 18, freccia).<br />
Collocare un nuovo filtro dell'aria nel vano (fig. 18, 1).<br />
• Riapplicare la copertura sull’apparecchio.<br />
Per facilitare il montaggio dell'aerografo, dopo la pulizia applicare una buona quantità<br />
di grasso lubrificante (in dotazione) sull'O-Ring della parte anteriore dell'aerografo<br />
(fig. 19, 7).<br />
74
<strong>WallPerfect</strong> W <strong>665</strong> I-<strong>Spray</strong><br />
17. Elenco dei ricambi<br />
I<br />
Elenco dei ricambi (fig. 19)<br />
Pos. Nome N° ord.<br />
1 Spruzzatore <strong>WallPerfect</strong> I-<strong>Spray</strong> con serbatoio da 1800 m 2326 477<br />
2 Anello di regolazione del getto nebulizzato 2328 900<br />
3 Dado a risvolto 2328 903<br />
4 Calotta dell’aria 2328 905<br />
5 Ugello 2328 908<br />
6 Guarnizione dell’ugello (2 pezzi) 2304 433<br />
7 O-Ring 0417 308<br />
8 Tubo flessibile di aerazione, coperchio della valvola, 2304 027<br />
membrana<br />
9 Guarnizione del serbatoio 2328 919<br />
10 Tubo montante 2328 922<br />
11 Serbatoio (1800 ml) con coperchio (soltanto per<br />
2304 025<br />
dispositivo spruzzatore <strong>WallPerfect</strong>)<br />
12 Impugnatura dell’aerografo 2303 300<br />
13 Tubo flessibile dell’aria 2303 410<br />
14 Cinghia di trasporto 0414 204<br />
15 Filtro dell’aria 0414 700<br />
16 Copertura 0414 302<br />
17 Imbuto di riempimento (3 pezzi) 2304 028<br />
18 Agitatore 2304 419<br />
Grasso lubrificante 2315 539<br />
18. Accessorii<br />
Con altri spruzzatori ed accessori, il nuovo SISTEMA CLICK&PAINT offre l'attrezzo<br />
adatto per ogni lavoro.<br />
Accessori (non in dotazione)<br />
Nome<br />
N° ord.<br />
Prolunga impugnatura HVLP<br />
Rende più semplice l'applicazione su soffitti e oggetti a pavimento. 2307 678<br />
Spruzzatore Brilliant con serbatoio da 600 ml<br />
Ugello e conduzione dell'aria ottimizzati per risultati di verniciatura brillanti 0417 932<br />
Spruzzatore Perfect <strong>Spray</strong> con serbatoio da 800 ml<br />
Per il cambio rapido della vernice. Per oggetti e mobili medi e grandi. 0417 914<br />
Spruzzatore per piccole quantità con serbatoio da 250 ml<br />
Per oggetti arabescati e delicati e per lavori dettagliati e creativi. 0417 918<br />
75
I<br />
<strong>WallPerfect</strong> W <strong>665</strong> I-<strong>Spray</strong><br />
Accessori (non in dotazione)<br />
Spruzzatore Perfect <strong>Spray</strong> con serbatoio da 1400 ml Rapido lavoro per<br />
grandi oggetti come casette di legno, portoni di garage, ecc. 0417 917<br />
Spruzzatore per dettagli e radiatori con prolunga e serbatoio da 600 ml<br />
Per zone difficilmente accessibili, ad esempio radiatori, angoli di armadi,<br />
nicchie, ecc. 0417 915<br />
Spruzzatore <strong>WallPerfect</strong> I-<strong>Spray</strong> con serbatoio da 1300 ml<br />
Per trattare pittura murale per interni<br />
Si consiglia di non utilizzare il dispositivo spruzzatore <strong>WallPerfect</strong> I-<strong>Spray</strong><br />
con il modello W550. 2321 896<br />
Ulteriori informazioni sulla gamma di prodotti WAGNER per lavori di rinnovamento<br />
al sito www.wagner-group.com<br />
19. Indicazione per lo smaltimento<br />
L'apparecchio con tutti gli accessori dovrebbe essere smaltito in conformità alla<br />
tutela dell'ambiente. Allo smaltimento dell'apparecchio, non gettarlo insieme<br />
ai rifiuti domestici. Supportate la tutela dell'ambiente e perciò portate il Vostro<br />
apparecchio ad un deposito di smaltimento locale oppure informatevi in un<br />
negozio specializzato dove smaltirlo.<br />
20. Avvertenza importante sulla responsabilità sul<br />
prodotto!<br />
Ai sensi di un decreto UE in vigore dal 01.01.1990, il costruttore è responsabile del suo<br />
prodotto solo se tutti i suoi componenti sono stati prodotti dallo stesso costruttore o se<br />
sono stati approvati da esso e se gli apparecchi sono montati ed utilizzati correttamente.<br />
Se si impiegano accessori e ricambi di terzi, la responsabilità può diventare completamente<br />
o parzialmente nulla.<br />
L’uso del prodotto, ivi compreso l'allestimento della postazione di lavoro e del materiale<br />
su cui eseguire la nebulizzazione nonché il risultato finale delle operazioni sono di<br />
competenza esclusiva dell'utilizzatore.<br />
<strong>Wagner</strong> non si assume responsabilità alcuna per danni che possano scaturire da nebbia<br />
di pittura, errori di utilizzo, miglioramenti del risultato finale o mancata osservanza delle<br />
istruzioni contenute nelle presenti istruzioni per l'uso.<br />
76
<strong>WallPerfect</strong> W <strong>665</strong> I-<strong>Spray</strong><br />
21. Eliminazione di anomalie<br />
I<br />
Anomalia Causa Rimedio<br />
Il materiale di<br />
Ugello intasato<br />
copertura non • Regolatore della portata di<br />
fuoriesce dall’ugello<br />
Il materiale di<br />
copertura gocciola<br />
dall’ugello<br />
La nebulizzazione è<br />
troppo grossolana<br />
Il getto di<br />
spruzzatura pulsa<br />
Il materiale di<br />
copertura presenta<br />
colature<br />
materiale ruotato eccessivamente<br />
a sinistra (-)<br />
• Assenza di aumento della pressione<br />
nel serbatoio<br />
Serbatoio vuoto<br />
Tubo montante allentato<br />
Tubo montante intasato<br />
• Foro di sfiato intasato (fig. 11, 1)<br />
• Accumulo di materiale di<br />
copertura nella calotta dell'aria<br />
o nell'ago<br />
Ugello allentato<br />
Guarnizione dell’ugello usurata<br />
• Ugello usurato<br />
Portata eccessiva di materiale<br />
• Regolatore della portata di<br />
materiale ruotato eccessivamente<br />
a destra (+)<br />
Ugello sporco<br />
• Viscosità eccessiva del<br />
materiale di copertura<br />
• Aumento insufficiente della<br />
pressione nel serbatoio<br />
• Filtro dell’aria eccessivamente<br />
sporco<br />
• Materiale di copertura quasi<br />
esaurito nel serbatoio<br />
Guarnizione dell’ugello usurata<br />
• Filtro dell’aria eccessivamente<br />
sporco<br />
• Applicazione di una quantità<br />
eccessiva di materiale di<br />
copertura<br />
• Viscosità insufficiente del<br />
materiale di copertura<br />
➞➞Pulire<br />
➞➞Ruotare a destra (+)<br />
➞➞Serrare il serbatoio<br />
➞➞Rabboccare<br />
➞➞Inserire<br />
➞➞Pulire<br />
➞➞Pulire<br />
➞➞Pulire<br />
➞➞Serrare il dado a risvolto<br />
➞➞Sostituire<br />
➞➞Sostituire<br />
➞➞Ruotare la vite di<br />
regolazione della portata<br />
di materiale a sinistra (-)<br />
➞➞Pulire<br />
➞➞Diluire ulteriormente<br />
➞➞Serrare il serbatoio<br />
➞➞Sostituire<br />
➞➞Rabboccare<br />
➞➞Sostituire<br />
➞➞Sostituire<br />
➞➞Ruotare la vite di regolazione<br />
della portata di materiale<br />
a sinistra (-)<br />
77
I<br />
<strong>WallPerfect</strong> W <strong>665</strong> I-<strong>Spray</strong><br />
Anomalia Causa Rimedio<br />
Formazione di • Distanza eccessiva dall’oggetto ➞➞Ridurre la distanza di<br />
una quantità<br />
da spruzzare<br />
spruzzatura<br />
eccessiva di nebbia • Quantità eccessiva di materiale ➞➞Ruotare la vite di regolazione<br />
di materiale<br />
(overspray)<br />
di copertura applicato<br />
della portata di materia-<br />
le a sinistra (-)<br />
Vernice nel<br />
tubo flessibile di<br />
aerazione<br />
L'apparecchio non<br />
funziona<br />
Cattivo potere<br />
coprente sulla<br />
parete<br />
Membrana sporca<br />
• Membrana danneggiata<br />
➞➞Pulire la membrana<br />
➞➞Sostituire la membrana<br />
• Apparecchio surriscaldato ➞➞Estrarre la spina di rete e<br />
far raffreddare l'apparecchio<br />
per 30 minuti<br />
Non schiacciare il tubo<br />
flessibile, controllare il<br />
filtro dell'aria, non coprire<br />
le fessure di aspirazione<br />
• Materiale nebulizzato troppo<br />
freddo<br />
• Fondo molto assorbente o<br />
pittura con cattivo potere<br />
coprente<br />
Distanza eccessiva<br />
•<br />
➞➞Riscaldare il materiale nebulizzato<br />
(max. fino a 40°C)<br />
➞➞Nebulizzare secondo uno<br />
schema incrociato (fig. 10)<br />
➞➞Più vicino all’oggetto<br />
78
<strong>WallPerfect</strong> W <strong>665</strong> I-<strong>Spray</strong><br />
I<br />
2 anni di garanzia<br />
La garanzia è di 2 anni, a partire dal giorno di vendita (scontrino di cassa).<br />
Comprende ed è limitata alla eliminazione gratuita di difetti, attribuibili all'utilizzo di<br />
materiale non perfetto alla produzione o difetti di montaggio, oppure al ricambio gratuito<br />
di pezzi difettosi.<br />
Uso o messa in esercizio, nonché montaggi o riparazioni non indicati nelle nostre istruzioni<br />
per l'uso, escludono una garanzia. Anche i pezzi soggetti ad usura sono esclusi dalla<br />
garanzia. La garanzia esclude l'impiego professionale. Ci riserviamo espressamente la<br />
prestazione della garanzia.<br />
La garanzia è sospesa, se l'apparecchio è stato aperto da altre persone che il personale<br />
di assistenza WAGNER.<br />
Danni dovuti al trasporto, lavori di manutenzione nonché danni e anomalie causate da<br />
lavori di manutenzione imperfetti non fanno parte della garanzia.<br />
In caso di ricorso alla garanzia la prova per l'acquisto dell'apparecchio deve essere data<br />
dalla presentazione dello scontrino originale di acquisto.<br />
Per quanto legalmente possibile escludiamo ogni responsabilità per ogni danno a<br />
persone, a cose o danni indiretti, specialmente se l'apparecchio è stato impiegato per<br />
un altro scopo che quello indicato nelle istruzioni per l'uso, non è stato messo in esercizio<br />
secondo le nostre istruzioni per l'uso o riparato o delle riparazioni sono state eseguite di<br />
iniziativa propria da una persona incompetente.<br />
Ci riserviamo in stabilimento il diritto di eseguire riparazioni oltre quelle indicate nelle<br />
presenti istruzioni per l'uso.<br />
In caso di garanzia o riparazione Vi preghiamo di rivolgervi al Vostro punto di vendita.<br />
79
<strong>WallPerfect</strong> W <strong>665</strong> I-<strong>Spray</strong><br />
PD CE Konformitätserklärung<br />
Wir erklären in alleiniger Verantwortung, dass dieses Produkt den folgenden<br />
einschlägigen Bestimmungen entspricht:<br />
2006/42/EG; 2004/108 EG; 2002/95/EG; 2002/96/EG<br />
Angewandte harmonisierte Normen:<br />
EN 60335-1:.....+ A14:2010 + A15:2012; EN 50144-2-7:2000; EN 55014-1:2006 + A1:2009<br />
+ A2:2011; EN 55014-2:1997 + Corrigendum 1997 + A1:2001 + A2:2008;<br />
EN 61000-3-2:2006 + A1:2009 + A2:2009; EN 61000-3-3:2008; EN 62233:2008<br />
CE Declaration of Conformity<br />
GB P<br />
We declare under sole responsibility that this product conforms to the following<br />
relevant stipulations:<br />
2006/42/EG; 2004/108 EG; 2002/95/EG; 2002/96/EG<br />
Applied harmonised norms:<br />
EN 60335-1:.....+ A14:2010 + A15:2012; EN 50144-2-7:2000; EN 55014-1:2006 + A1:2009<br />
+ A2:2011; EN 55014-2:1997 + Corrigendum 1997 + A1:2001 + A2:2008;<br />
EN 61000-3-2:2006 + A1:2009 + A2:2009; EN 61000-3-3:2008; EN 62233:2008<br />
PF<br />
CE Déclaration de conformité<br />
Nous déclarons sous notre responsabilité que ce produit est en conformité avec les<br />
réglementations suivantes:<br />
2006/42/EG; 2004/108 EG; 2002/95/EG; 2002/96/EG<br />
Conforme aux normes et documents normalisés:<br />
EN 60335-1:.....+ A14:2010 + A15:2012; EN 50144-2-7:2000; EN 55014-1:2006 + A1:2009<br />
+ A2:2011; EN 55014-2:1997 + Corrigendum 1997 + A1:2001 + A2:2008;<br />
EN 61000-3-2:2006 + A1:2009 + A2:2009; EN 61000-3-3:2008; EN 62233:2008<br />
PNL<br />
CE Conformiteitsverklaring<br />
Wij verklaren dat dit product voldoet aan de volgende normen:<br />
2006/42/EG; 2004/108 EG; 2002/95/EG; 2002/96/EG<br />
En normatieve dokumenten:<br />
EN 60335-1:.....+ A14:2010 + A15:2012; EN 50144-2-7:2000; EN 55014-1:2006 + A1:2009<br />
+ A2:2011; EN 55014-2:1997 + Corrigendum 1997 + A1:2001 + A2:2008;<br />
EN 61000-3-2:2006 + A1:2009 + A2:2009; EN 61000-3-3:2008; EN 62233:2008<br />
i.V. T. Jeltsch<br />
Senior Vice President<br />
Global Product Strategy & Planning<br />
80<br />
i. V. J. Ulbrich<br />
Vice President Engineering<br />
Dokumentationsverantwortlicher<br />
Responsible person for documents<br />
Responsable de la documentation<br />
Documentatieverantwoordelijke<br />
J. <strong>Wagner</strong> GmbH Otto-Lilienthal-Str. 18 D-88677 Markdorf
<strong>WallPerfect</strong> W <strong>665</strong> I-<strong>Spray</strong><br />
PI<br />
Dichiarazione di conformità CE<br />
Dichiariamo sotto la nostra esclusiva responsabilità, che il presente prodotto<br />
corrisponde alle relative disposizioni seguenti:<br />
2006/42/EG; 2004/108 EG; 2002/95/EG; 2002/96/EG<br />
Norme armonizzate:<br />
EN 60335-1:.....+ A14:2010 + A15:2012; EN 50144-2-7:2000; EN 55014-1:2006 + A1:2009<br />
+ A2:2011; EN 55014-2:1997 + Corrigendum 1997 + A1:2001 + A2:2008;<br />
EN 61000-3-2:2006 + A1:2009 + A2:2009; EN 61000-3-3:2008; EN 62233:2008<br />
i.V. T. Jeltsch<br />
Senior Vice President<br />
Global Product Strategy & Planning<br />
i. V. J. Ulbrich<br />
Vice President Engineering<br />
Responsabile della documentazione<br />
J. <strong>Wagner</strong> GmbH Otto-Lilienthal-Str. 18 D-88677 Markdorf<br />
81
<strong>WallPerfect</strong> W <strong>665</strong> I-<strong>Spray</strong><br />
D J. <strong>Wagner</strong> GmbH<br />
Otto-Lilienthal-Str. 18<br />
D-88677 Markdorf<br />
Hotline 0180 5 59 24 637<br />
+49/ (0) 75 44/ 505-1169<br />
B <strong>Wagner</strong> <strong>Spray</strong>tech Belgie<br />
Veilinglaan 56-58<br />
1861 Meise-Wolvertem<br />
+32/2/2 69 46 75 +32/2/2 69 78 45<br />
F <strong>Wagner</strong> France S.a.r.l.<br />
12 Avenue des Tropiques<br />
Z.A. de Courtaboeuf<br />
91978 Les Ulis Cedex<br />
0 825 011 111 +33 (0) 1 69 81 72 57<br />
DK/S <strong>Wagner</strong> <strong>Spray</strong>tech<br />
Scandinavia A/S<br />
Helgeshøj Allé 28<br />
DK-2630 Tåstrup<br />
+45/43 27 18 18 +45/43 43 05 28<br />
CZ<br />
E-Coreco s.r.o.<br />
Na Roudné 102<br />
301 00 Plzen<br />
+420 739 359 518 +420 227 077 364<br />
E J. <strong>Wagner</strong> <strong>Spray</strong>tech Ibérica S.A.<br />
Ctra. N-340, Km 1245,4<br />
08750 Molins de Rei (Barcelona)<br />
+34/93/6 80 00 28 +34/93/6 68 01 56<br />
SLO Adresa servisa:<br />
GMA Elektromehanika d.o.o.<br />
Cesta Andreja Bitenca 115,<br />
Ljubljana 1000/Slowenien<br />
+386(1)/583 83 04 +386(1)/518 38 03<br />
H Magyarországi szerviz<br />
Hondimpex KFT.<br />
Kossuth L. u. 48-50<br />
8060 Mór<br />
+36(-22)/407 321 +36(-22)/407 852<br />
CH<br />
J. <strong>Wagner</strong> AG<br />
Industriestraße 22<br />
9450 Altstätten<br />
PL<br />
PUT <strong>Wagner</strong> Service<br />
ul. E. Imieli 14<br />
41-605 Swietochlowice<br />
+41/71/7 57 22 11 +41/71/7 57 23 23<br />
SK<br />
NL<br />
Phobos Corporation Spol.r.o<br />
Stanicna 6, 92700 Sala<br />
Slowakei<br />
+421/31/7 70 78 84 +421/31/7 70 22 42<br />
<strong>Wagner</strong> <strong>Spray</strong>tech Benelux B.V.<br />
De Heldinnenlaan 200<br />
3543 MB Utrecht<br />
+31/30/2 41 41 55 +31/30/2 41 17 87<br />
GB<br />
<strong>Wagner</strong> <strong>Spray</strong>tech (UK) Ltd.<br />
The Coach House<br />
2 Main Road<br />
Middleton Cheney OX17 2ND<br />
01295 714200 01295 710100<br />
Part. No. 2329168 07/2012_RS<br />
© Copyright by J.<strong>Wagner</strong> GmbH<br />
+48/32/2 45 06 19 +48/32/2 41 42 51<br />
HR Adresa servisa:<br />
EL-ME-HO<br />
Horvatinčićev put 2<br />
10436 Rakov Potok/Kroatien<br />
/ +385(-1)65 86 - 028<br />
AUS <strong>Wagner</strong> <strong>Spray</strong>tech<br />
Australia Pty. Ltd.,<br />
14-16 Kevlar Close,<br />
Braeside, VIC 3195/Australia<br />
+61/3/95 87 20 00 +61/3/95 80 91 20<br />
www.wagner-group.com<br />
Irrtümer und Änderungen vorbehalten.<br />
Not responsible for errors and changes.<br />
Sous réserves d’erreurs et de modifications.<br />
Fouten en wijzigingen voorbehouden.<br />
82