

manuel d'installation installation manual - Service.pioneer-eur.com ...
manuel d'installation installation manual - Service.pioneer-eur.com ...
manuel d'installation installation manual - Service.pioneer-eur.com ...

You also want an ePaper? Increase the reach of your titles
YUMPU automatically turns print PDFs into web optimized ePapers that Google loves.
Connecting the system<br />
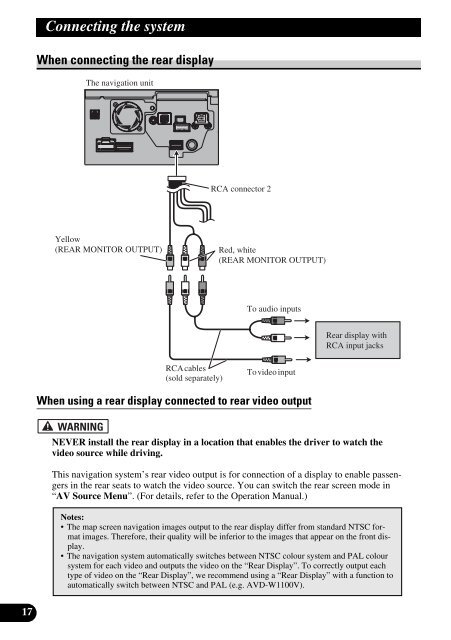
When connecting the rear display<br />
The navigation unit<br />
RCA connector 2<br />
Yellow<br />
(REAR MONITOR OUTPUT)<br />
Red, white<br />
(REAR MONITOR OUTPUT)<br />
To audio inputs<br />
Rear display with<br />
RCA input jacks<br />
RCAcables<br />
(sold separately)<br />
Tovideo input<br />
When using a rear display connected to rear video output<br />
NEVER install the rear display in a location that enables the driver to watch the<br />
video source while driving.<br />
This navigation system’s rear video output is for connection of a display to enable passengers<br />
in the rear seats to watch the video source. You can switch the rear screen mode in<br />
“AV Source Menu”. (For details, refer to the Operation Manual.)<br />
Notes:<br />
• The map screen navigation images output to the rear display differ from standard NTSC format<br />
images. Therefore, their quality will be inferior to the images that appear on the front display.<br />
• The navigation system automatically switches between NTSC colour system and PAL colour<br />
system for each video and outputs the video on the “Rear Display”. To correctly output each<br />
type of video on the “Rear Display”, we re<strong>com</strong>mend using a “Rear Display” with a function to<br />
automatically switch between NTSC and PAL (e.g. AVD-W1100V).<br />
17


