- Page 1 and 2: INSTALLATION MANUAL MANUEL D’INST
- Page 3 and 4: IMPORTANT INFORMATION Section 01 AB
- Page 5 and 6: Connecting the System Section 03 Pr
- Page 7 and 8: Connecting the System Section 03 !
- Page 9 and 10: Connecting the System Section 03 En
- Page 11 and 12: Connecting the System Section 03 En
- Page 13 and 14: Connecting the System Section 03 En
- Page 15 and 16: Connecting the System Section 03 En
- Page 17 and 18: Connecting the System Section 03 Wh
- Page 19 and 20: Installation Section 04 Precautions
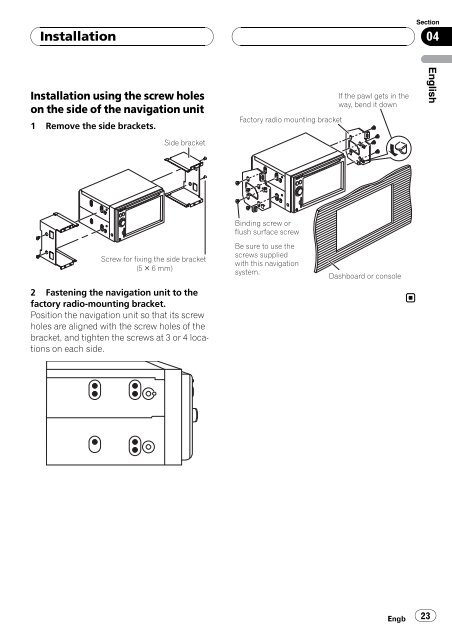
- Page 21: Installation Section 04 ! The semic
- Page 25 and 26: Installation Section 04 When instal
- Page 27 and 28: Installation Section 04 Installing
- Page 29 and 30: After Installation Section 05 After
- Page 31 and 32: INFORMACIÓN IMPORTANTE Sección 01
- Page 33 and 34: Conexión del sistema Sección 03 P
- Page 35 and 36: Conexión del sistema Sección 03 A
- Page 37 and 38: Conexión del sistema Sección 03 E
- Page 39 and 40: Conexión del sistema Sección 03 M
- Page 41 and 42: Conexión del sistema Sección 03 L
- Page 43 and 44: Conexión del sistema Sección 03 C
- Page 45 and 46: Conexión del sistema Sección 03 C
- Page 47 and 48: Conexión del sistema Sección 03 A
- Page 49 and 50: Instalación Sección 04 Precaucion
- Page 51 and 52: Instalación Sección 04 Partes sum
- Page 53 and 54: Instalación Sección 04 3 Coloque
- Page 55 and 56: Instalación Sección 04 Cuando ins
- Page 57 and 58: Instalación Sección 04 Instalaci
- Page 59 and 60: Después de la instalación Secció
- Page 61 and 62: WICHTIGE INFORMATION Abschnitt 01
- Page 63 and 64: Anschluss des Systems Abschnitt 03
- Page 65 and 66: Anschluss des Systems Abschnitt 03
- Page 67 and 68: Anschluss des Systems Abschnitt 03
- Page 69 and 70: Anschluss des Systems Abschnitt 03
- Page 71 and 72: Anschluss des Systems Abschnitt 03
- Page 73 and 74:
Anschluss des Systems Abschnitt 03
- Page 75 and 76:
Anschluss des Systems Abschnitt 03
- Page 77 and 78:
Anschluss des Systems Abschnitt 03
- Page 79 and 80:
Einbau Abschnitt 04 Vor der Install
- Page 81 and 82:
Einbau Abschnitt 04 ! Installieren
- Page 83 and 84:
Einbau Abschnitt 04 3 Bringen Sie d
- Page 85 and 86:
Einbau Abschnitt 04 Einbau der Ante
- Page 87 and 88:
Einbau Abschnitt 04 Einbau des Mikr
- Page 89 and 90:
Nach der Installation Abschnitt 05
- Page 91 and 92:
INFORMATION IMPORTANTE Section 01 A
- Page 93 and 94:
Branchement du système Section 03
- Page 95 and 96:
Branchement du système Section 03
- Page 97 and 98:
Branchement du système Section 03
- Page 99 and 100:
Branchement du système Section 03
- Page 101 and 102:
Branchement du système Section 03
- Page 103 and 104:
Branchement du système Section 03
- Page 105 and 106:
Branchement du système Section 03
- Page 107 and 108:
Installation Section 04 Précaution
- Page 109 and 110:
Installation Section 04 Pièces fou
- Page 111 and 112:
Installation Section 04 3 Attacher
- Page 113 and 114:
Installation Section 04 Installatio
- Page 115 and 116:
Installation Section 04 Installatio
- Page 117 and 118:
Après l’installation Section 05
- Page 119 and 120:
INFORMAZIONI IMPORTANTI Sezione 01
- Page 121 and 122:
Collegamento del sistema Sezione 03
- Page 123 and 124:
Collegamento del sistema Sezione 03
- Page 125 and 126:
Collegamento del sistema Sezione 03
- Page 127 and 128:
Collegamento del sistema Sezione 03
- Page 129 and 130:
Collegamento del sistema Sezione 03
- Page 131 and 132:
Collegamento del sistema Sezione 03
- Page 133 and 134:
Collegamento del sistema Sezione 03
- Page 135 and 136:
Installazione Sezione 04 Precauzion
- Page 137 and 138:
Installazione Sezione 04 ! I cavi n
- Page 139 and 140:
Installazione Sezione 04 3 Fissare
- Page 141 and 142:
Installazione Sezione 04 Quando si
- Page 143 and 144:
Installazione Sezione 04 Installazi
- Page 145 and 146:
Dopo l’installazione Sezione 05 D
- Page 147 and 148:
BELANGRIJKE INFORMATIE Hoofdstuk 01
- Page 149 and 150:
Aansluitingen Hoofdstuk 03 Voorzorg
- Page 151 and 152:
Aansluitingen Hoofdstuk 03 ! Sluit
- Page 153 and 154:
Aansluitingen Hoofdstuk 03 Nederlan
- Page 155 and 156:
Aansluitingen Hoofdstuk 03 Microfoo
- Page 157 and 158:
Aansluitingen Hoofdstuk 03 De navig
- Page 159 and 160:
Aansluitingen Hoofdstuk 03 Verlengs
- Page 161 and 162:
Aansluitingen Hoofdstuk 03 Eindvers
- Page 163 and 164:
Aansluitingen Hoofdstuk 03 Tijdens
- Page 165 and 166:
Aansluitingen Hoofdstuk 03 BELANGRI
- Page 167 and 168:
Inbouwen Hoofdstuk 04 ! Installeer
- Page 169 and 170:
Inbouwen Hoofdstuk 04 Vóór het in
- Page 171 and 172:
Inbouwen Hoofdstuk 04 Bevestigen va
- Page 173 and 174:
Inbouwen Hoofdstuk 04 Bevestigen va
- Page 175 and 176:
Inbouwen Hoofdstuk 04 Installatie o
- Page 177:
Technische Hotline der Pioneer Elec


