SC 190-210:Layout 10mm Ränder.qxd - Saruhan Makina ve ...
SC 190-210:Layout 10mm Ränder.qxd - Saruhan Makina ve ...
SC 190-210:Layout 10mm Ränder.qxd - Saruhan Makina ve ...

You also want an ePaper? Increase the reach of your titles
YUMPU automatically turns print PDFs into web optimized ePapers that Google loves.
GB<br />
Nach After dem Kapitel Gebrauch use<br />
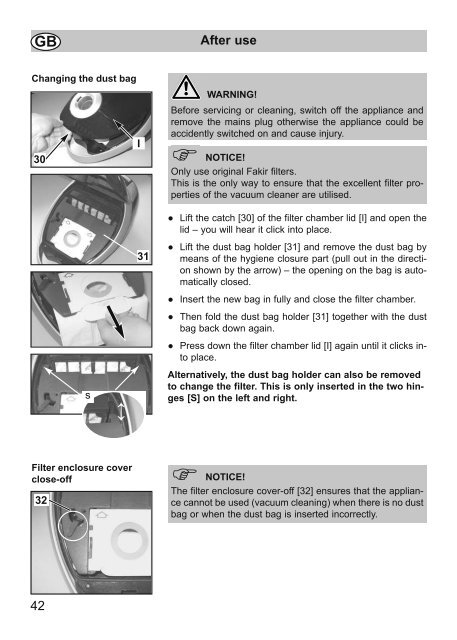
Changing the dust bag<br />
30<br />
I<br />
WARNING!<br />
Before servicing or cleaning, switch off the appliance and<br />
remo<strong>ve</strong> the mains plug otherwise the appliance could be<br />
accidently switched on and cause injury.<br />
NOTICE!<br />
Only use original Fakir filters.<br />
This is the only way to ensure that the excellent filter properties<br />
of the vacuum cleaner are utilised.<br />
s<br />
↕<br />
31<br />
● Lift the catch [30] of the filter chamber lid [I] and open the<br />
lid – you will hear it click into place.<br />
● Lift the dust bag holder [31] and remo<strong>ve</strong> the dust bag by<br />
means of the hygiene closure part (pull out in the direction<br />
shown by the arrow) – the opening on the bag is automatically<br />
closed.<br />
● Insert the new bag in fully and close the filter chamber.<br />
● Then fold the dust bag holder [31] together with the dust<br />
bag back down again.<br />
● Press down the filter chamber lid [I] again until it clicks into<br />
place.<br />
Alternati<strong>ve</strong>ly, the dust bag holder can also be remo<strong>ve</strong>d<br />
to change the filter. This is only inserted in the two hinges<br />
[S] on the left and right.<br />
Filter enclosure co<strong>ve</strong>r<br />
close-off<br />
32<br />
NOTICE!<br />
The filter enclosure co<strong>ve</strong>r-off [32] ensures that the appliance<br />
cannot be used (vacuum cleaning) when there is no dust<br />
bag or when the dust bag is inserted incorrectly.<br />
42