Template BA B168xH238 - Hormann.fr
Template BA B168xH238 - Hormann.fr
Template BA B168xH238 - Hormann.fr

Create successful ePaper yourself
Turn your PDF publications into a flip-book with our unique Google optimized e-Paper software.
ENGLISH<br />
3.7.7<br />
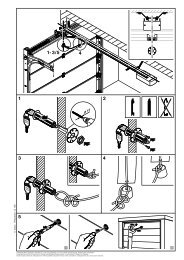
2-wire photocell * (dynamic)<br />
Note:<br />
Follow the fitting instructions when mounting photocells.<br />
▶ Connect the photocell as shown in Figure 13.<br />
After the photocell triggers, the operator stops and a safety<br />
reversal of the door is performed to the OPEN end-of-travel<br />
position.<br />
3.7.8 Self-testing wicket door contact *<br />
▶ Connect wicket door contacts that switch to ground (0 V) as<br />
shown in Figure 14.<br />
3.7.9 Closing edge safety device *<br />
▶ Connect closing edge safety devices that switch to ground<br />
(0 V) as shown in Figure 15.<br />
After the closing edge safety device triggers, the operator stops<br />
and the door reverses in the OPEN direction.<br />
3.7.10 Option relay HOR 1 *<br />
▶ See Figure 16<br />
Option relay HOR 1 is required to connect an external lamp or<br />
warning light (programming via menu 5).<br />
3.7.11 Universal adapter print UAP 1 *<br />
▶ See Figure 17<br />
The universal adapter print UAP 1 can be used:<br />
• For choosing a direction (Open/Stop/Close) via external<br />
control elements<br />
• For control of the operator light and second opening height<br />
via external command units<br />
• For OPEN and CLOSE limit switch reporting<br />
• For the option relay (programming via menu 5).<br />
3.7.12 Emergency battery HNA 18 *<br />
▶ See Figure 18<br />
To enable door movement in the event of a mains failure, an<br />
optional emergency battery can be connected. In the case of a<br />
mains failure, the system automatically switches to battery<br />
operation. During battery operation, the operator light remains<br />
switched off.<br />
WARNING<br />
Danger of injury due to unexpected door travel<br />
Unexpected door travel can result when the emergency battery<br />
is still connected despite the mains plug being pulled out.<br />
▶ Pull out the mains plug and the plug of the emergency<br />
battery when performing all work on the door system.<br />
4 Putting into Service<br />
WARNING<br />
Danger of injury during door travel<br />
If people or objects are in the area around<br />
the door while the door is in motion, this<br />
can lead to injuries or damage.<br />
▶ Children are not allowed to play near<br />
the door system.<br />
▶ Make sure that no persons or objects<br />
are in the door's travel range.<br />
▶ If the door system has only one safety<br />
feature, only operate the garage door<br />
operator if you are within sight of the<br />
door's area of travel.<br />
▶ Monitor the door travel until the door<br />
has reached the end-of-travel position.<br />
▶ Only drive or pass through remote<br />
control door systems if the door is in<br />
the OPEN end-of-travel position!<br />
▶ Never stay standing under the open<br />
door.<br />
Caution<br />
Danger of crushing in the boom<br />
Do not reach into the boom with your fingers during door travel,<br />
as this can cause crushing.<br />
▶ Do not reach into the boom during door travel.<br />
Caution<br />
Danger of injury <strong>fr</strong>om the cord knob<br />
If you hang on the cord knob, you may fall and injure yourself.<br />
The operator could break away and injure persons or damage<br />
objects that are located underneath, or the operator itself could<br />
be destroyed.<br />
▶ Do not hang on the cord knob with your body weight.<br />
Caution<br />
Danger of injuries due to the hot lamp<br />
Touching the cold-light reflector lamp during or immediately<br />
following operation can lead to burns.<br />
▶ Do not touch the cold-light reflector lamp if it is switched<br />
on or was recently switched on.<br />
4.1 Notes on the operator control<br />
The operator control includes 13 menus that contain many user<br />
functions.<br />
However, two menus are needed for initial start-up of the operator.<br />
• To adjust/set the door type (menu J)<br />
• To teach in door travel (menu 1)<br />
Note:<br />
Menus J, 1, P and 2 are initial start-up/function selection menus<br />
and customer menus; menus 3, 4, 5, 6, 7, 8, 9 and A are special<br />
menus and should only be changed if needed.<br />
* Accessory, not included as standard equipment!<br />
10 TR10A040-E RE / 06.2010