Template BA B168xH238 - Hormann.fr
Template BA B168xH238 - Hormann.fr
Template BA B168xH238 - Hormann.fr

You also want an ePaper? Increase the reach of your titles
YUMPU automatically turns print PDFs into web optimized ePapers that Google loves.
ENGLISH<br />
6.2.1<br />
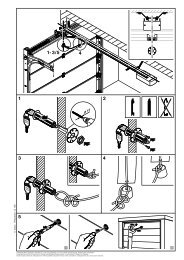
▶ See Figure 25.1<br />
Operator light – Setting the switch-off delay<br />
Menu 2 acts on the internal light relay.<br />
If a parameter > 0 (1 – 5) is selected, the light relay is activated as<br />
soon as the door starts to move.<br />
After the door has stopped moving, the operator light remains<br />
active for the set period (switch-off delay).<br />
6.2.2 Operator light – Setting the illumination time,<br />
switched via radio/external button<br />
▶ See Figure 25.2<br />
The illumination time of the operator light can be set via<br />
parameters 6 – 9 and switched on via radio or an external button<br />
(e.g. internal push button IT3b).<br />
The operator light can also be turned off ahead of time using the<br />
same control elements (radio or external button).<br />
6.2.3 External radio – Function of the 2nd channel<br />
▶ See Figure 25.3<br />
If an external 2-channel radio receiver is connected to the<br />
operator, you can select whether the second channel should be<br />
used to actuate the operator light (parameter A) or for partial<br />
opening (parameter b).<br />
Note:<br />
The light cannot be switched on and off while the door is in<br />
motion.<br />
Display<br />
Function<br />
Operator light switch-off delay<br />
Not active<br />
1 minute<br />
2 minutes<br />
3 minutes<br />
4 minutes<br />
5 minutes<br />
Operator light/illumination time (radio, external button)<br />
6.3 MENU 0 – Normal operation<br />
During normal operation, the garage door operator works with the<br />
impulse sequence control, which is triggered via an external button<br />
or a taught-in radio code:<br />
1st impulse: The door runs towards an end-of-travel position.<br />
2nd impulse: The door stops.<br />
3rd impulse: The door runs in the opposite direction.<br />
4th impulse: The door stops.<br />
5th impulse: The door runs in the direction of the end-of-travel<br />
position selected in the 1st impulse.<br />
etc.<br />
6.3.1<br />
Garage door operator behaviour after two<br />
consecutive high-speed OPEN runs<br />
Note:<br />
The garage door operator motor is equipped with thermal overload<br />
protection. If two fast OPEN cycles take place within two minutes,<br />
overload protection reduces the travel speed, i.e. OPEN and<br />
CLOSE runs are at the same speed. After a waiting period of two<br />
minutes, the next OPEN run will be fast.<br />
7<br />
7.1<br />
Special Menus<br />
Selecting special menus<br />
To access the special menus (menu 3 – menu A):<br />
1. In menu 2, press the and buttons simultaneously.<br />
2. Then select the special menu via the PRG button.<br />
7.2 Notes on the special menus<br />
The menu number is always briefly displayed after selection.<br />
Then the first active menu parameter is displayed flashing slowly.<br />
1. To scroll through the menu, press the or button.<br />
Active parameters are indicated by an illuminated decimal<br />
point.<br />
2. To be able to change a parameter, press the PRG button until<br />
3.<br />
the display begins flashing rapidly.<br />
To scroll through the menu, press the or button.<br />
The parameter that is active is identified by an illuminated<br />
decimal point.<br />
4. To activate a parameter, press the PRG button until<br />
the decimal point is illuminated.<br />
The system will change to the next menu if the PRG button<br />
is released too early.<br />
If the operator is taught in and no button is pressed, the control<br />
automatically changes back to normal operation (menu 0).<br />
Not active<br />
7.2.1<br />
7-segment display when switching <strong>fr</strong>om the<br />
customer menu to the special menus<br />
5 minutes<br />
10 minutes<br />
15 minutes<br />
Radio/function of the 2nd channel<br />
Operator light<br />
Partial opening<br />
Note:<br />
When changing to the special menus, a number between 0 to 5<br />
with a decimal point may flash in the 7-segment display,<br />
depending on the current setting in menu 2.<br />
7.2.2<br />
7-segment display after selecting a special menu<br />
Note:<br />
After selecting a special menu, a number between 0 to 9 with a<br />
decimal point may flash in the 7-segment display, depending on<br />
the menu. This number indicates the (first) active parameter.<br />
7.3 MENU 3 – Automatic timed closing<br />
▶ See Figure 26<br />
▶<br />
Change to normal operation by pressing the PRG button<br />
(menu 0).<br />
Note:<br />
Automatic timed closing can only be activated if at least one safety<br />
device is active (menu 4).<br />
14 TR10A040-E RE / 06.2010