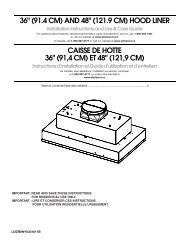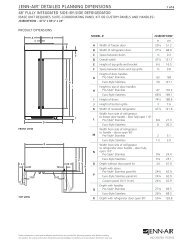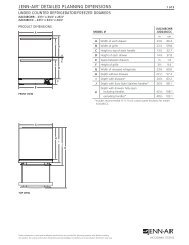
jenn-air® 36" (91.4 cm) accolade™ downdraft ventilation system ...
jenn-air® 36" (91.4 cm) accolade™ downdraft ventilation system ...
jenn-air® 36" (91.4 cm) accolade™ downdraft ventilation system ...

You also want an ePaper? Increase the reach of your titles
YUMPU automatically turns print PDFs into web optimized ePapers that Google loves.
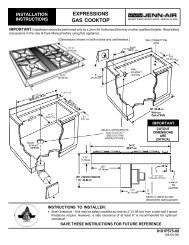
INSTALLATION REQUIREMENTS<br />
Tools and Parts<br />
Gather the required tools and parts before starting installation.<br />
Read and follow the instructions provided with any tools listed<br />
here.<br />
Tools Needed<br />
■ Jigsaw or keyhole saw<br />
■ Drill<br />
■ ³⁄₁₆" (5 mm) drill bit for pilot holes<br />
■<br />
■<br />
■<br />
■<br />
■<br />
■<br />
■<br />
■<br />
■<br />
■<br />
Pencil<br />
Tape measure or ruler<br />
¹⁄₈" Flat-blade screwdriver<br />
Phillips screwdriver<br />
½" and ⁹⁄₁₆" Open-end wrenches or adjustable wrench<br />
1¼" (32 mm) drill bit<br />
Level<br />
Metal snips<br />
Wire stripper or utility knife<br />
Caulking gun and weatherproof caulking compound<br />
Parts Supplied<br />
■ Remote control with batteries<br />
■<br />
■<br />
■<br />
■<br />
■<br />
■<br />
■<br />
■<br />
■<br />
■<br />
■<br />
■<br />
■<br />
■<br />
2 - Grease filters<br />
Top frame<br />
Frame support<br />
12 - 4 x 10 mm flat-head screws<br />
10" (25.4 <strong>cm</strong>) diameter vent collar<br />
Vent collar mounting frame (attached)<br />
Remote up/down switch<br />
4 - Cable tie mounting bases<br />
4 - Cable ties<br />
Curved glass panel<br />
4 - Leveler feet with nuts<br />
2 - Undercounter mounting brackets<br />
8 - 5 mm x 12 mm pan-head screws<br />
6 - 4 x 20 mm wood screws<br />
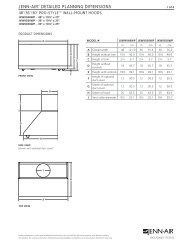
Location Requirements<br />
NOTE: Downdraft vent is installed directly behind the cooktop.<br />
For ease of installation, install the <strong>downdraft</strong> vent <strong>system</strong> first,<br />
then install the cooktop.<br />
IMPORTANT: Observe all governing codes and ordinances.<br />
■<br />
■<br />
■<br />
■<br />
■<br />
■<br />
Have a qualified technician install the <strong>downdraft</strong> vent. It is the<br />
installer’s responsibility to comply with installation clearances<br />
specified on the model/serial rating plate. The model/serial<br />
rating plate is located on the front of the <strong>downdraft</strong> vent.<br />
Downdraft vent location should be away from strong draft<br />
areas, such as windows, doors, and strong heating vents or<br />
fans.<br />
Cabinet opening dimensions that are shown must be used.<br />
Given dimensions provide minimum clearance.<br />
Consult the cooktop manufacturer Installation Instructions<br />
before making any cutouts.<br />
Check that the <strong>downdraft</strong> vent and cooktop location will<br />
clear the cabinet walls, backsplash, and rear wall studs<br />
inside the cabinet.<br />
Check for the minimum distance between the front edge<br />
of the countertop and the front edge of the cooktop. The<br />
minimum horizontal distance between the overhead<br />
cabinets is the same as the width of the installed<br />
<strong>downdraft</strong> vent.<br />
All openings in ceiling and wall where the <strong>downdraft</strong> vent will<br />
be installed must be sealed.<br />
Grounded electrical outlet is required. See “Electrical<br />
Requirements” section.<br />
For Mobile Home Installations<br />
The installation of this <strong>downdraft</strong> vent must conform to the<br />
Manufactured Home Construction Safety Standards, Title 24<br />
CFR, Part 328 (formerly the Federal Standard for Mobile Home<br />
Construction and Safety, title 24, HUD, Part 280) or when such<br />
standard is not applicable, the standard for Manufactured Home<br />
Installation 1982 (Manufactured Home Sites, Communities and<br />
Setups) ANSI A225.1/NFPA 501A, or latest edition, or with local<br />
codes.<br />
Parts Needed<br />
■ UL listed or CSA approved ½" (12.7 mm) conduit connector<br />
■<br />
■<br />
■<br />
■<br />
■<br />
Wall or roof cap with damper to match vent <strong>system</strong><br />
Vent <strong>system</strong><br />
Wiring cable for remote blower kit<br />
Vent clamps/duct tape<br />
Blower motor <strong>system</strong> (see the “Accessories” section for<br />
information on ordering)<br />
5