jenn-air® 36" (91.4 cm) accolade™ downdraft ventilation system ...
jenn-air® 36" (91.4 cm) accolade™ downdraft ventilation system ...
jenn-air® 36" (91.4 cm) accolade™ downdraft ventilation system ...

You also want an ePaper? Increase the reach of your titles
YUMPU automatically turns print PDFs into web optimized ePapers that Google loves.
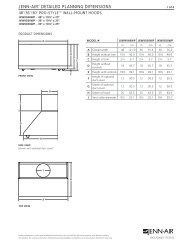
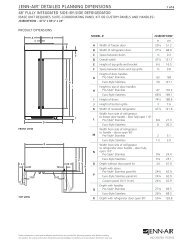
5. Measure the distance “E” from the cabinet floor to the top of<br />
the countertop.<br />
NOTE: Dimension “E” must be 32⁵⁄₈" (82.9 <strong>cm</strong>) minimum or<br />
the cabinet floor will have to be removed to allow the hood<br />
feet to rest on the floor.<br />
A<br />
C<br />
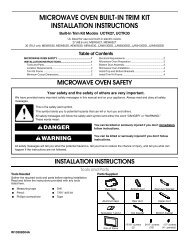
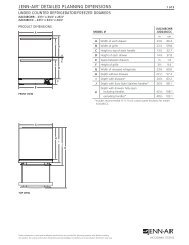
Vent Collar and Vent Transition Installation<br />
When installed in a cabinet, the vent <strong>system</strong> can exhaust through<br />
the bottom, right side, or left side of the vent box. The <strong>downdraft</strong><br />
vent <strong>system</strong> is shipped ready to vent out of the bottom of the<br />
vent box. If this is not the desired exhaust direction, complete the<br />
following steps.<br />
B<br />
D<br />
A<br />
E<br />
B<br />
C<br />
D<br />
A. Cooktop<br />
B. Downdraft vent <strong>system</strong><br />
C. Countertop<br />
D. Back wall of cabinet<br />
E. Cabinet floor to top of<br />
countertop<br />
E<br />
F<br />
6. Screw in the 4 feet so that the overall height of the unit from<br />
the feet to the top is approximately 1" (2.5 <strong>cm</strong>) less than<br />
dimension “E.”<br />
7. Install the right and left undercounter mounting brackets to<br />
the vent box. The mounting brackets can be mounted to the<br />
front or rear face of the <strong>downdraft</strong> for attachment to the<br />
cabinets, or to each side face for attachment to the<br />
countertop. (See the following illustration.) Loosely secure the<br />
screws in the slots with the 4 - 4.9 x 12 mm machine screws.<br />
A. Vent box<br />
B. Exhaust port<br />
C. Vent collar mounting frame<br />
D. Vent transition<br />
E. Cover plate<br />
F. Screws<br />
1. Remove cover plate from the desired exhaust port location.<br />
2. Remove vent collar mounting frame from bottom exhaust<br />
port location.<br />
3. Install the vent collar mounting frame to the desired vent box<br />
exhaust port using the 4 screws.<br />
4. Install the vent translation to the vent collar mounting frame<br />
using 4 - 4.9 x 12 mm screws.<br />
5. Install the cover plate to the exhaust port that the vent collar<br />
mounting frame was removed from, using the 4 screws.<br />
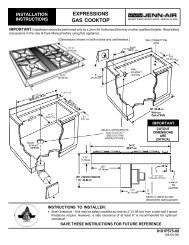
Install Downdraft Vent System<br />
1. Remove the 3 screws from the terminal box cover.<br />
A<br />
B<br />
A. Terminal box cover<br />
B. Knockout<br />
2. Remove the knockout from the front panel and install a ½"<br />
(1.3 <strong>cm</strong>) UL listed or CSA approved conduit connector.<br />
3. Using 2 or more people, insert the <strong>downdraft</strong> vent into the<br />
cabinet. Position the <strong>downdraft</strong> vent so that it is<br />
approximately centered below the countertop cutout<br />
location.<br />
4. If the countertop is not already installed, follow the directions<br />
for the countertop installation to place it onto the cabinets.<br />
5. Using a ½" wrench, screw out the feet on the vent box to<br />
raise the top of the unit until it is flush with the top surface of<br />
the countertop.<br />
9