INSTALLATION MANUAL - Master
INSTALLATION MANUAL - Master
INSTALLATION MANUAL - Master

Create successful ePaper yourself
Turn your PDF publications into a flip-book with our unique Google optimized e-Paper software.
(3) Attach the wire cover.<br />
(4) Attach the intake grille<br />
CAUTION<br />
Install the Front panel and Intake grille securely. If<br />
installation is imperfect, the Front panel or Intake grille<br />
may fall off and cause injury.<br />
10. TEST RUN<br />
Check items<br />
(1) Is operation of each button on the remote control unit<br />
normal?<br />
(2) Does each lamp light normally?<br />
(3) Do air ow direction louvers operate normally?<br />
(4) Is the drain normal?<br />
(5) Do not have an abnormal noise and vibration during<br />
operation?<br />
Do not operate the air conditioner in test run for a long<br />
time.<br />
[Operation method]<br />
For the operation method, refer to the operating manual.<br />
The outdoor unit may not operate depending on the room<br />
temperature.<br />
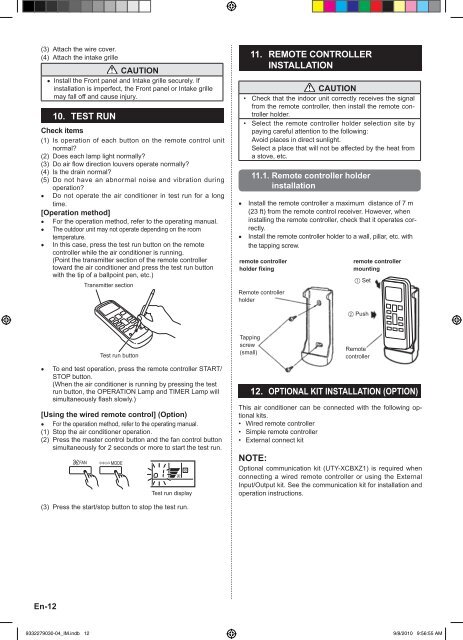
In this case, press the test run button on the remote<br />
controller while the air conditioner is running.<br />
(Point the transmitter section of the remote controller<br />
toward the air conditioner and press the test run button<br />
with the tip of a ballpoint pen, etc.)<br />
Transmitter section<br />
11. REMOTE CONTROLLER<br />
<strong>INSTALLATION</strong><br />
CAUTION<br />
• Check that the indoor unit correctly receives the signal<br />
from the remote controller, then install the remote controller<br />
holder.<br />
• Select the remote controller holder selection site by<br />
paying careful attention to the following:<br />
Avoid places in direct sunlight.<br />
Select a place that will not be affected by the heat from<br />
a stove, etc.<br />
11.1. Remote controller holder<br />
installation<br />
Install the remote controller a maximum distance of 7 m<br />
(23 ft) from the remote control receiver. However, when<br />
installing the remote controller, check that it operates correctly.<br />
Install the remote controller holder to a wall, pillar, etc. with<br />
the tapping screw.<br />
remote controller<br />
holder xing<br />
Remote controller<br />
holder<br />
remote controller<br />
mounting<br />
1 Set<br />
2 Push<br />
<br />
Test run button<br />
To end test operation, press the remote controller START/<br />
STOP button.<br />
(When the air conditioner is running by pressing the test<br />
run button, the OPERATION Lamp and TIMER Lamp will<br />
simultaneously ash slowly.)<br />
[Using the wired remote control] (Option)<br />
For the operation method, refer to the operating manual.<br />
(1) Stop the air conditioner operation.<br />
(2) Press the master control button and the fan control button<br />
simultaneously for 2 seconds or more to start the test run.<br />
Test run display<br />
Tapping<br />
screw<br />
(small)<br />
Remote<br />
controller<br />
12. OPTIONAL KIT <strong>INSTALLATION</strong> (OPTION)<br />
This air conditioner can be connected with the following optional<br />
kits.<br />
• Wired remote controller<br />
• Simple remote controller<br />
• External connect kit<br />
NOTE:<br />
Optional communication kit (UTY-XCBXZ1) is required when<br />
connecting a wired remote controller or using the External<br />
Input/Output kit. See the communication kit for installation and<br />
operation instructions.<br />
(3) Press the start/stop button to stop the test run.<br />
En-12<br />
9332279030-04_IM.indb 12<br />
9/8/2010 9:56:55 AM